

Lab 50 – Importing VMs from VMware ESXi: ESXi storage, import wizard, live-import, Linux and Windows
Dependencies
Section titled “Dependencies”- Previous labs:
- Systems:
- a separate server with VMware ESXi 8.0 U3,
esxi8.proxmox.community(172.27.199.30), with thedatastore1datastore: its preparation is described in step 0; - on the ESXi host, the VM
linux-src01(Ubuntu 24.04, 172.27.199.31, nginx,open-vm-tools); - on the ESXi host, the VM
win-src01(Windows Server 2025, 172.27.199.32, BIOS, LSI SAS controller, e1000e network card, VMware Tools); - the
deso-clustercluster, withdesopve01as the import node.
- a separate server with VMware ESXi 8.0 U3,
- Credentials:
rooton the ESXi host androot@pam→ Appendix B.
Objectives
Section titled “Objectives”- Connect an ESXi host to Proxmox VE as an ESXi-type storage.
- Use the import wizard: disks, storage, controllers, network cards, advanced options.
- Import a Linux VM with live-import and measure it.
- Import a Windows VM prepared for VirtIO and complete the switch to the paravirtualized drivers.
- Recognize the typical problems: a VM still running on the source, snapshots, VMware hardware, MAC addresses and network card names.
How it works
Section titled “How it works”ESXi storage. Proxmox VE connects to the API of the ESXi host (or of a vCenter) with a user name and a password, and exposes the contents of the datastores through a FUSE file system. The storage does not contain any Proxmox disks: it serves only as a source for importing VMs, and it appears in the tree of each node with the list of the .vmx files.
Import wizard. It reads the .vmx file and proposes an equivalent configuration in Proxmox VE: CPU, RAM, firmware (BIOS or UEFI), OS type, disks, SCSI controller, network cards with their MAC addresses. You can change the controller and the network card model before the import. The disks are converted to raw (or qcow2) format on the chosen storage.
Live-import. The VM is created and started immediately on Proxmox VE, while the disks are copied in the background: reads of blocks that have not been copied yet are fetched from the ESXi host on the fly. The service is available again long before the copy ends, at the price of reduced performance during the import and of the risk of losing the writes made in the meantime if the copy fails halfway.
Windows and VirtIO. A Windows system installed on ESXi has no VirtIO drivers: if the boot disk is switched to VirtIO SCSI right away, the system does not boot. The Prepare for VirtIO-SCSI option attaches the disks on SATA (which Windows always recognizes) and already sets the VirtIO SCSI controller, so after the drivers are installed you only need to move the disk.
Procedure
Section titled “Procedure”0. Preparing the source environment
Section titled “0. Preparing the source environment”The source is a separate server with VMware ESXi 8.0 U3, installed following the VMware documentation (vSphere 8.0 – ESXi Installation and Setup): static IP 172.27.199.30/24, gateway 172.27.199.1, DNS 172.27.199.20, name esxi8.proxmox.community, and a VMFS datastore called datastore1. The evaluation license is enough for the lab. From the host’s web client (Host → Actions → Services → Enable Secure Shell (SSH)), enable SSH, which you need in the following steps.
linux-src01: Ubuntu 24.04 from a cloud image. On a Linux workstation with Internet access and the qemu-utils and cloud-image-utils packages, convert the cloud image to VMDK and prepare a small cloud-init configuration ISO with the files user-data, network-config and meta-data:
curl -O https://cloud-images.ubuntu.com/noble/current/noble-server-cloudimg-amd64.imgqemu-img convert -O vmdk -o adapter_type=lsilogic,subformat=monolithicSparse noble-server-cloudimg-amd64.img ubuntu-src.vmdkcloud-localds -N network-config seed.iso user-data meta-datanetwork-config selects the network card with a wildcard (match: name: "e*") instead of its exact name: you will see why this helps after the import (step 4).
On the ESXi host, over SSH, convert the disk to the thin VMFS format, grow it to 20 GB and register the VM described by linux-src01.vmx (PVSCSI controller, vmxnet3 network card, BIOS, cloud-init ISO in the CD drive):
cd /vmfs/volumes/datastore1/linux-src01vmkfstools -i src.vmdk -d thin linux-src01.vmdk && rm src.vmdk && vmkfstools -X 20G linux-src01.vmdk# copy linux-src01.vmx here, then:vim-cmd solo/registervm /vmfs/volumes/datastore1/linux-src01/linux-src01.vmxvim-cmd vmsvc/power.on <vmid restituito>The pciBridge lines of the .vmx file are required: without them, the power-on fails with No PCIe slot available for SCSI0. At first boot, cloud-init creates the labuser user and configures the network. Then, inside the VM, install nginx and open-vm-tools through the lab proxy and write the test page:
echo 'Acquire::http::Proxy "http://proxy.proxmox.community:3128";' | sudo tee /etc/apt/apt.conf.d/80proxysudo apt-get update && sudo apt-get install -y nginx open-vm-toolsecho '<html><body><h1>linux-src01 - origine ESXi</h1></body></html>' | sudo tee /var/www/html/index.htmlFinally, with the VM powered off, remove the CD drive with the cloud-init ISO (the sata0 lines of the .vmx, then vim-cmd vmsvc/reload <vmid>) and delete the ISO from the datastore: it contains the initial password.
win-src01: Windows Server 2025. A VM created from the ESXi web client with BIOS firmware, an LSI Logic SAS controller, an E1000e network card, 2 vCPUs, 4 GB of RAM and a 40 GB thin disk, installed from the Windows Server 2025 evaluation ISO (Standard, Desktop Experience). In the lab the installation was automated with an answer file (autounattend.xml); by hand the result is the same. After the installation, in PowerShell as administrator:
Rename-Computer -NewName WIN-SRC01New-NetIPAddress -InterfaceAlias Ethernet0 -IPAddress 172.27.199.32 -PrefixLength 24 -DefaultGateway 172.27.199.1Set-DnsClientServerAddress -InterfaceAlias Ethernet0 -ServerAddresses 172.27.199.20Set-ItemProperty 'HKLM:\System\CurrentControlSet\Control\Terminal Server' -Name fDenyTSConnections -Value 0Enable-NetFirewallRule -DisplayGroup 'Remote Desktop'New-NetFirewallRule -DisplayName 'ICMPv4 in' -Protocol ICMPv4 -IcmpType 8 -Action AllowSet-Content C:\marker-origine.txt "win-src01 - VM di origine ESXi - configurata il $(Get-Date -Format s)"The C:\marker-origine.txt file will be used to verify that the data reach Proxmox VE. To have a realistic source VM, also install the VMware Tools: in the web client, Actions → Guest OS → Install VMware Tools mounts the Tools ISO (the host’s windows.iso); then, in the VM, run D:\setup64.exe /s /v"/qn REBOOT=R" and reboot.
1. Connecting the ESXi host
Section titled “1. Connecting the ESXi host”Datacenter → Storage → Add → ESXi: ID esxi8, server esxi8.proxmox.community, user root and its password. The certificate of the ESXi host is self-signed, so in the lab you enable Skip Certificate Verification. In production, import the CA of the host or of vCenter instead.
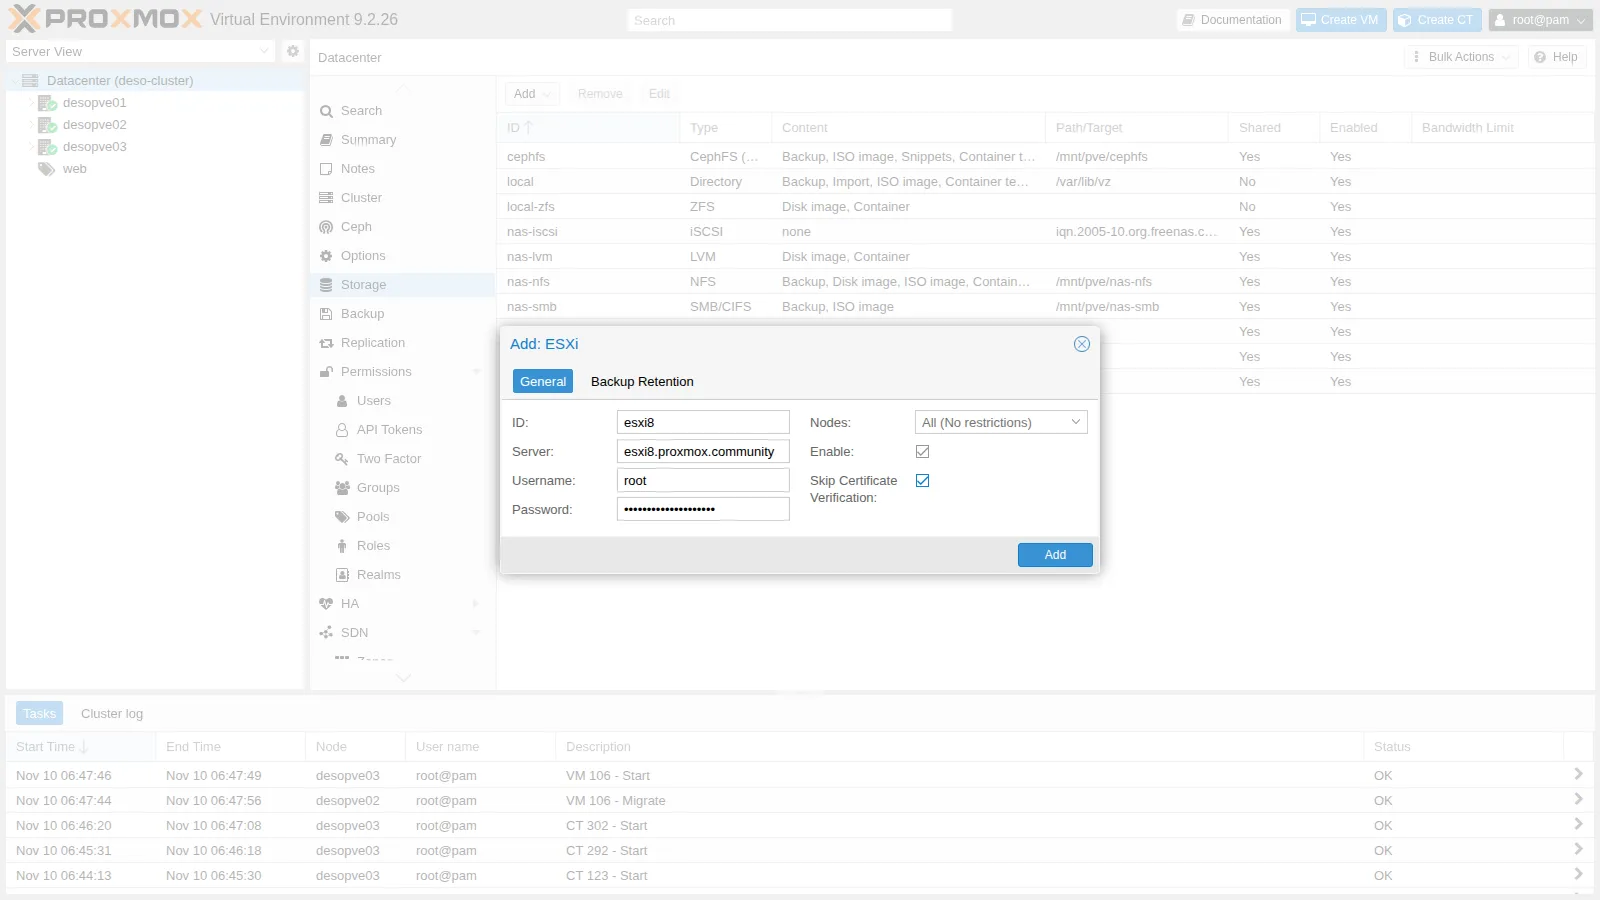
esxi: esxi8 server esxi8.proxmox.community username root skip-cert-verification 1pvesm status | grep esxi8esxi8 esxi active 0 0 0 0.00%The storage is active but has no space: it does not contain Proxmox VE disks, only the list of the VMs on the ESXi host. In the tree, desopve01 → esxi8 shows the .vmx files of the VMs, with the Import button.
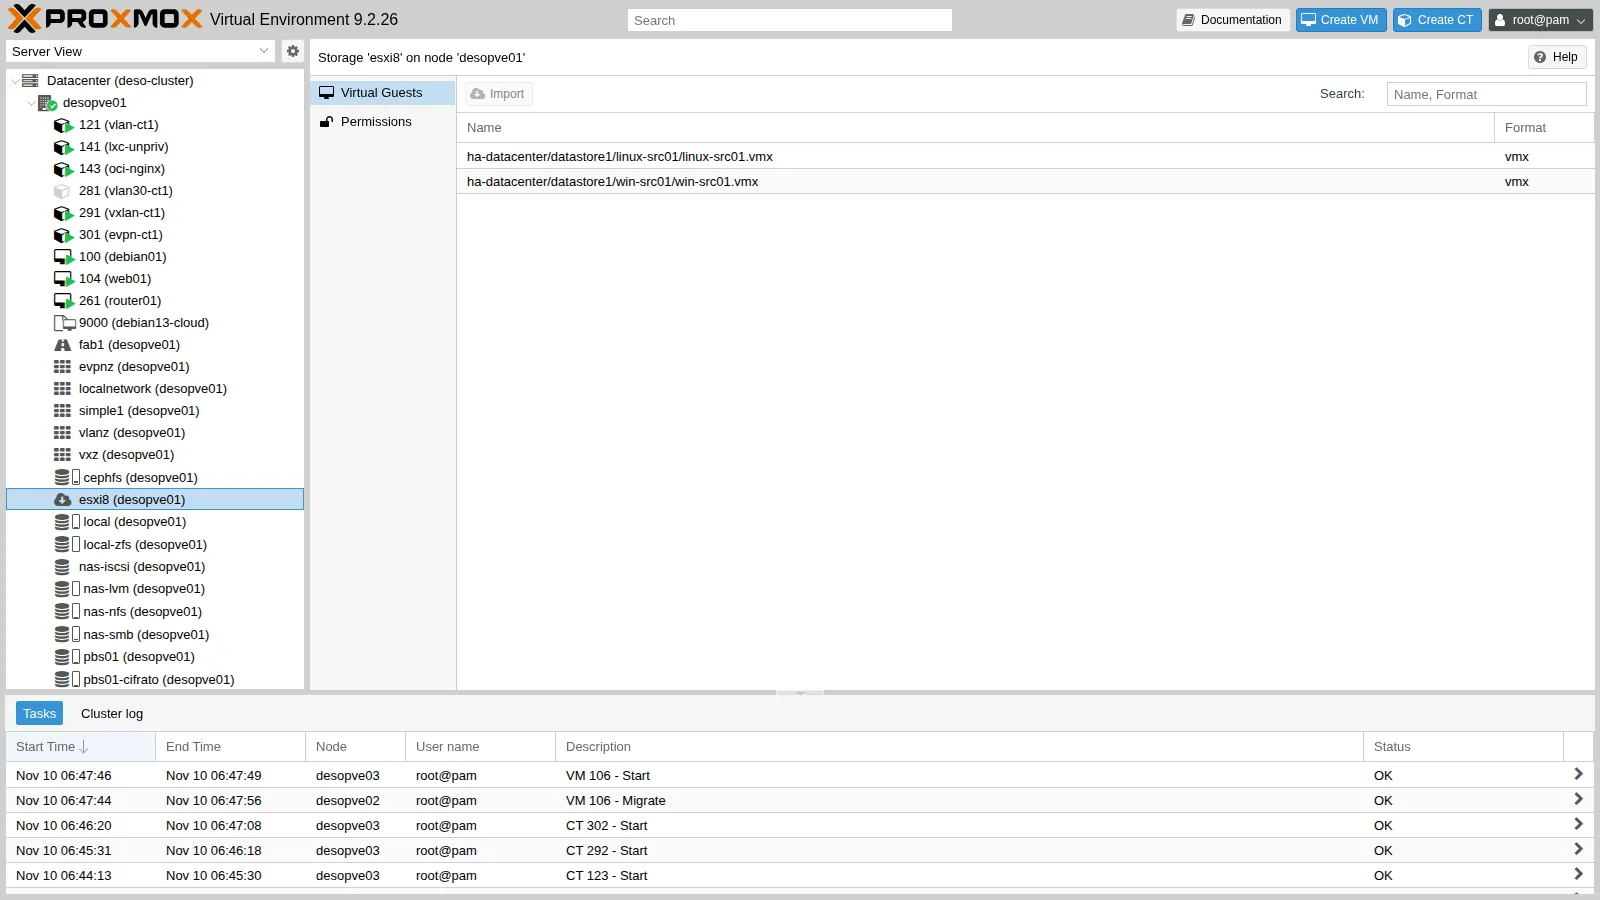
2. First problem: the VM is running on the source
Section titled “2. First problem: the VM is running on the source”With linux-src01 still running on the ESXi host, the wizard warns:
Virtual guest seems to be running on source host. Import might fail or have inconsistent state!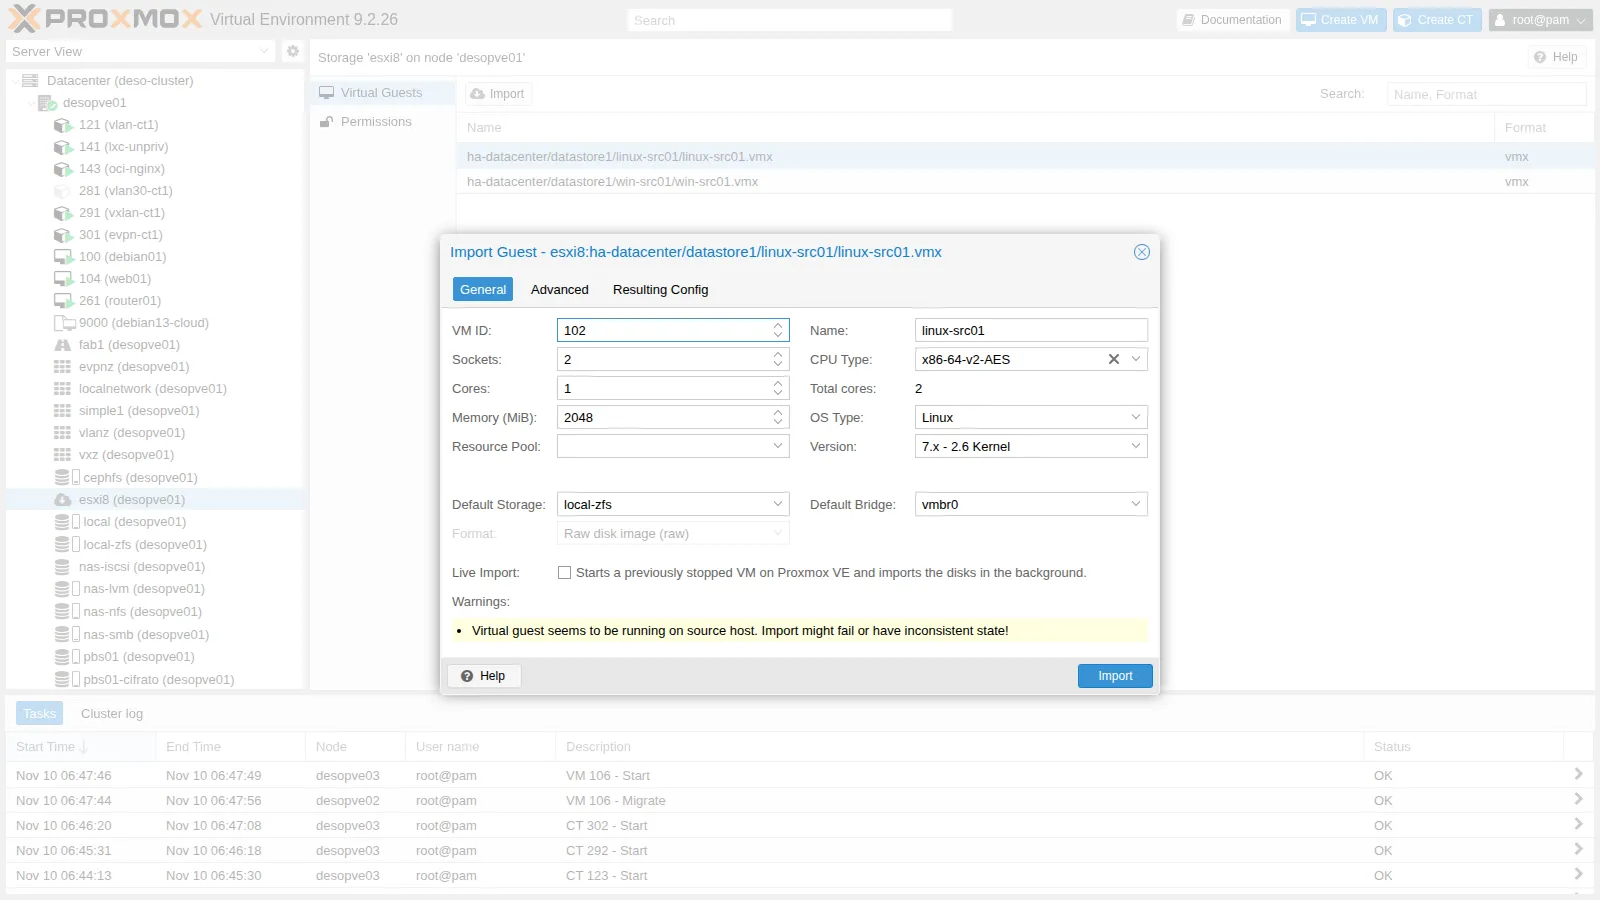
A disk copied while the VM is writing is inconsistent: first shut down the VM on the source, with a clean shutdown of the operating system, over SSH on the ESXi host (enabled in step 0) or from its web client. You can read the VM ID with vim-cmd vmsvc/getallvms:
Vmid Name File Guest OS Version Annotation3 linux-src01 [datastore1] linux-src01/linux-src01.vmx ubuntu64Guest vmx-214 win-src01 [datastore1] win-src01/win-src01.vmx windows2022srvNext_64Guest vmx-21vim-cmd vmsvc/power.shutdown 3vim-cmd vmsvc/power.getstate 3Powered off3. Importing linux-src01 with live-import
Section titled “3. Importing linux-src01 with live-import”-
General: VM ID
501, target storagerbd-vm(shared, useful for migrations and HA), bridgevmbr0, Live Import enabled. CPU, RAM, name and OS type come from the.vmx.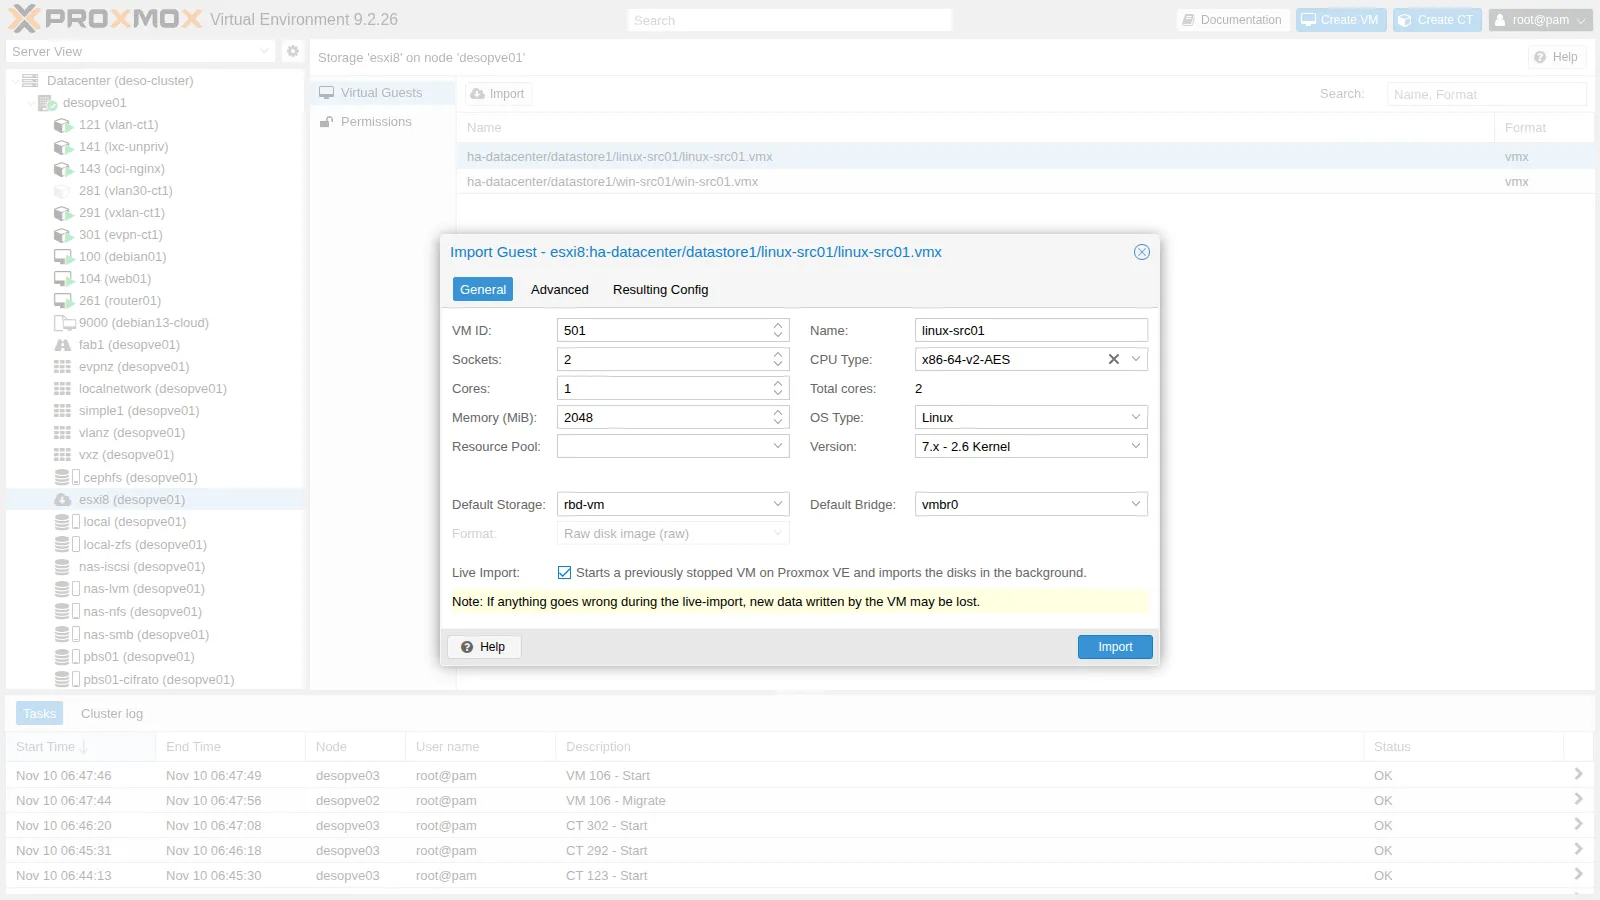
-
Advanced: the wizard proposes the hardware of the source, that is, a VMware PVSCSI controller and a VMware vmxnet3 network card. Linux ships with the VirtIO drivers, so choose VirtIO SCSI single and VirtIO (paravirtualized). The source MAC address (
00:0c:29:…) is kept; Unique MAC addresses would generate a new one.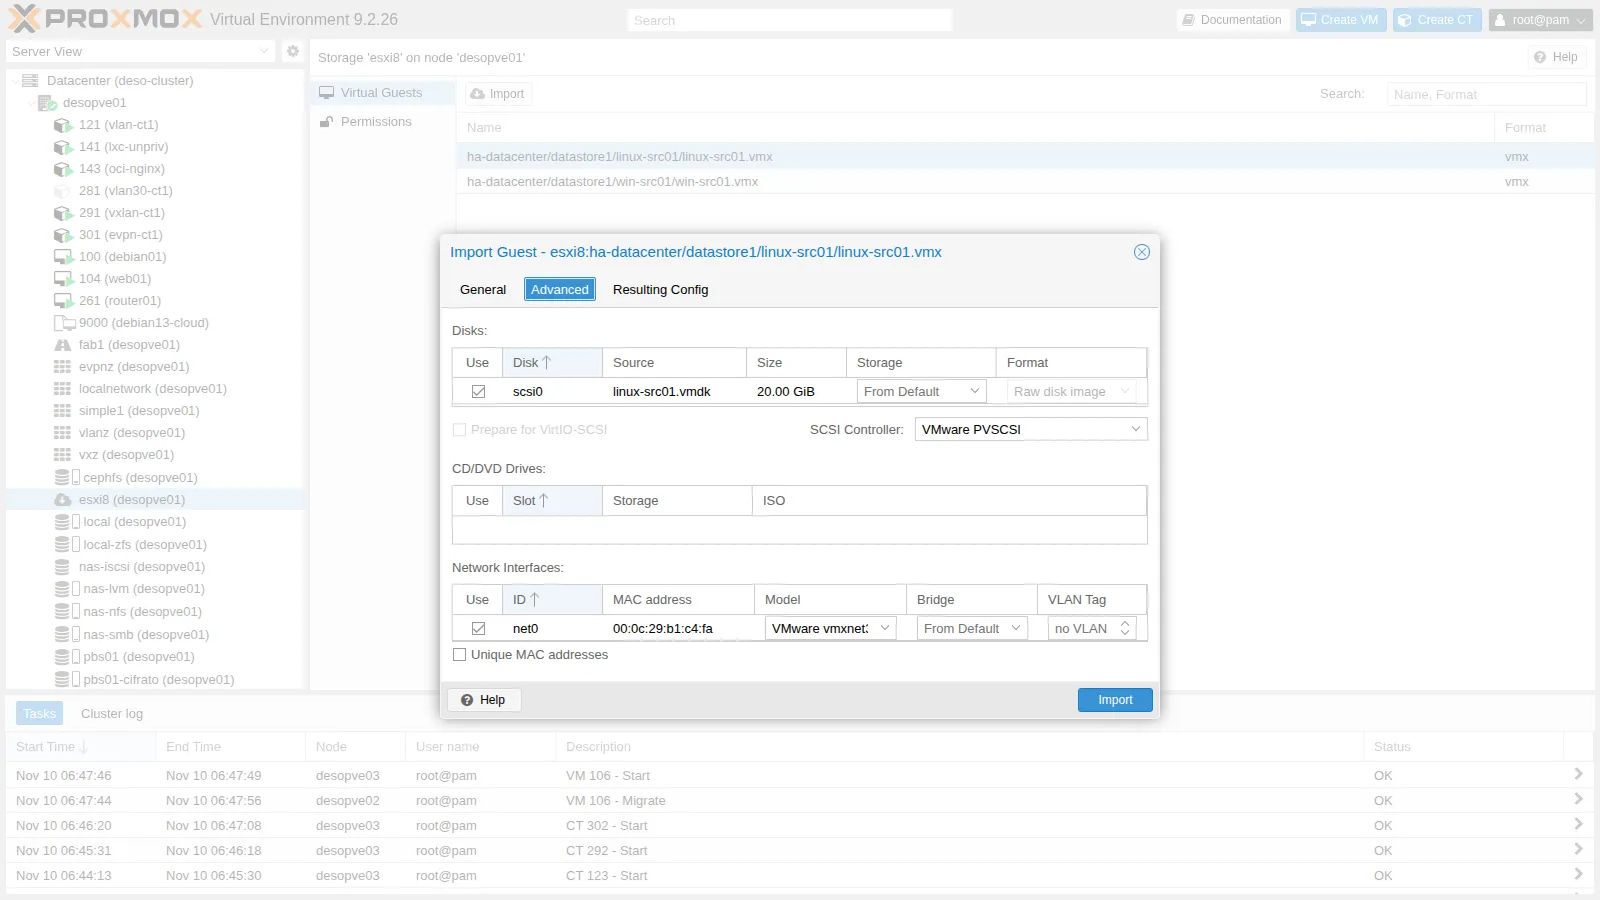
-
Resulting Config shows the VM that will be created: the disk is imported from
esxi8:…/linux-src01.vmdkand the SMBIOS UUID of the source is kept, so licenses and tools tied to the UUID do not change.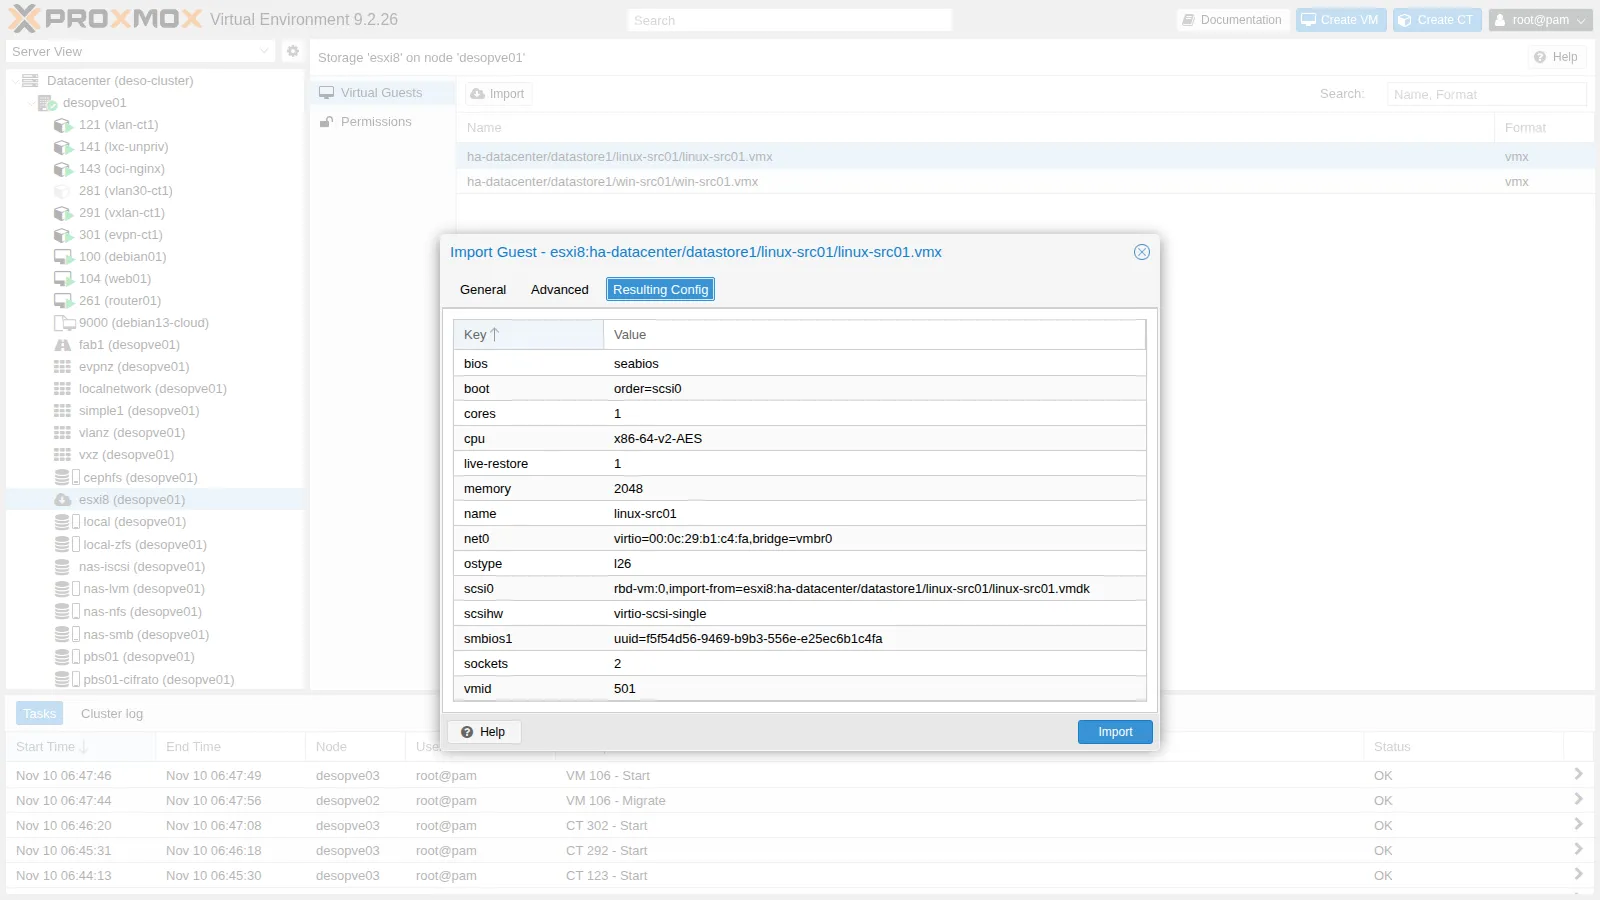
-
Import. The task creates the VM, starts it immediately and copies the disk in the background:
scsi0: successfully created disk 'rbd-vm:vm-501-disk-0,size=20G'restore-scsi0: transferred 96.0 MiB of 20.0 GiB (0.47%) in 1s...restore-scsi0: transferred 20.0 GiB of 20.0 GiB (100.00%) in 6m 48srestore-scsi0: stream-job finishedrestore-drive jobs finished successfully, removing all tracking block devices -
The measurements, with one HTTP request per second to 172.27.199.31:
Time Event Since the start of the import 06:58:12 import started, the VM boots on Proxmox VE 0 s 07:01:00 nginx responds 2 min 48 s 07:05:04 disk copy completed 6 min 52 s The service was back when only a fifth of the disk had been copied. During the live-import the VM is slow: every read of a block that has not been copied yet goes all the way to the ESXi host.
4. Linux after the import
Section titled “4. Linux after the import”ip -br alspci | grep -iE "ethernet|scsi"ens18 UP 172.27.199.31/24 fd27:199::20c:29ff:feb1:c4fa/64 fe80::20c:29ff:feb1:c4fa/6400:12.0 Ethernet controller: Red Hat, Inc. Virtio network device01:01.0 SCSI storage controller: Red Hat, Inc. Virtio SCSI-
The network card is now called
ens18: the name depends on the virtual PCI slot, and on the ESXi host it was different. The network works because the netplan configuration prepared in step 0 selects the network cards by name with a wildcard (match: name: "e*"). With the exact name of the card, as the Ubuntu installer usually writes it, or with amatchon the MAC address and a different MAC (Unique MAC addresses), the VM would have started without a network: in that case, fix the file in/etc/netplan/from the console and runnetplan apply. -
The VMware Tools for Linux (
open-vm-tools) are no longer needed and are replaced with the QEMU Guest Agent:Terminal window sudo apt-get purge -y open-vm-toolssudo apt-get install -y qemu-guest-agentIn Proxmox VE, enable the QEMU Guest Agent option and shut down and start the VM again: the agent channel is added only when the VM starts, not with a reboot from inside the guest.
Terminal window qm set 501 --agent enabled=1,fstrim_cloned_disks=1qm shutdown 501 && qm start 501qm agent 501 ping && echo agent-okqm guest cmd 501 get-osinfo | grep pretty-nameOutput agent-ok"pretty-name" : "Ubuntu 24.04.5 LTS", -
The disk is thin on Ceph too: of its 20 GiB, it uses 2.5.
Terminal window rbd du rbd-vm/vm-501-disk-0Output vm-501-disk-0 20 GiB 2.5 GiB
5. Snapshots on the source
Section titled “5. Snapshots on the source”Before importing win-src01, create a snapshot on the ESXi host, as is often the case with production VMs:
vim-cmd vmsvc/snapshot.create 4 prima-della-migrazione "snapshot di prova" 0 0ls /vmfs/volumes/datastore1/win-src01/ | grep vmdkwin-src01-000001-sesparse.vmdkwin-src01-000001.vmdkwin-src01-flat.vmdkwin-src01.vmdkThe wizard shows no warnings and uses the delta disk win-src01-000001.vmdk as its source: the import reads the chain (base + delta) and brings the current state of the disk, consolidated, into Proxmox VE. VMware snapshots are not imported. It is still better to consolidate them first: the whole chain has to be read, and a problem in the delta would end up in the imported VM.
6. Importing win-src01 prepared for VirtIO
Section titled “6. Importing win-src01 prepared for VirtIO”-
General: VM ID
502, storagerbd-vm, without live-import (at boot Windows reads many blocks, and with live-import each of them would have to be fetched from the ESXi host: a full copy is better). The wizard recognizes the OS (win11) and the BIOS firmware of the source. The only warning concerns the CD drive of the source, which is not imported.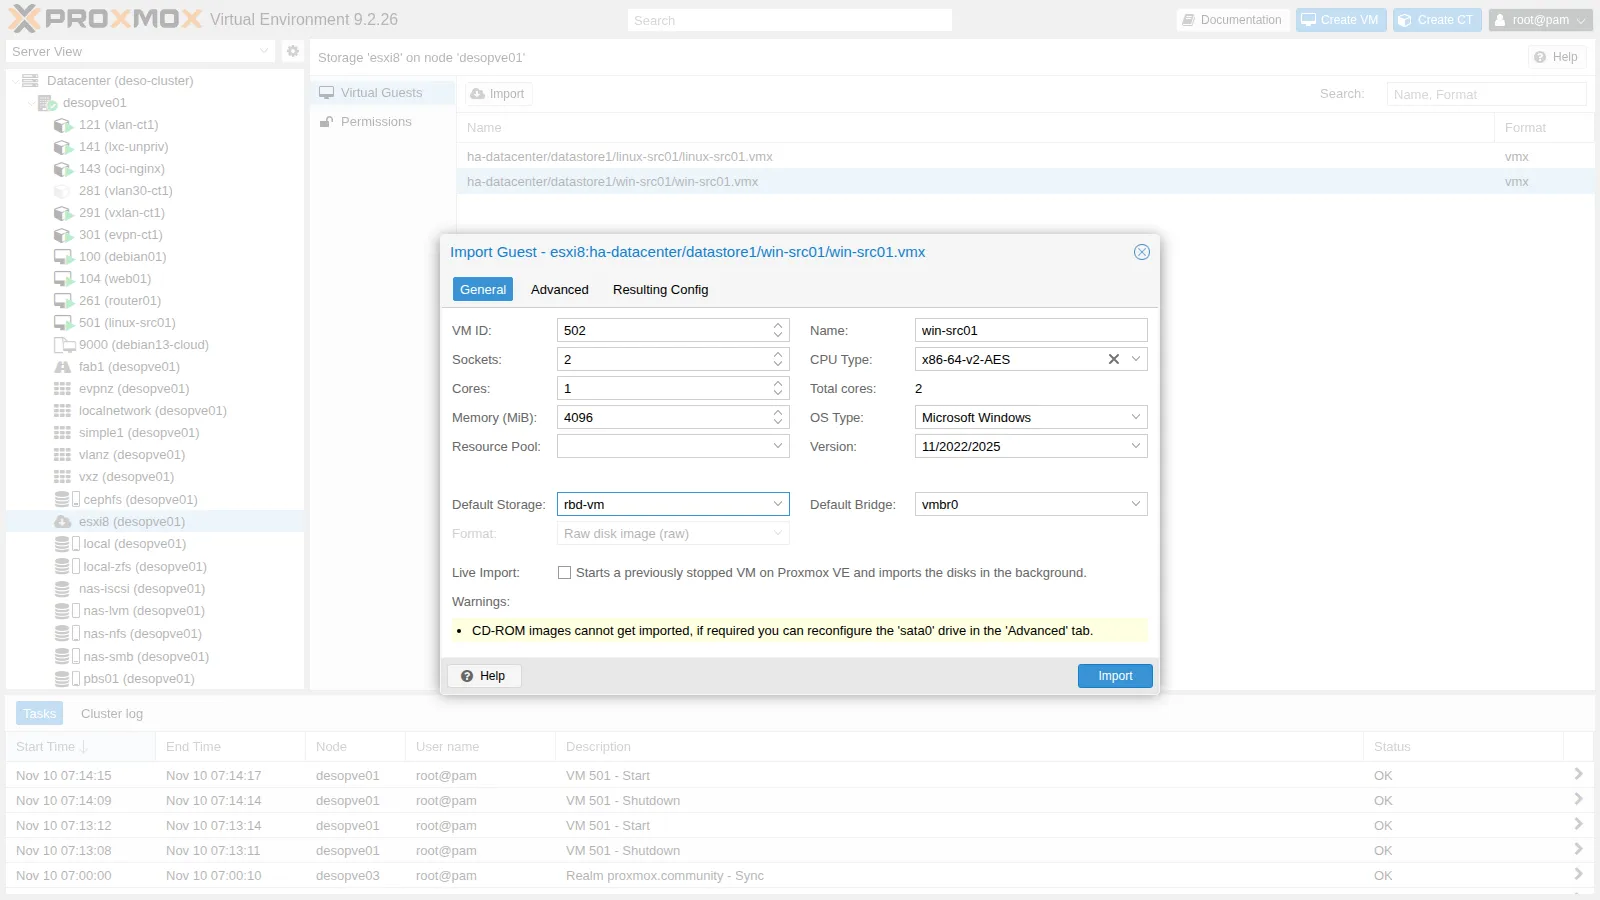
-
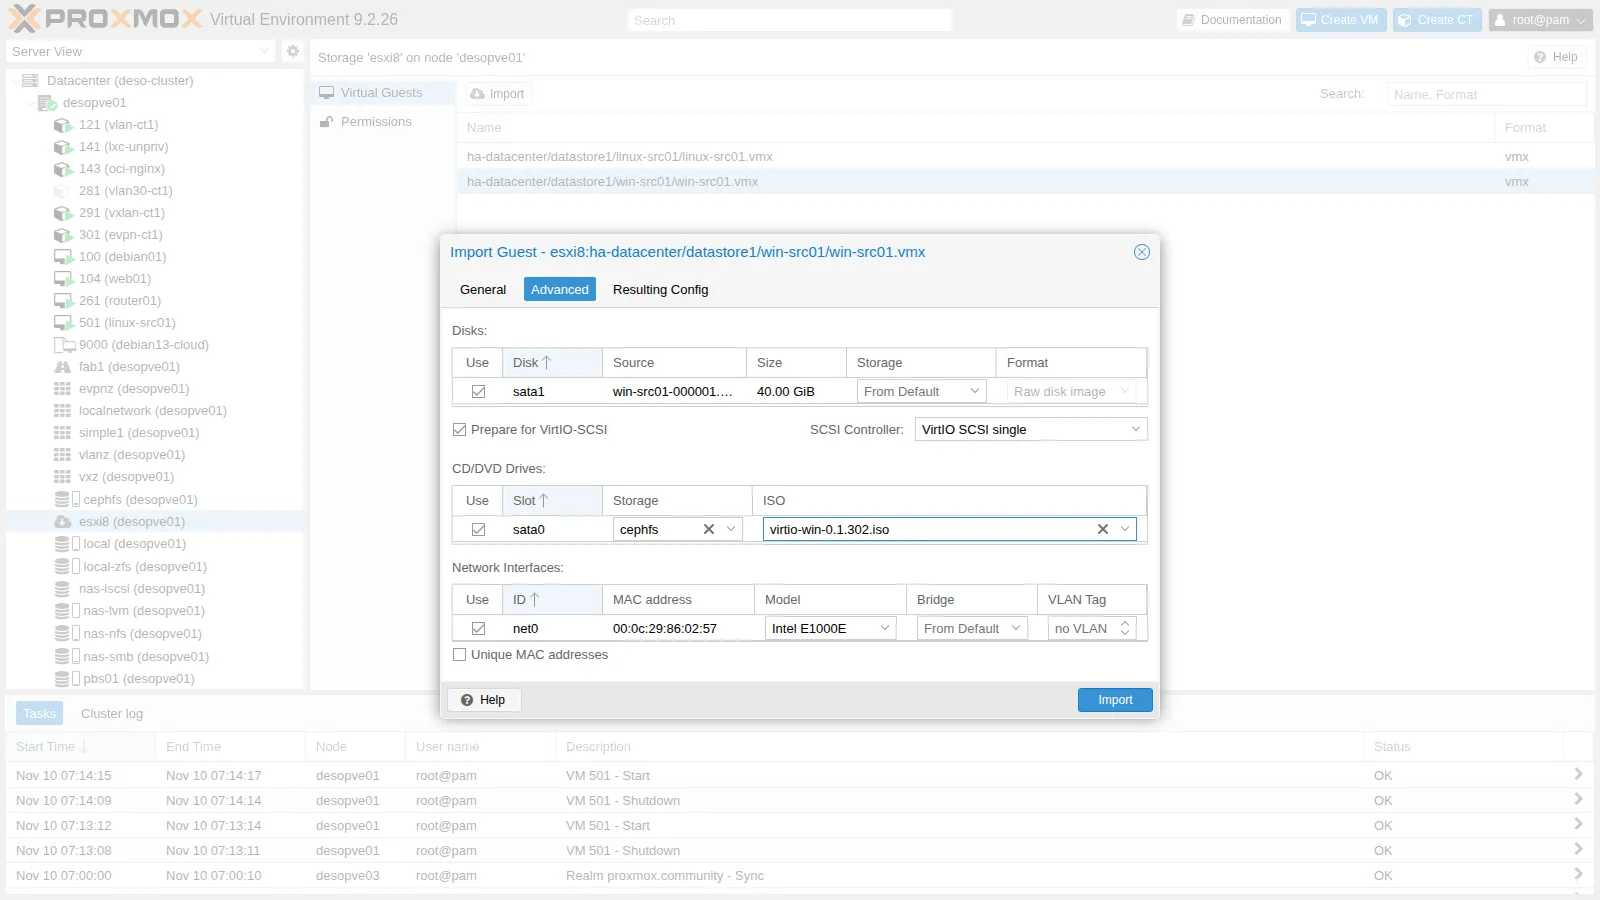
Advanced:
- Prepare for VirtIO-SCSI: the disk is attached on SATA (
sata1), which Windows can always boot from, and the controller is already set to VirtIO SCSI single; - in the
sata0drive, mount thevirtio-win-0.1.302.isoISO fromcephfs; - the network card stays Intel E1000E, because Windows already has its driver: NetKVM comes later.
- Prepare for VirtIO-SCSI: the disk is attached on SATA (
-
The import takes 31 min 44 s for 40 GiB (about 21 MB/s, versus the 50 MB/s of the
linux-src01disk, which had no snapshot):transferred 40.0 GiB of 40.0 GiB (100.00%)sata1: successfully created disk 'rbd-vm:vm-502-disk-0,size=40G'pinning machine type to 'pc-i440fx-11.1' for Windows guest OSTASK OKThe machine type is pinned: for Windows, a change in the version of the virtual machine can cause new hardware to be detected.
7. Windows after the import: network, VirtIO and VMware Tools
Section titled “7. Windows after the import: network, VirtIO and VMware Tools”-
Before the first boot, add a small temporary VirtIO SCSI disk: without a VirtIO SCSI device present, Windows installs the driver but does not set it up for booting.
Terminal window qm set 502 --boot order=sata1 --scsi0 rbd-vm:1,discard=onqm start 502 -
First trap: the static IP is gone. Windows boots, but does not respond on 172.27.199.32. From the console:
Ethernet adapter Ethernet:Autoconfiguration IPv4 Address. . : 169.254.121.36The network card has the same model and the same MAC address, but for Windows it is a new device (
Intel(R) 82574L Gigabit Network Connection #2), because its PCI location has changed. The IP configuration stayed on the old card, which is now hidden. Set it again from the console:netsh interface ipv4 set address Ethernet static 172.27.199.32 255.255.255.0 172.27.199.1netsh interface ipv4 set dnsservers Ethernet static 172.27.199.20 primary -
From the
virtio-winISO, install the drivers and the QEMU Guest Agent non-interactively:Terminal window $p = Start-Process D:\virtio-win-guest-tools.exe -ArgumentList "/install","/quiet","/norestart" -Wait -PassThru"virtio-win-guest-tools: exit code " + $p.ExitCodeOutput virtio-win-guest-tools: exit code 0Name Status StartTypeBalloonService Running AutomaticQEMU-GA Running AutomaticFriendlyName StatusVirtIO Balloon Driver OKRed Hat VirtIO SCSI pass-through controller OK -
Second trap: the VMware Tools cannot be uninstalled outside VMware:
Terminal window $t = Get-ItemProperty HKLM:\Software\Microsoft\Windows\CurrentVersion\Uninstall\* | ? DisplayName -like "VMware Tools*"Start-Process msiexec.exe -ArgumentList "/x",$t.PSChildName,"/qn","/norestart","/l*v","C:\vmt.log" -WaitOutput VMware Tools 12.4.0.23259341msiexec /x: exit code 1603CustomAction VM_LogStart returned actual error code 1603Windows Installer removed the product. Product Name: VMware Tools. Product Version: 12.4.0.23259341. ... Removal success or error status: 1603.The package runs actions that only work on a VMware VM, and the removal fails. Remedies:
- the rule: uninstall the VMware Tools on the source before the final shutdown and the import;
- after the import: disable the services, as done here, and plan a manual cleanup or a clean reinstallation.
Terminal window Stop-Service VMTools,VGAuthService -ForceSet-Service VMTools -StartupType DisabledSet-Service VGAuthService -StartupType DisabledOutput Name Status StartTypeVGAuthService Stopped DisabledVMTools Stopped Disabled -
Switching to VirtIO. With the VM powered off, remove the temporary disk, move the system disk from SATA to VirtIO SCSI, switch the network card to VirtIO (same MAC address), enable the agent and empty the CD drive:
Terminal window qm set 502 --delete scsi0 # the temporary disk becomes unused0qm disk unlink 502 --idlist unused0 --force # and is destroyedqm set 502 --delete sata1 # the system disk becomes unused0qm set 502 --scsi0 rbd-vm:vm-502-disk-0,discard=on,iothread=1,ssd=1 --boot order=scsi0 \--net0 virtio=00:0C:29:86:02:57,bridge=vmbr0 --agent enabled=1 --sata0 none,media=cdromqm start 502Windows boots from the VirtIO SCSI disk and the agent responds in less than a minute. The NetKVM card is once again a new device, so the IP has to be set again, this time from the host through the agent (
qm guest exec):Terminal window qm guest exec 502 -- powershell -NoProfile -Command "New-NetIPAddress -InterfaceAlias 'Ethernet 2' -IPAddress 172.27.199.32 -PrefixLength 24 -DefaultGateway 172.27.199.1; Set-DnsClientServerAddress -InterfaceAlias 'Ethernet 2' -ServerAddresses 172.27.199.20; Rename-NetAdapter -Name 'Ethernet 2' -NewName LAN" -
Final check, again through the agent:
Name InterfaceDescription StatusLAN Red Hat VirtIO Ethernet Adapter UpFriendlyName BusType GBQEMU QEMU HARDDISK SAS 40FriendlyName Class StatusVirtIO Serial Driver System OKVirtIO Balloon Driver System OKRed Hat VirtIO SCSI pass-through controller SCSIAdapter OKRed Hat VirtIO Ethernet Adapter Net OKName Status StartTypeQEMU-GA Running AutomaticVGAuthService Stopped DisabledVMTools Stopped DisabledTest-Path C:\marker-origine.txtTrueThe test file created on the source is there: the data arrived, including the state of the snapshot delta.
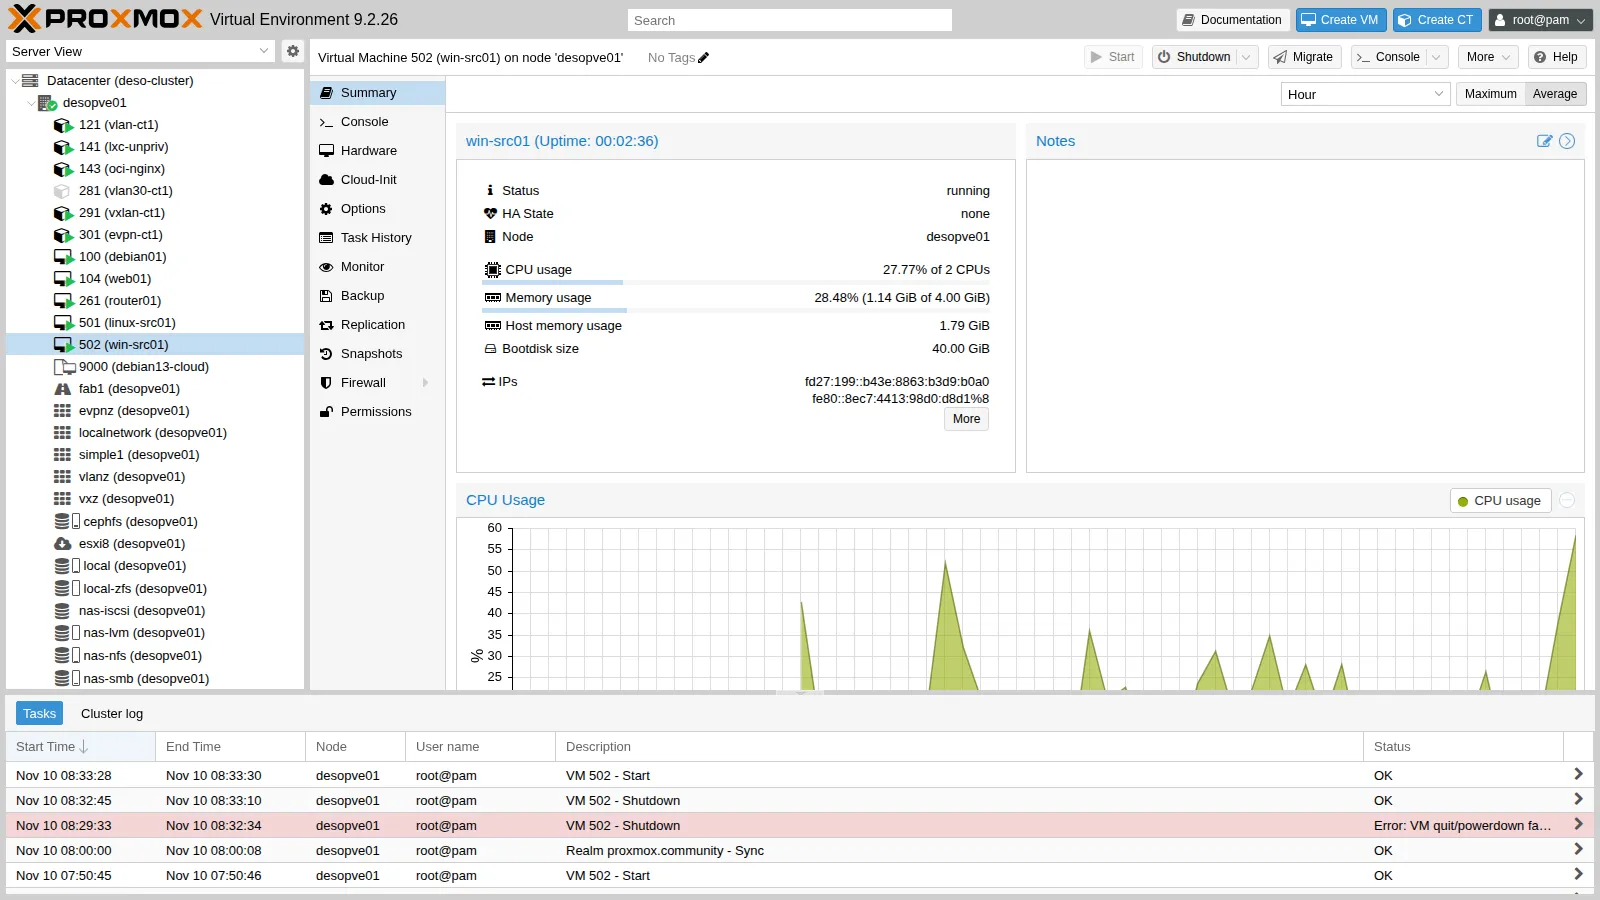
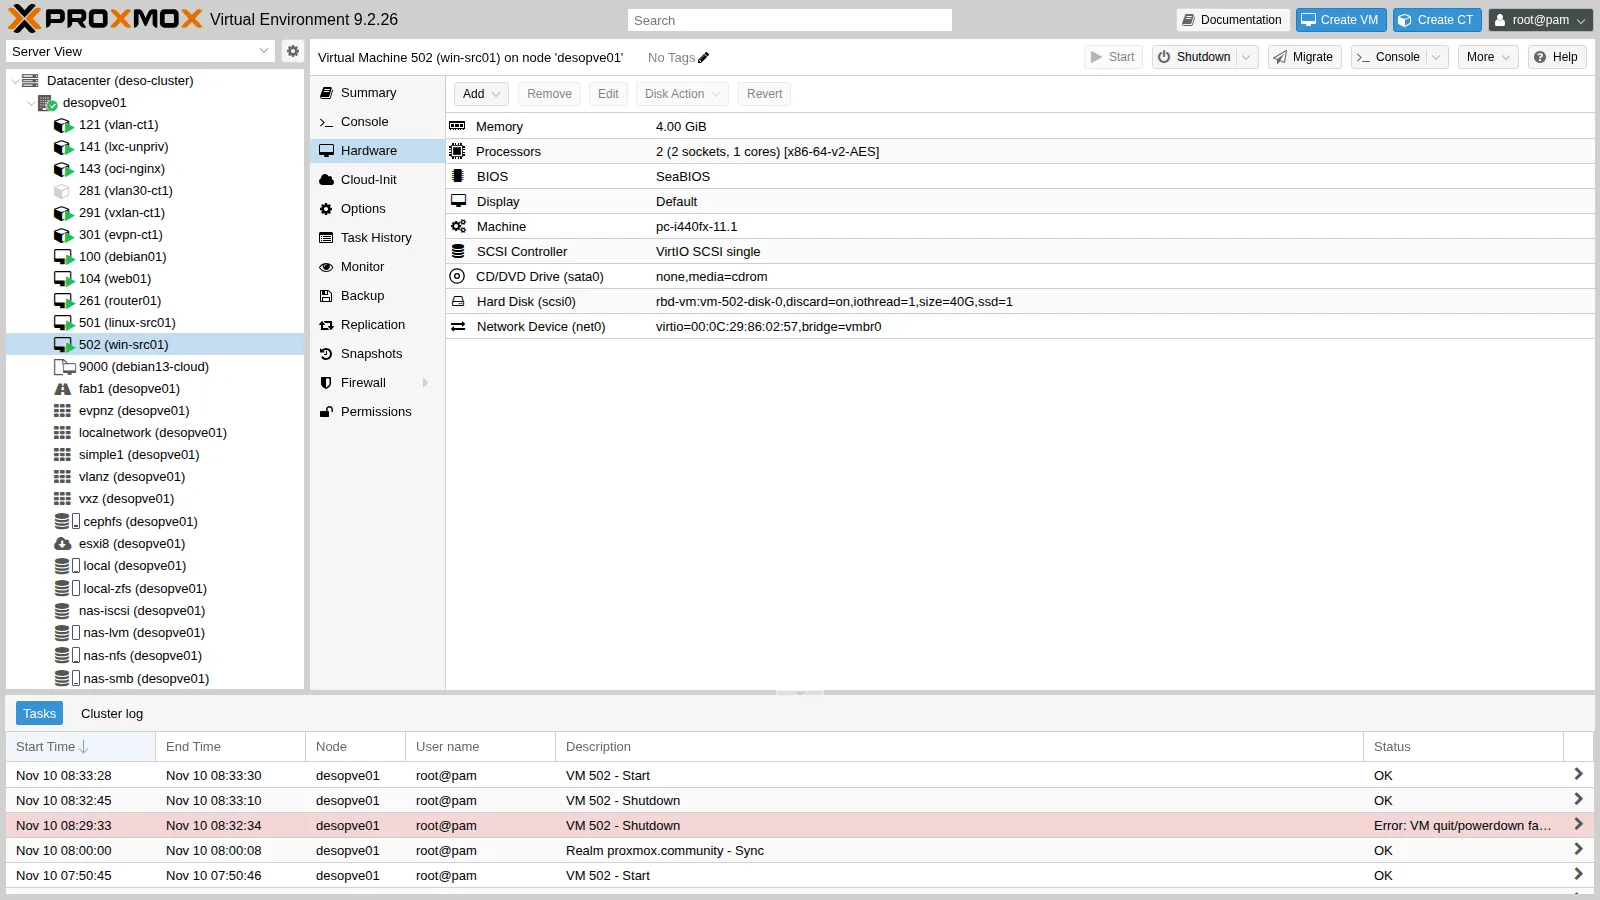
Verification and tests
Section titled “Verification and tests”| Test | Result in the lab |
|---|---|
| ESXi storage | active, lists the VMs of the host |
| Wizard with the VM running on the source | warning “seems to be running on source host” |
Live-import of linux-src01 (20 GiB) |
service reachable at 2 min 48 s, copy complete in 6 min 52 s |
Network of linux-src01 after the import |
working (ens18, netplan with e*) |
| Import with a snapshot on the source | successful: current state imported, no snapshot carried over |
Offline import of win-src01 (40 GiB) |
31 min 44 s |
| Windows static IP | lost twice (e1000e “#2”, then NetKVM): must be set again |
| Uninstalling the VMware Tools outside VMware | failed, error 1603 (VM_LogStart) |
| Windows boot from VirtIO SCSI | successful after the drivers and the temporary disk |
Final lab state
Section titled “Final lab state”- Storage
esxi8(ESXi type) configured in the datacenter. - VM 501
linux-src01ondesopve01, running:rbd-vm, VirtIO SCSI single, VirtIO network card with the source MAC address, QEMU Guest Agent, 172.27.199.31, nginx running. - VM 502
win-src01ondesopve01, stopped:rbd-vm, VirtIO SCSI single, NetKVM with the source MAC address, QEMU Guest Agent, 172.27.199.32, VMware Tools disabled. - On the ESXi host the two source VMs are powered off, and
win-src01still has theprima-della-migrazionesnapshot. They must not be powered on while the copies in Proxmox VE are running: they have the same IPs and the same MAC addresses. - Cluster with quorum 3/3 and Ceph
HEALTH_OK; HA unchanged from Lab 49.
What you learned
Section titled “What you learned”- An ESXi host (or vCenter) becomes an import storage: Proxmox VE reads its VMs and converts them.
- Before the import, the VM must be powered off on the source, and it is best to consolidate the snapshots and uninstall the VMware Tools on the source.
- Live-import reduces downtime to a few minutes, with reduced performance until the copy finishes.
- Linux accepts VirtIO right away; for Windows, import onto SATA with Prepare for VirtIO-SCSI, install the drivers (
virtio-win-guest-tools), then switch to VirtIO SCSI and NetKVM. - In Windows, every change of network card creates a new card: the static IP must be set again, and the agent lets you do it from the host.