

Lab 17 – Ceph 1: architecture, installation, RBD pools and CephFS
Dependencies
Section titled “Dependencies”- Previous labs: Lab 06 (three-node cluster
deso-cluster), Lab 08 (moving disks between storages), Lab 14 (the Debian ISO on thenas-smbstorage). - Nodes:
desopve01,desopve02anddesopve03in a cluster, each with:- two free 60 GB disks (
/dev/sdcand/dev/sdd), never used before; - a free third network card (
nic2) connected to a switch that carries VLANs 50 and 51.
- two free 60 GB disks (
- VM: VM 100
debian01running ondesopve01, with its disk onlocal-zfs. - Internet: the lab proxy (
proxy.proxmox.community:3128) must allowdownload.proxmox.com, where the Ceph packages come from. - Credentials:
root/<lab-password>on the nodes → Appendix B.
Objectives
Section titled “Objectives”- Understand the Ceph components (MON, MGR, OSD, MDS) and how Ceph decides where to place data (pools, placement groups, CRUSH).
- Prepare a dedicated Ceph network with two VLANs, separate from the management network.
- Install Ceph Tentacle with the Proxmox VE wizard and complete the Ceph cluster on the three nodes.
- Create the OSDs, a 3/2 replicated RBD pool and the cluster’s RBD storage.
- Move a VM to Ceph and live-migrate it without copying its disk.
- Create a CephFS file system for ISOs, templates and backups.
How it works
Section titled “How it works”The components
Section titled “The components”Ceph is distributed storage: it combines the disks of several servers into a single system, replicates data across the servers and heals itself when a disk or a node fails. In Proxmox VE it is integrated into the interface: you install, configure and monitor it from the GUI, with no external tools.
| Component | What it does | How many in the lab |
|---|---|---|
| MON (monitor) | Maintains the cluster map: which OSDs exist, where the data is, who is alive. Decides by majority (quorum). | 3, one per node |
| MGR (manager) | Collects statistics and hosts the modules (PG autoscaler, dashboard, metrics). One is active, the others are on standby. | 3 (1 active, 2 standby) |
| OSD (object storage daemon) | One process per disk: writes data to the disk, replicates it to the other OSDs and takes part in recovery. | 6, two per node |
| MDS (metadata server) | Manages the metadata (directories, names, permissions) of the CephFS file system. Needed only for CephFS. | 2 (1 active, 1 standby) |
There are three monitors for the same reason as the Corosync votes (lab 06): with three monitors the cluster keeps working if one stops, because the other two are still a majority. With two monitors, losing one blocks everything.
From data to disks: pools, PGs and CRUSH
Section titled “From data to disks: pools, PGs and CRUSH” VM 100 ──▶ RBD image vm-100-disk-0 (16 GiB) │ split into 4 MiB objects ▼ pool rbd-vm (size 3, min_size 2) │ each object lands in a placement group (PG) ▼ PG 2.1a ──CRUSH──▶ osd.1 (desopve01) + osd.2 (desopve02) + osd.4 (desopve03)- Pool: a logical container with its own protection rules.
size 3= every object exists in three copies;min_size 2= the pool accepts writes as long as at least two copies are available. - Placement group (PG): groups of objects. Ceph does not move individual objects but whole PGs, which is much lighter to manage. The autoscaler chooses the number of PGs for each pool based on the space used.
- CRUSH: the algorithm that, given a PG, computes which OSDs hold its copies, without looking anything up in a table. The default rule,
replicated_rule, places each copy on a different host: losing an entire node does not lose any data.
Two networks for Ceph
Section titled “Two networks for Ceph”| Network | VLAN | Subnet | Traffic |
|---|---|---|---|
| Public network | 50 | 10.50.10.0/24 | clients (the nodes that read and write the VM disks) and monitors |
| Cluster network | 51 | 10.51.10.0/24 | replication and recovery between the OSDs |
Separating Ceph traffic from the management network (172.27.199.0/24) prevents heavy replication from slowing down the GUI, Corosync or migrations. In the lab both networks run on the same nic2 card as tagged VLANs: this is the most common way to separate traffic when you have few network cards. VLANs and dedicated networks are the subject of track B (labs 20-22).
Procedure
Section titled “Procedure”1. Dedicated network: two VLANs on nic2
Section titled “1. Dedicated network: two VLANs on nic2”-
Node desopve01 → System → Network → Create → Linux VLAN. Name
nic2.50, address10.50.10.21/24, no gateway, Autostart checked. Proxmox derives the base interface (nic2) and the tag (50) from the name on its own.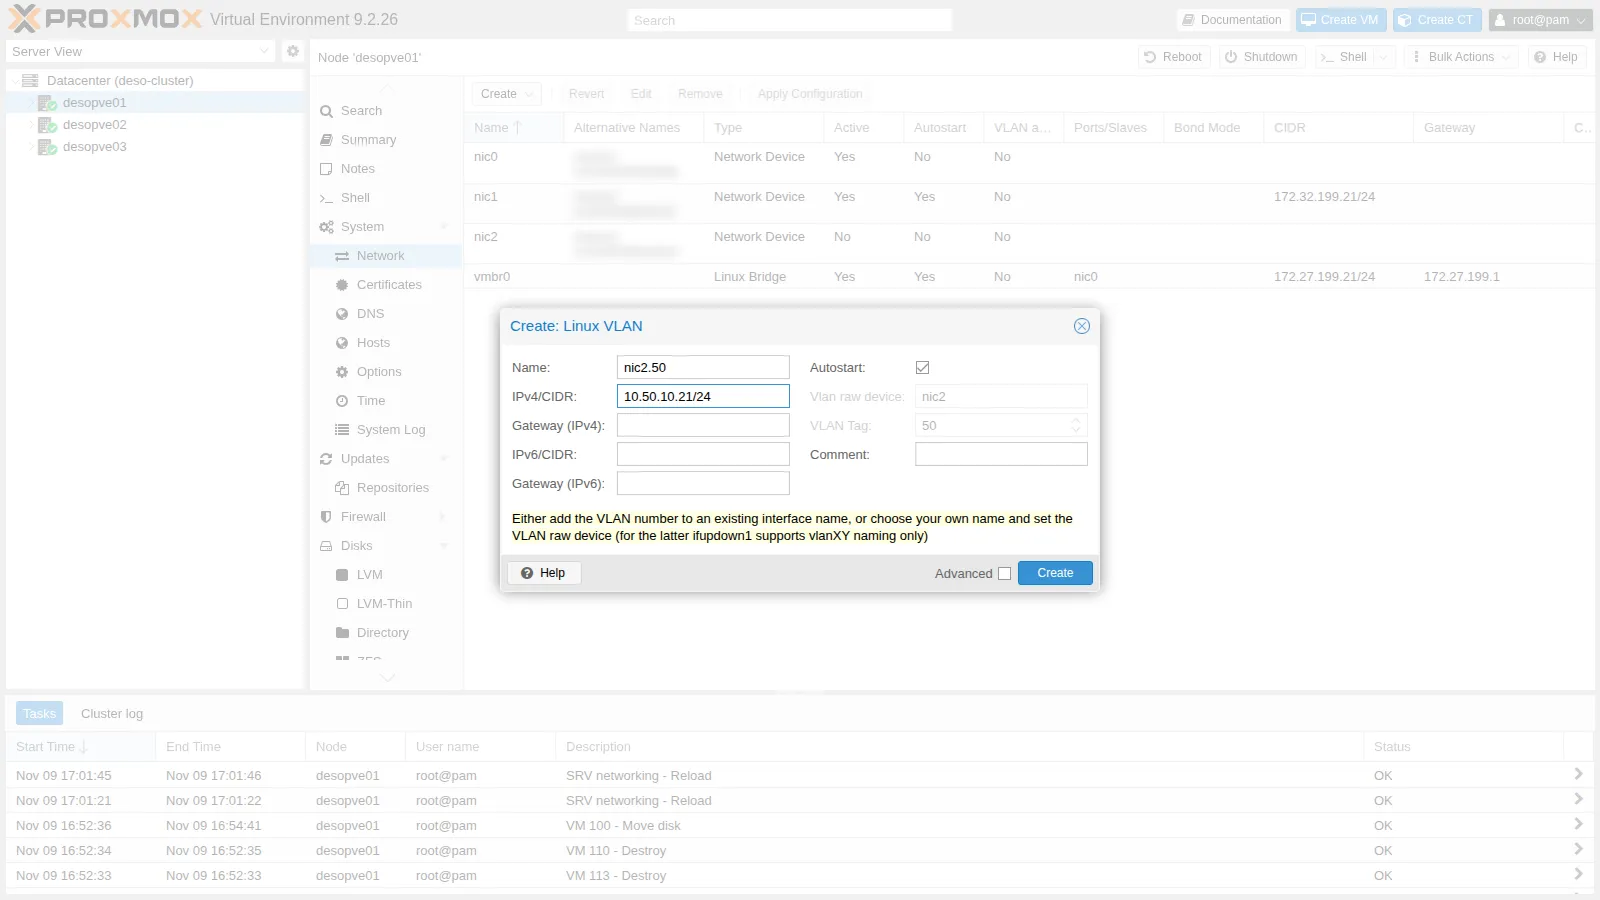
-
Repeat for
nic2.51with10.51.10.21/24, then Apply Configuration.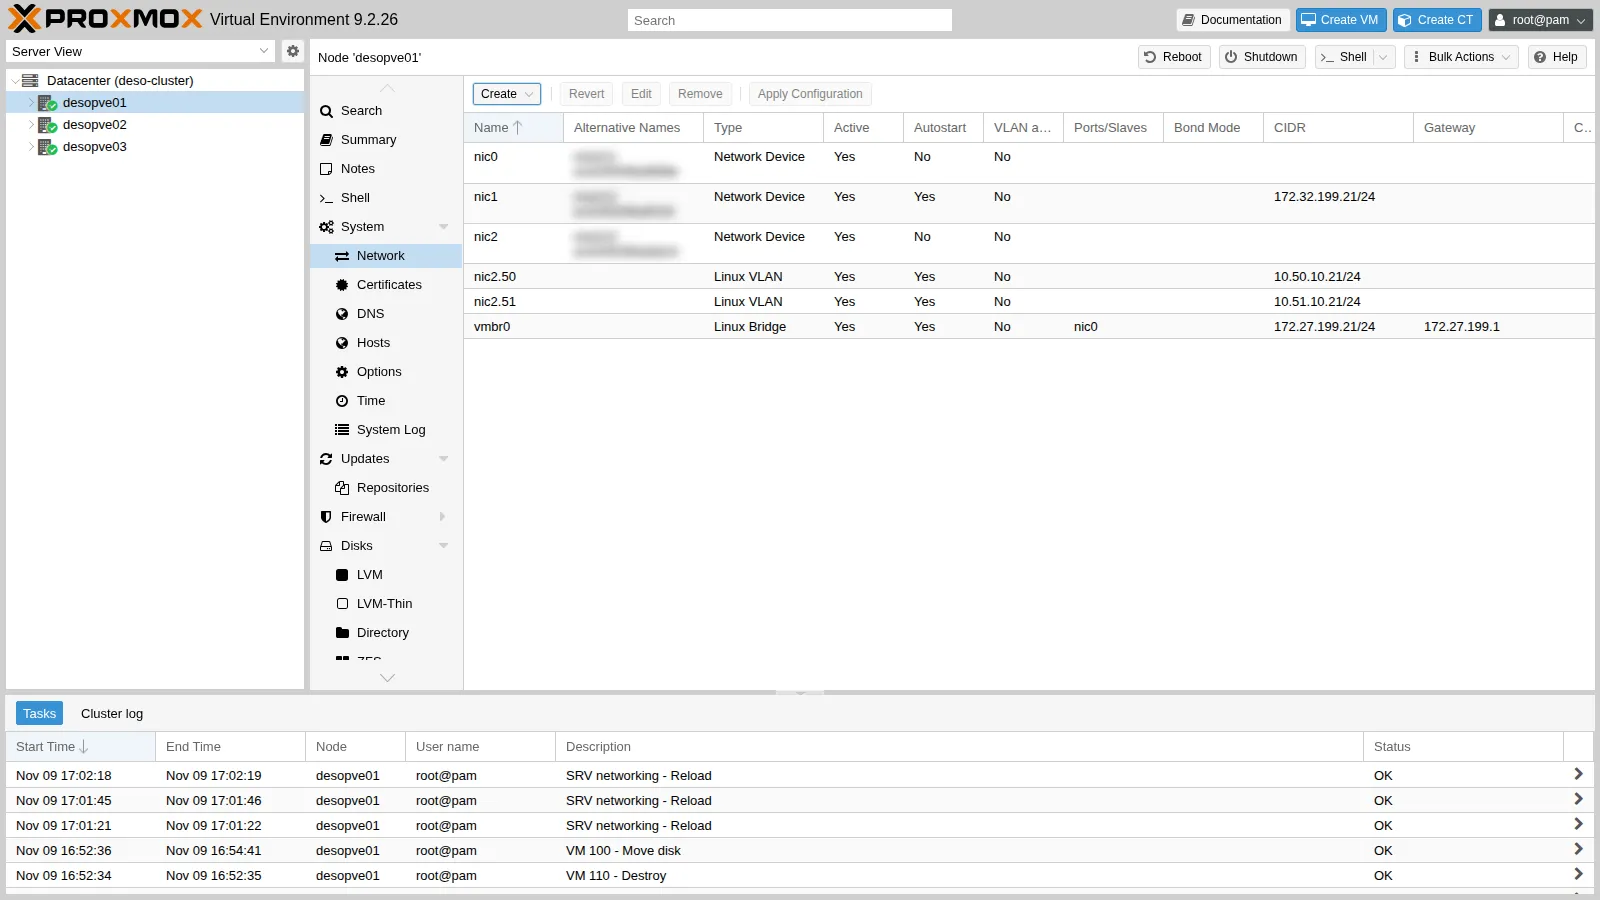
-
On the other two nodes do the same from the command line, through the Proxmox API: the result is identical to the one you get from the GUI.
root@desopve02 pvesh create /nodes/desopve02/network --iface nic2.50 --type vlan --cidr 10.50.10.22/24 --autostart 1pvesh create /nodes/desopve02/network --iface nic2.51 --type vlan --cidr 10.51.10.22/24 --autostart 1pvesh set /nodes/desopve02/networkip -br a | grep nic2Output nic2 UPnic2.50@nic2 UP 10.50.10.22/24nic2.51@nic2 UP 10.51.10.22/24On
desopve03the addresses are10.50.10.23/24and10.51.10.23/24. -
Check that tagged packets pass between the nodes and that the VLANs are isolated from the rest of the network:
root@desopve01 ping -c2 -W1 10.50.10.22 | tail -2Output 2 packets transmitted, 2 received, 0% packet loss, time 1002msrtt min/avg/max/mdev = 0.658/0.992/1.326/0.334 msroot@desopve01 ping -c2 -W1 10.51.10.23 | tail -2Output 2 packets transmitted, 2 received, 0% packet loss, time 1001msrtt min/avg/max/mdev = 0.269/0.560/0.852/0.291 msThe two VLANs have no gateway: Ceph traffic never leaves the dedicated network. A test from the DC confirms it: the DC sits on the management network and cannot reach VLAN 50, because no router routes it:
PowerShell — desopve-dc01 (Test-NetConnection 10.50.10.21 -WarningAction SilentlyContinue).PingSucceededOutput False
2. Installing Ceph with the wizard
Section titled “2. Installing Ceph with the wizard”-
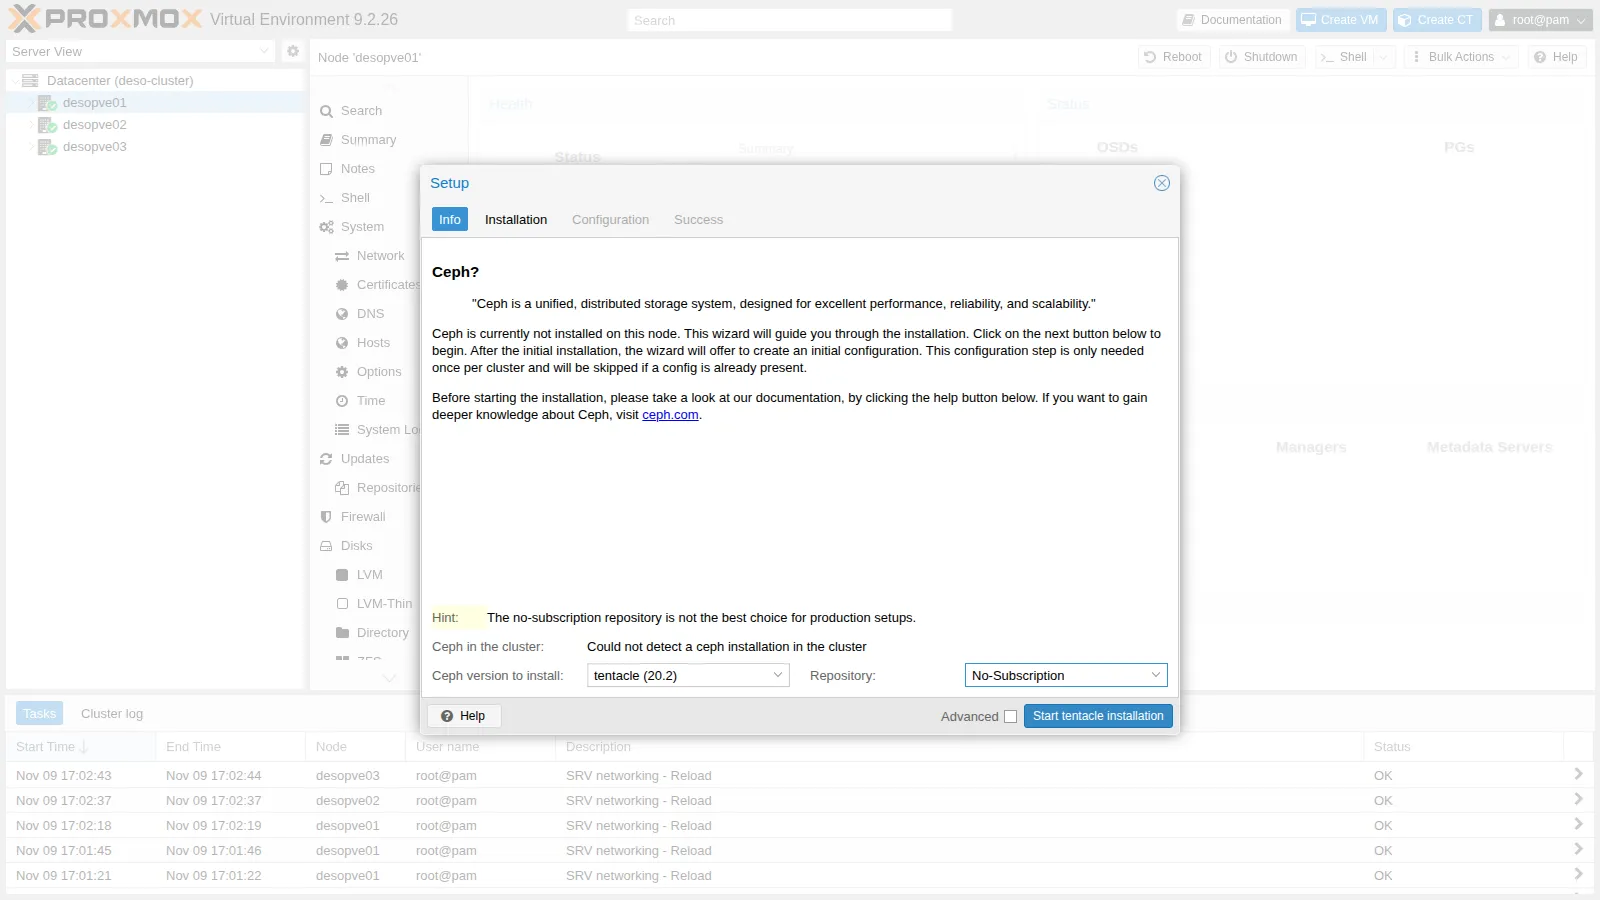
Node desopve01 → Ceph. Ceph is not installed, so Proxmox offers Install Ceph.
-
The wizard proposes tentacle (20.2), the default version in Proxmox VE 9.2. As Repository choose No-Subscription: the Enterprise repository requires a subscription.
-
Start tentacle installation: a terminal opens running
apt. Check the list of packages and confirm with Y.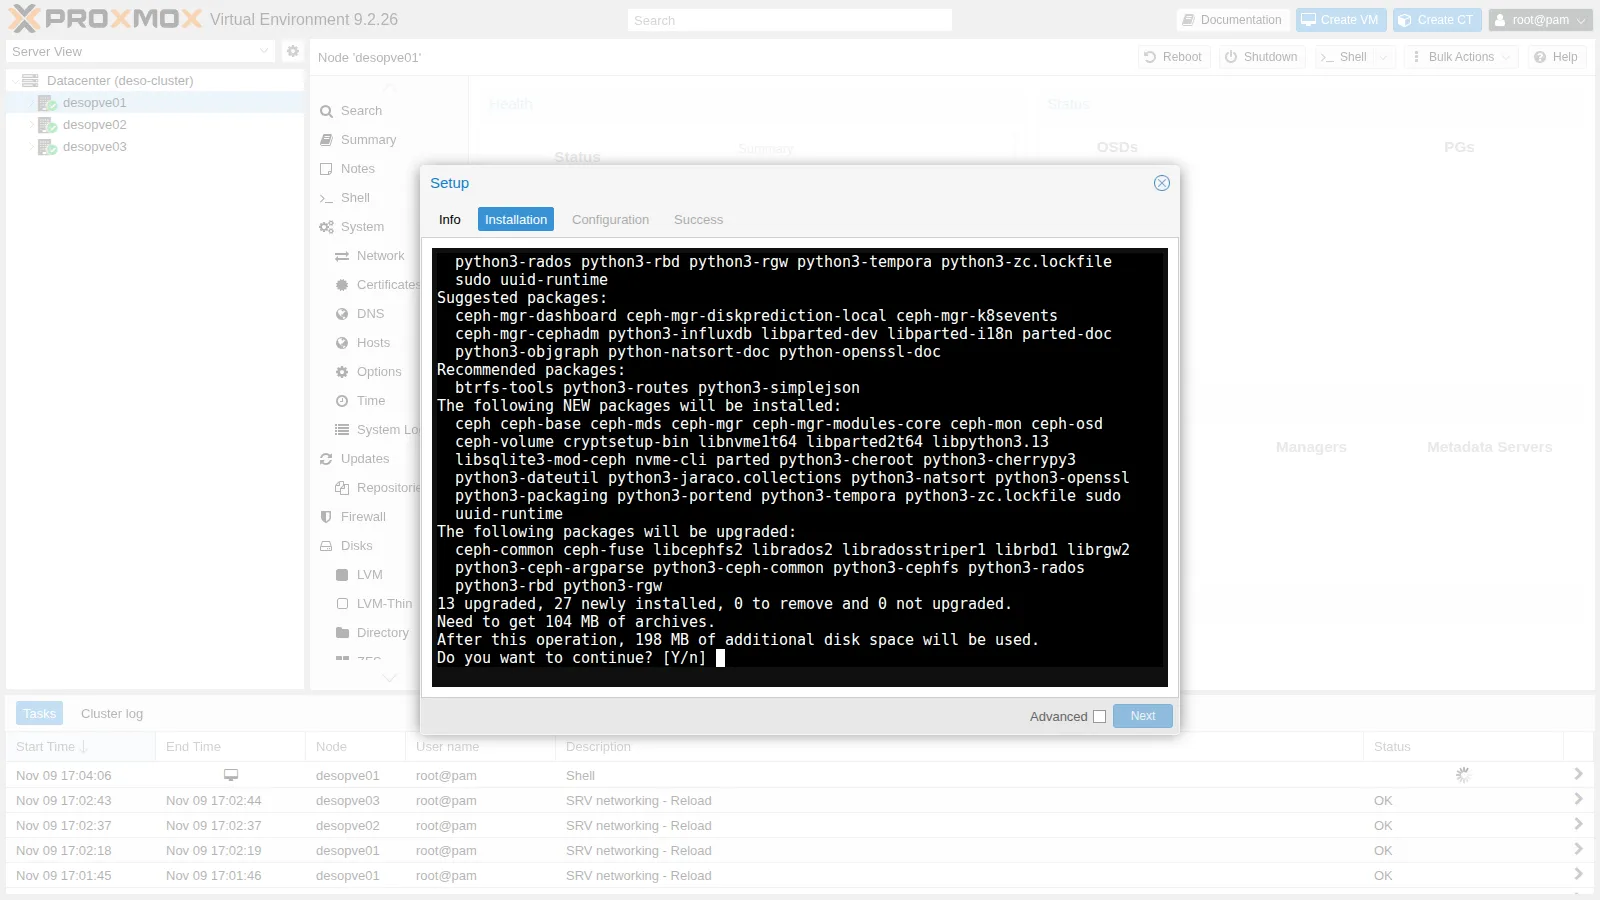
The installation takes about a minute: the packages come from
download.proxmox.comthrough the lab proxy. -
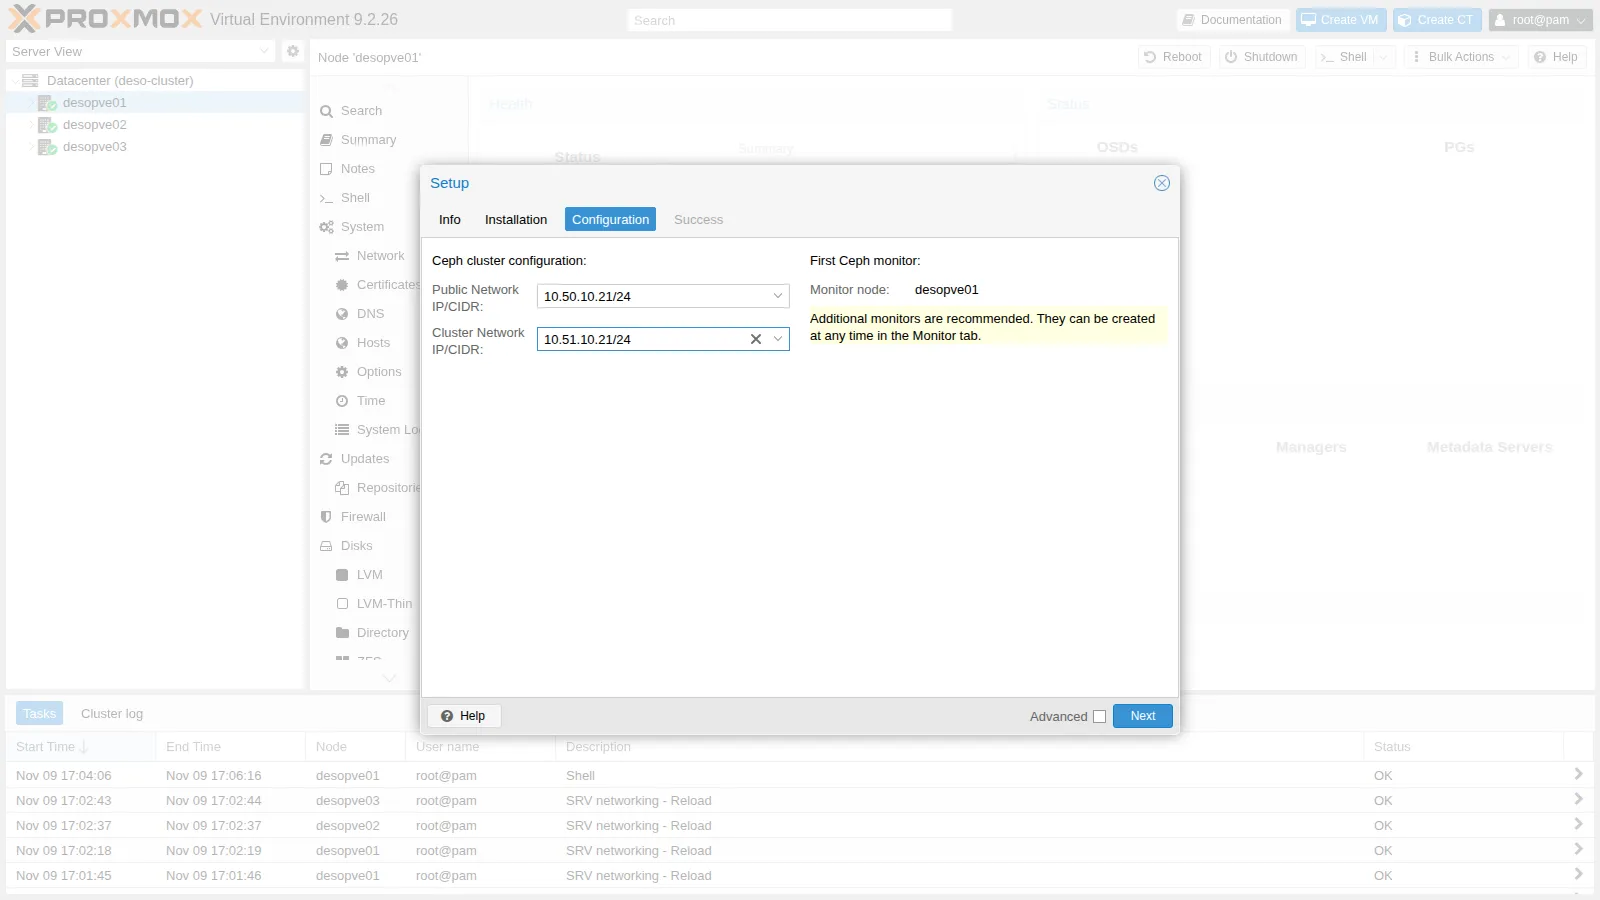
Next → Configuration: this is where you create the Ceph cluster configuration, only once for the whole cluster.
- Public Network IP/CIDR:
10.50.10.21/24(VLAN 50); - Cluster Network IP/CIDR:
10.51.10.21/24(VLAN 51). - The number of replicas and the minimum number of replicas stay at their defaults, 3 and 2 (they are in the Advanced options).
- Public Network IP/CIDR:
-
Next: Proxmox writes
/etc/pve/ceph.confand creates the first monitor and the first manager ondesopve01.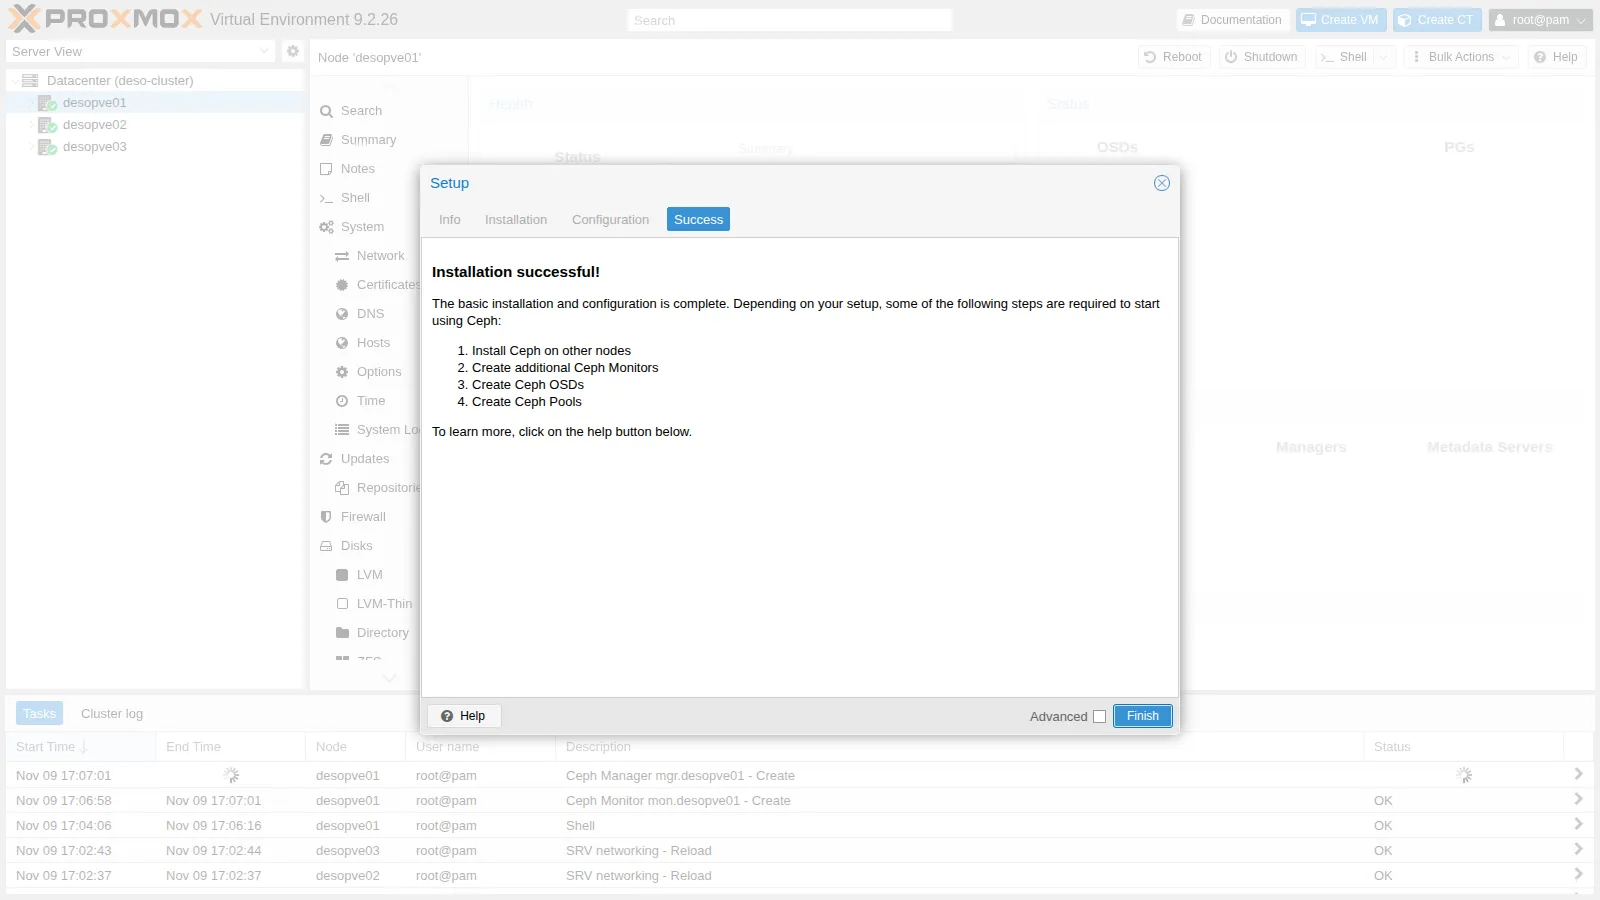
root@desopve01 cat /etc/pve/ceph.confOutput [global]auth_client_required = cephxauth_cluster_required = cephxauth_service_required = cephxcluster_network = 10.51.10.21/24fsid = cfd9bc4d-a092-487e-9c25-2a042c84bbbfmon_allow_pool_delete = truemon_host = 10.50.10.21ms_bind_ipv4 = truems_bind_ipv6 = falseosd_pool_default_min_size = 2osd_pool_default_size = 3public_network = 10.50.10.21/24...- The file lives in
/etc/pve, so it is already identical on all the nodes of the Proxmox cluster. - The networks are written with the node’s address (
10.50.10.21/24): Ceph uses only the network part, that is 10.50.10.0/24, so the setting works for every node.
- The file lives in
-
On the other two nodes install the packages from the command line, confirming with Y:
root@desopve02 pveceph install --repository no-subscription --version tentacleOutput ...reloading API to load new Ceph RADOS library...root@desopve02 ceph --versionOutput ceph version 20.2.5 (18a25ea6153a998538b0b02f656cd62b4cadaca4) tentacle (stable)There is no need to repeat the configuration: the nodes read
ceph.conffrom/etc/pve.
3. Monitors and managers on all nodes
Section titled “3. Monitors and managers on all nodes”-
Ceph → Monitor → Create (Monitor panel), Host
desopve02. Then Create in the Manager panel, again fordesopve02.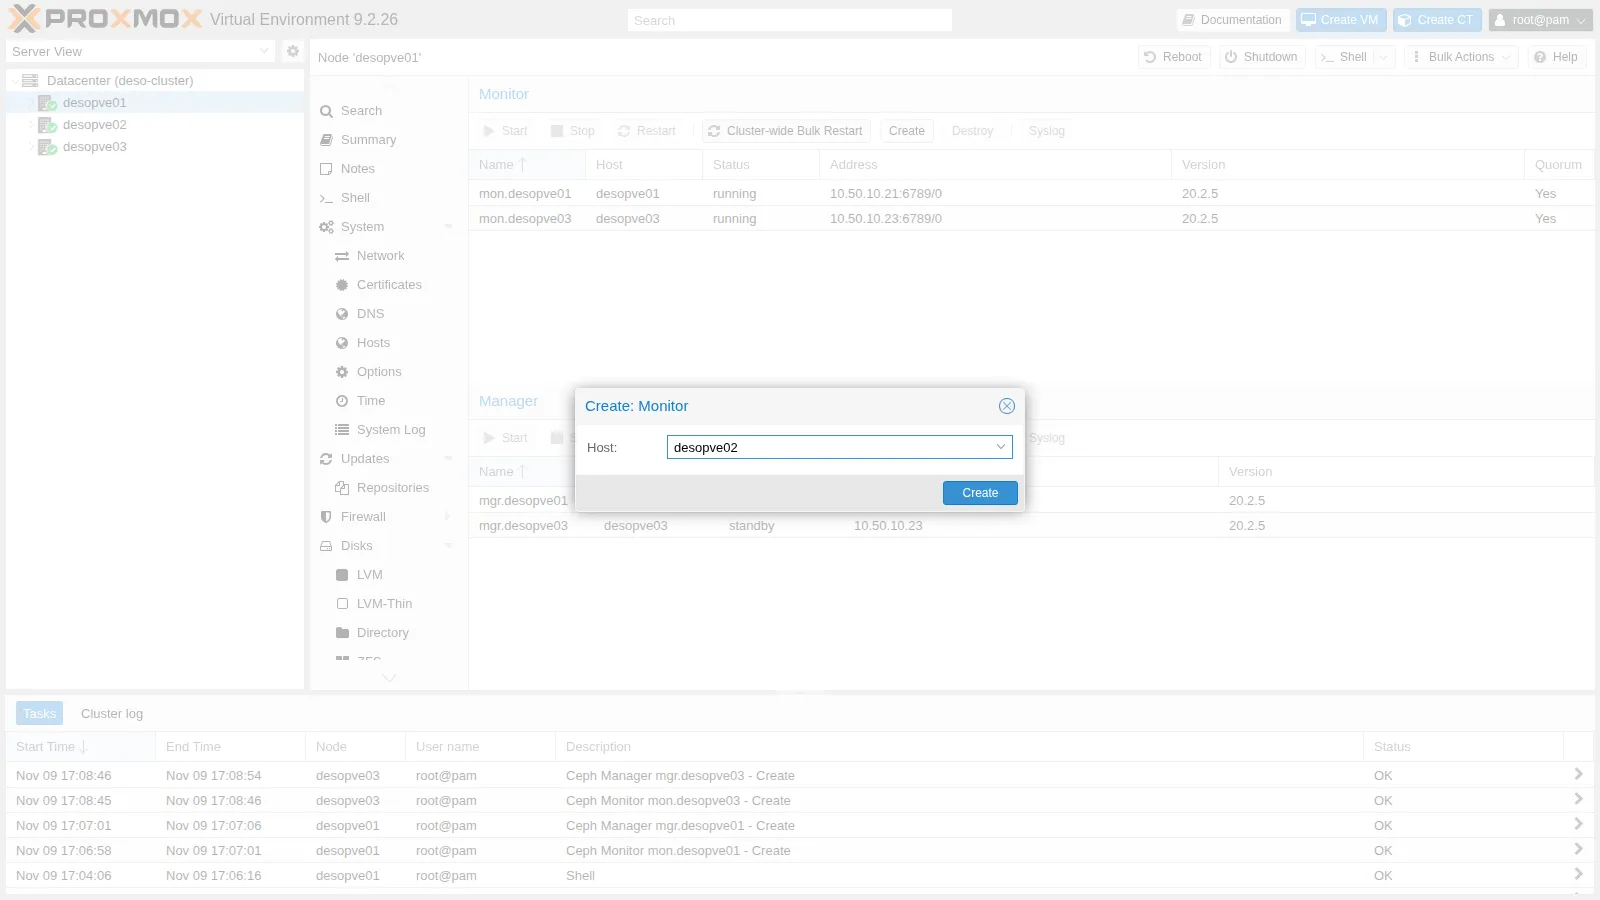
-
For
desopve03use the command line:root@desopve03 pveceph mon createOutput monmaptool: writing epoch 1 to /tmp/monmap (2 monitors)...root@desopve03 pveceph mgr createOutput starting service '[email protected]' -
The result: three monitors in quorum and three managers, one active and two on standby.
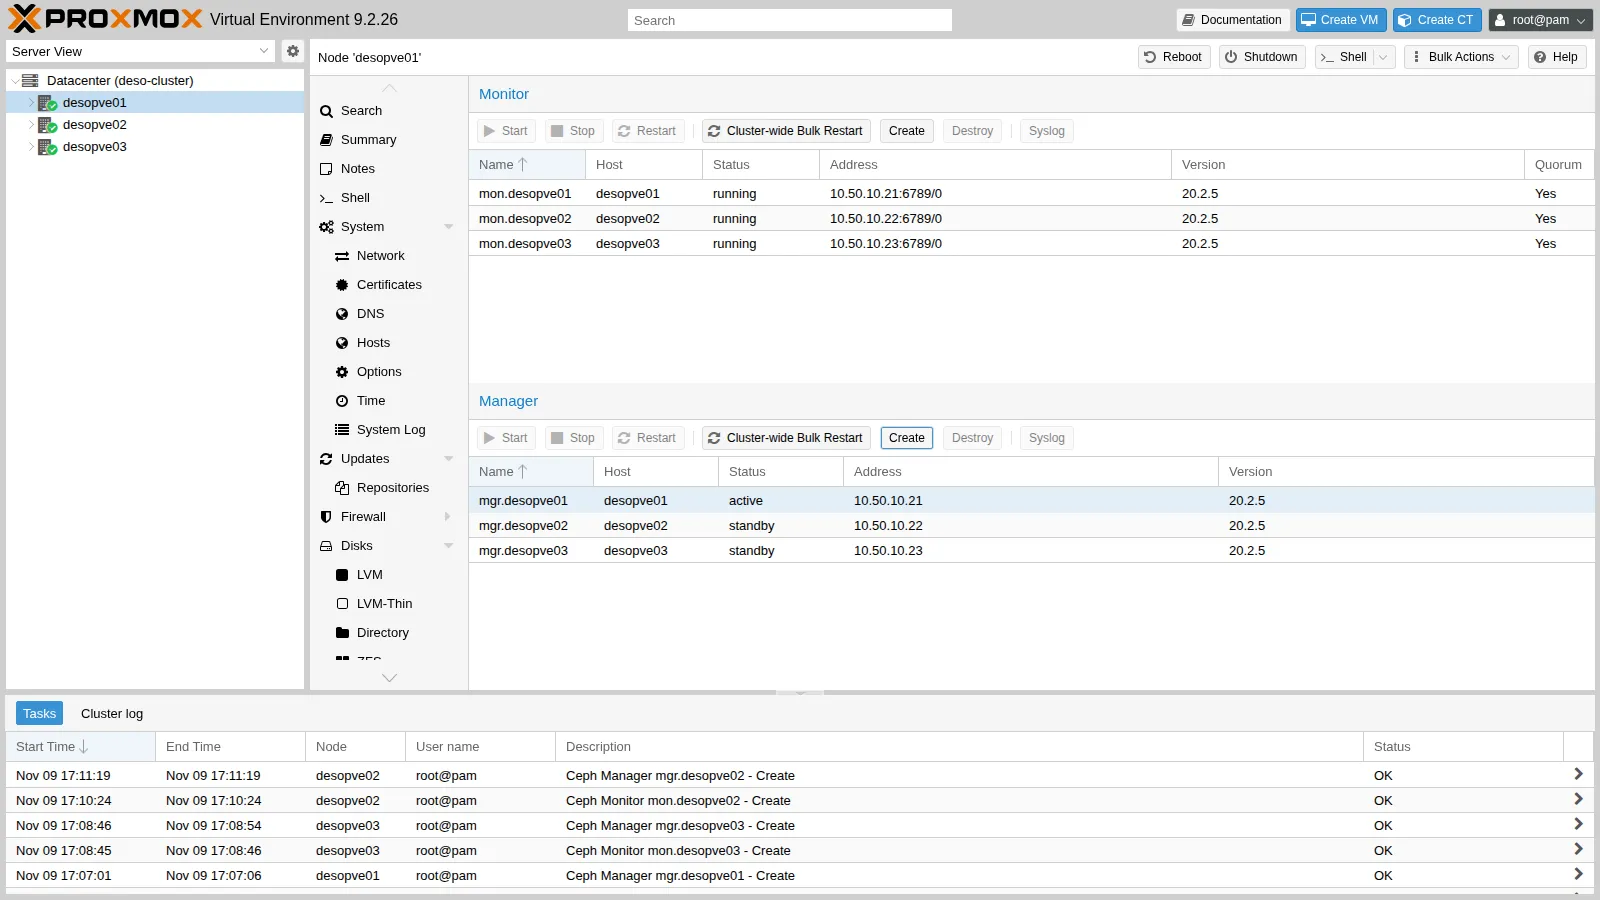
root@desopve01 ceph mon statOutput e3: 3 mons at {desopve01=[v2:10.50.10.21:3300/0,v1:10.50.10.21:6789/0],desopve02=[v2:10.50.10.22:3300/0,v1:10.50.10.22:6789/0],desopve03=[v2:10.50.10.23:3300/0,v1:10.50.10.23:6789/0]} removed_ranks: {} disallowed_leaders: {}, election epoch 12, leader 0 desopve01, quorum 0,1,2 desopve01,desopve03,desopve02The monitors listen on the Ceph public network (10.50.10.x), not on the management network.
4. The OSDs
Section titled “4. The OSDs”-
Node desopve01 → Ceph → OSD → Create: OSD. Disk
/dev/sdc, DB Disk use OSD disk: the BlueStore DB and WAL stay on the same disk.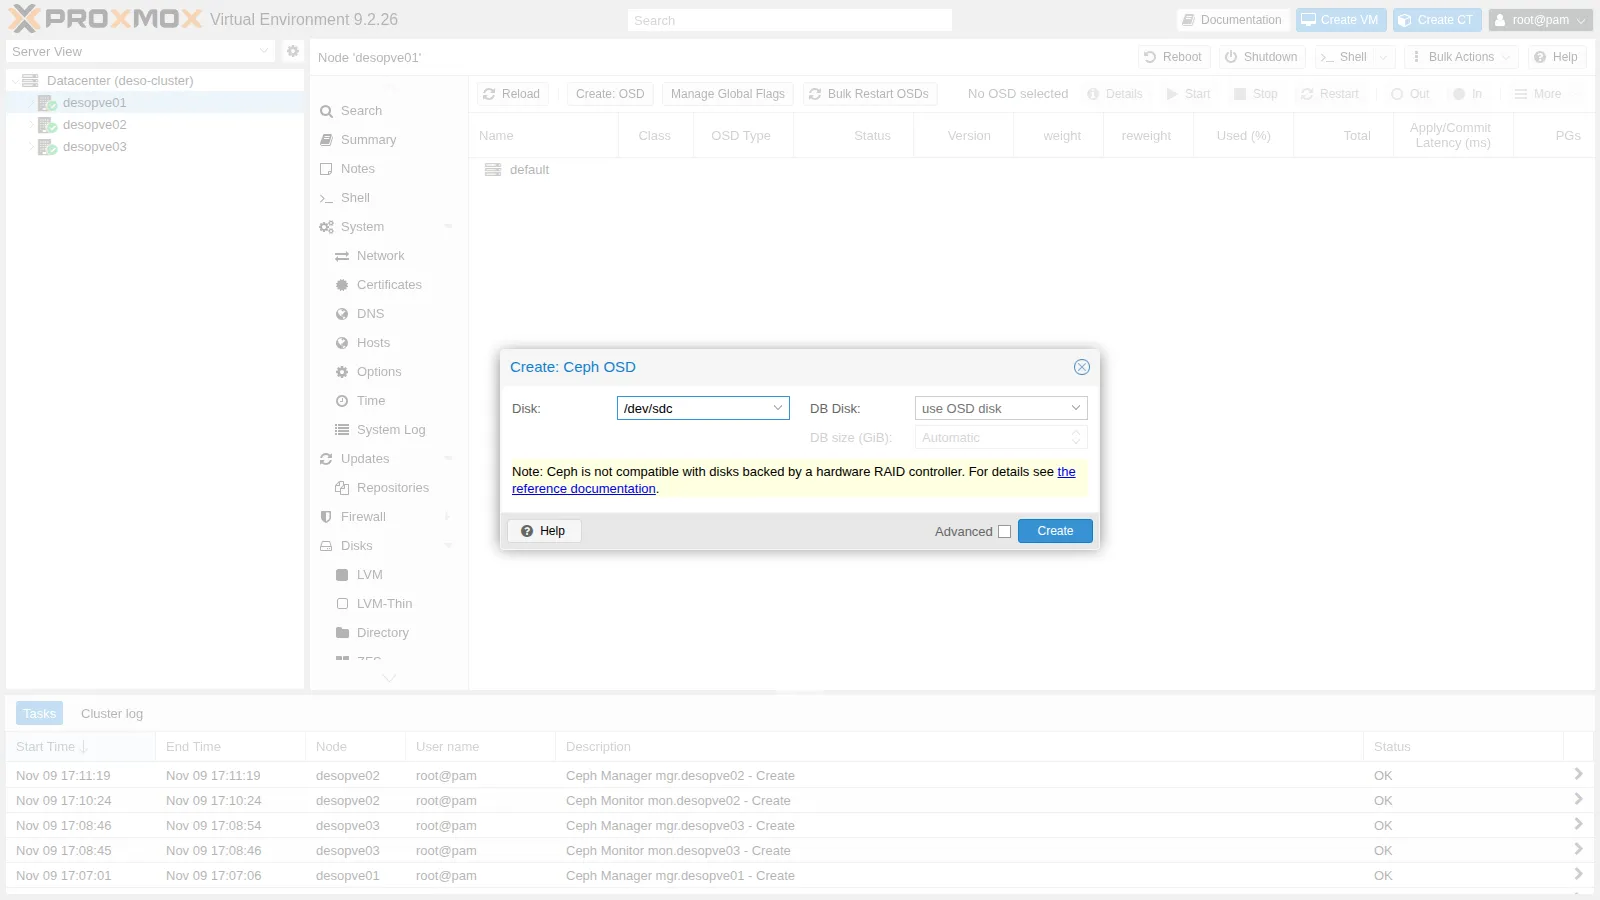
In production, with spinning disks, you put the DB on a fast SSD (DB Disk); with all-SSD or NVMe disks you do not need to. The note in the dialog reminds you that Ceph wants direct access to the disks: no hardware RAID controllers.
-
Create the other five OSDs from the command line, two per node:
root@desopve01 pveceph osd create /dev/sddOutput ...--> ceph-volume lvm create successful for: /dev/sddroot@desopve02 pveceph osd create /dev/sdcpveceph osd create /dev/sddroot@desopve03 pveceph osd create /dev/sdcpveceph osd create /dev/sddEvery command ends with the same
ceph-volume lvm create successfulline.Each OSD is an LVM volume that
ceph-volumecreates on the whole disk, with BlueStore as its format:root@desopve01 ceph-volume lvm list /dev/sdc | grep -E "osd id|objectstore|block device"Output block device /dev/ceph-92836807-f4fd-4193-a256-dc9f557c2df7/osd-block-eff89a0e-fa94-462d-ad23-49e431295708objectstore bluestoreosd id 0 -
The OSD tree shows the hierarchy that CRUSH uses:
root default→ three hosts → two OSDs each.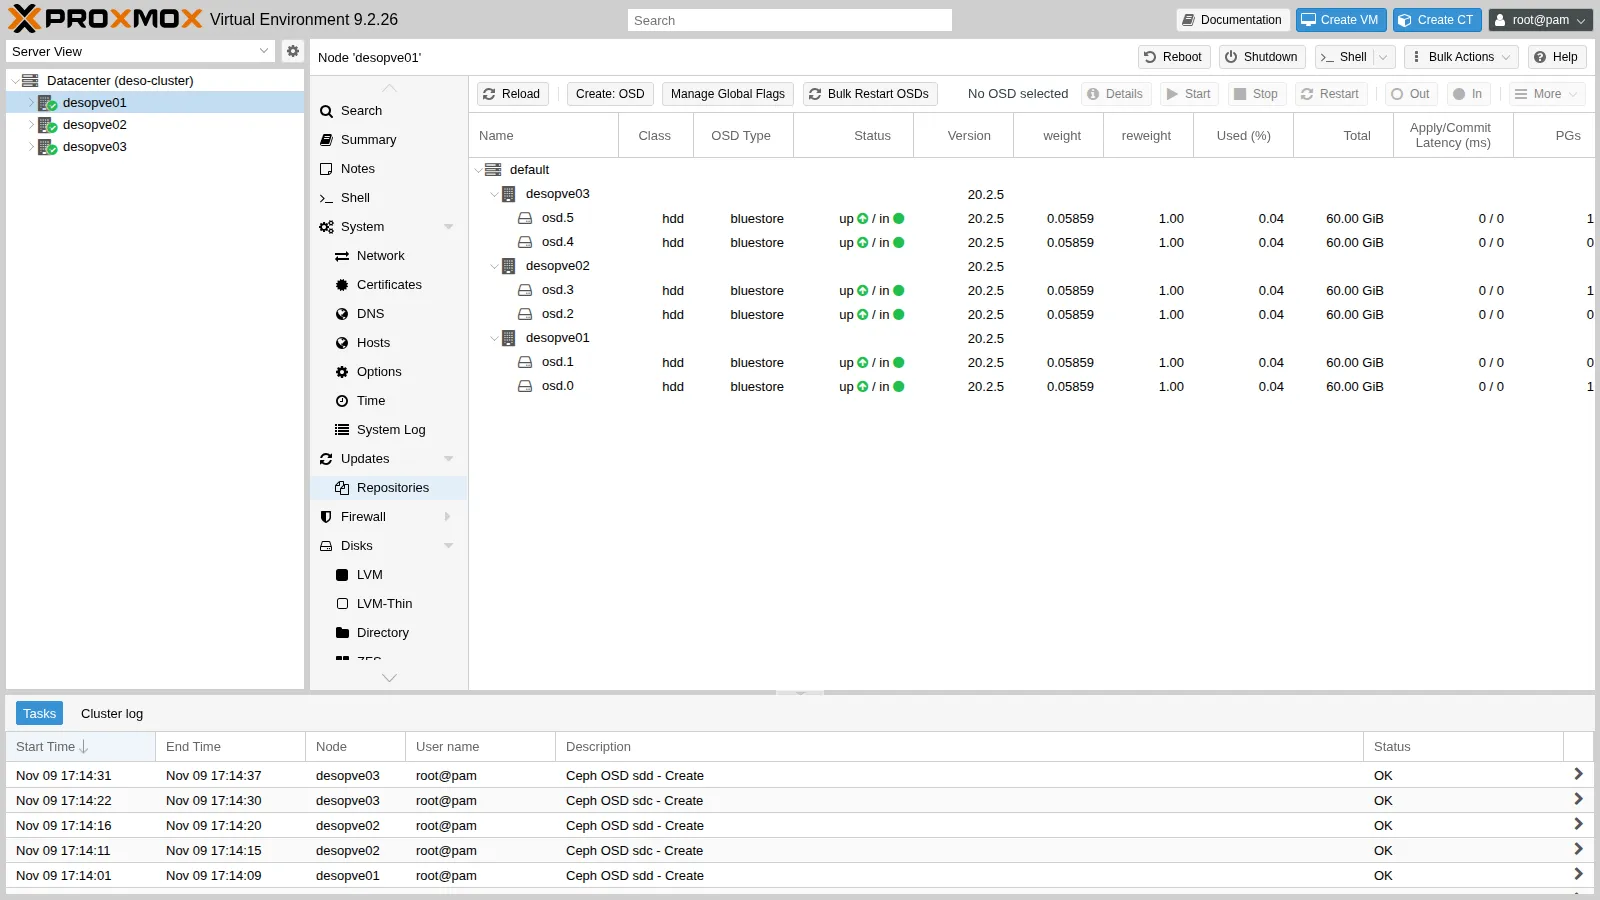
root@desopve01 ceph osd treeOutput ID CLASS WEIGHT TYPE NAME STATUS REWEIGHT PRI-AFF-1 0.35156 root default-3 0.11719 host desopve010 hdd 0.05859 osd.0 up 1.00000 1.000001 hdd 0.05859 osd.1 up 1.00000 1.00000-5 0.11719 host desopve022 hdd 0.05859 osd.2 up 1.00000 1.000003 hdd 0.05859 osd.3 up 1.00000 1.00000-7 0.11719 host desopve034 hdd 0.05859 osd.4 up 1.00000 1.000005 hdd 0.05859 osd.5 up 1.00000 1.00000- WEIGHT is the capacity in TiB (60 GiB = 0.0586 TiB): CRUSH distributes data in proportion to it.
- CLASS
hddis the automatically detected device class. In lab 18 we use it to build different CRUSH rules.
5. RBD pool and cluster storage
Section titled “5. RBD pool and cluster storage”-
Ceph → Pools → Create: Name
rbd-vm, Size 3, Min. Size 2, PG Autoscale Modeon, Add as Storage checked.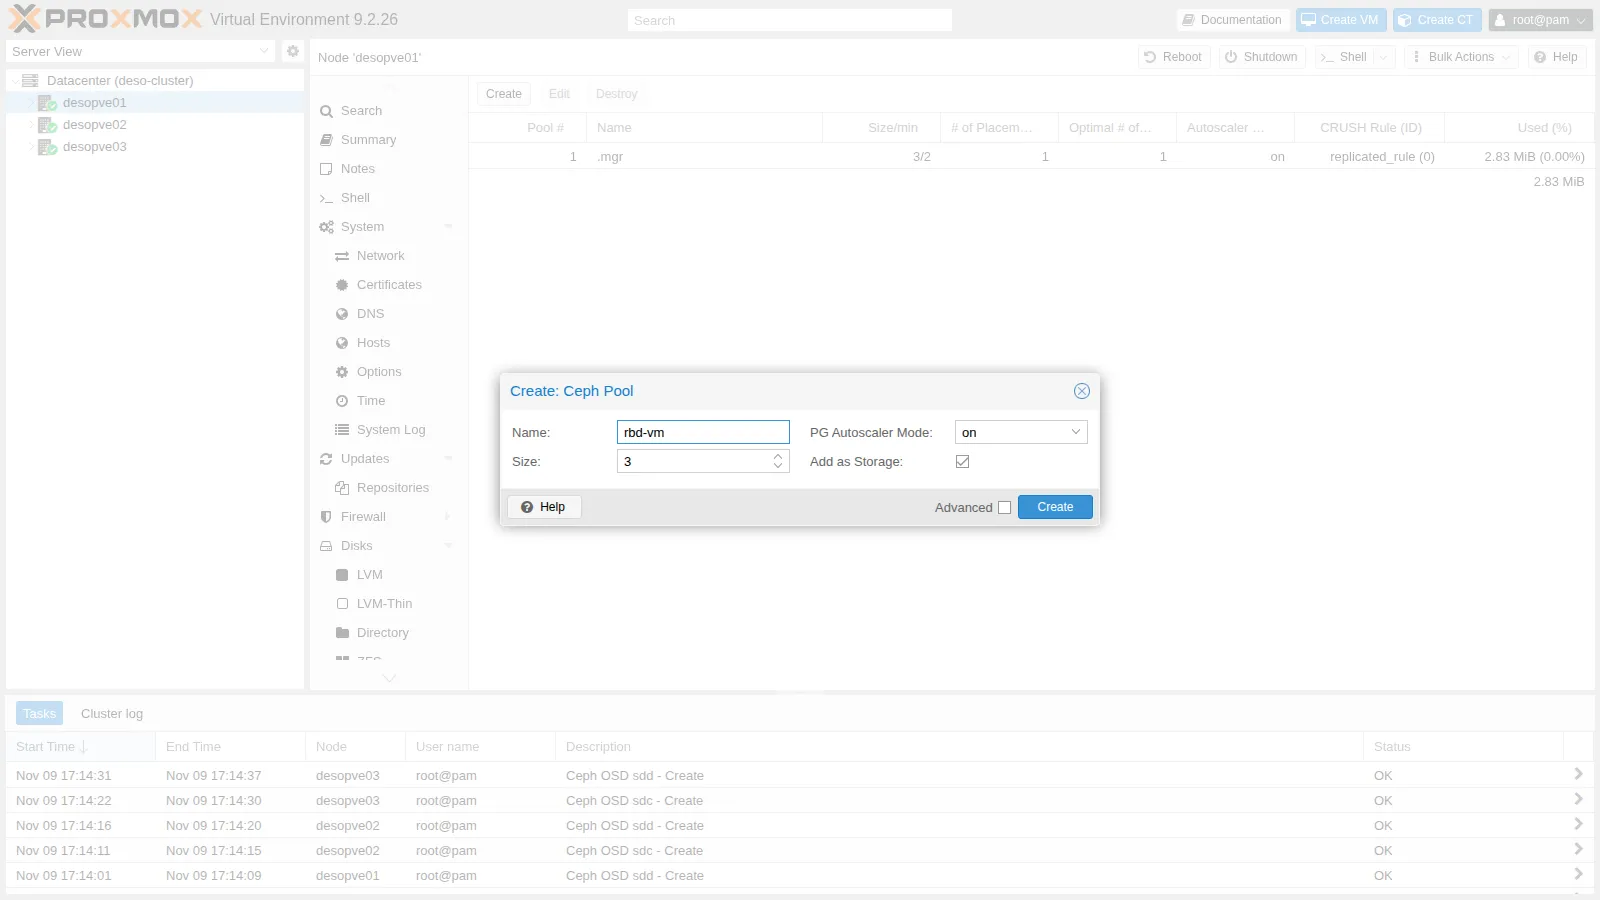
Add as Storage also creates the Proxmox storage
rbd-vm, available on all nodes for VM and container disks:root@desopve01 grep -A3 "rbd: rbd-vm" /etc/pve/storage.cfgOutput rbd: rbd-vmcontent rootdir,imageskrbd 0pool rbd-vm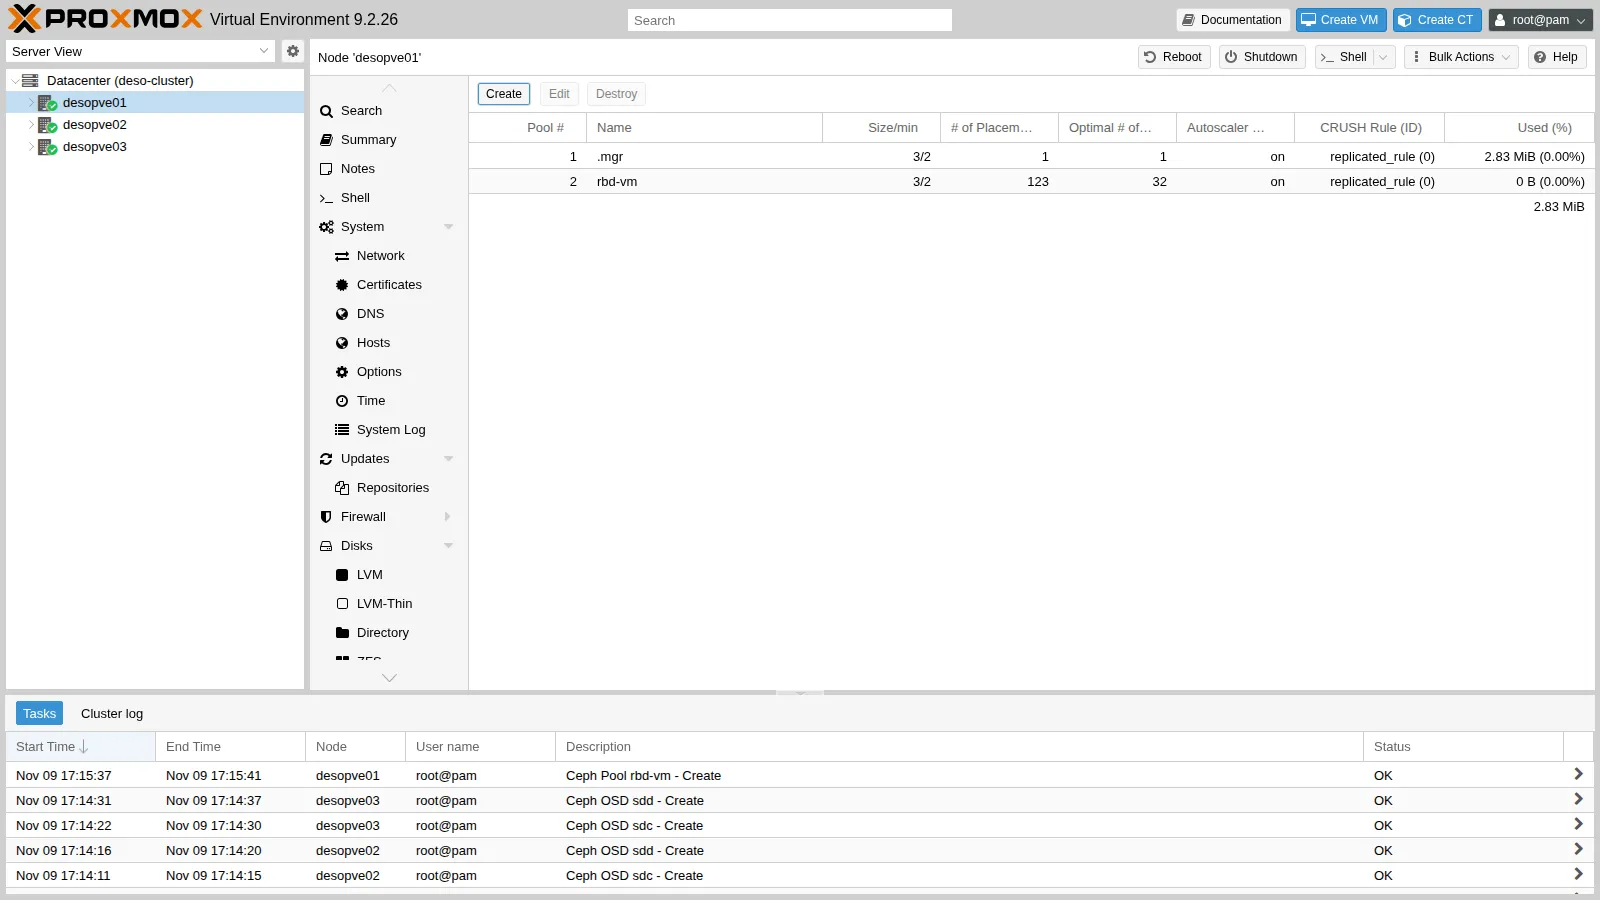
-
The pool starts with 128 PGs; the autoscaler sees an empty pool and immediately reduces them to 32. The autoscaler status below was captured after step 6, when the pool already contains the disk of VM 100:
root@desopve01 ceph osd pool autoscale-statusOutput POOL SIZE TARGET SIZE RATE RAW CAPACITY RATIO FINAL RATIO TARGET RATIO EFFECTIVE RATIO BIAS PG_NUM NEW PG_NUM AUTOSCALE BULK.mgr 966.6k 3.0 359.9G 0.0000 0.0050 1.0 1 on Falserbd-vm 6561M 3.0 359.9G 0.0534 0.1600 1.0 32 on False...Ceph creates the
.mgrpool for the manager modules: leave it alone. -
Ceph → Configuration shows
ceph.confand the CRUSH map: thereplicated_rulerule picks one OSD from each different host (chooseleaf_firstnof typehost).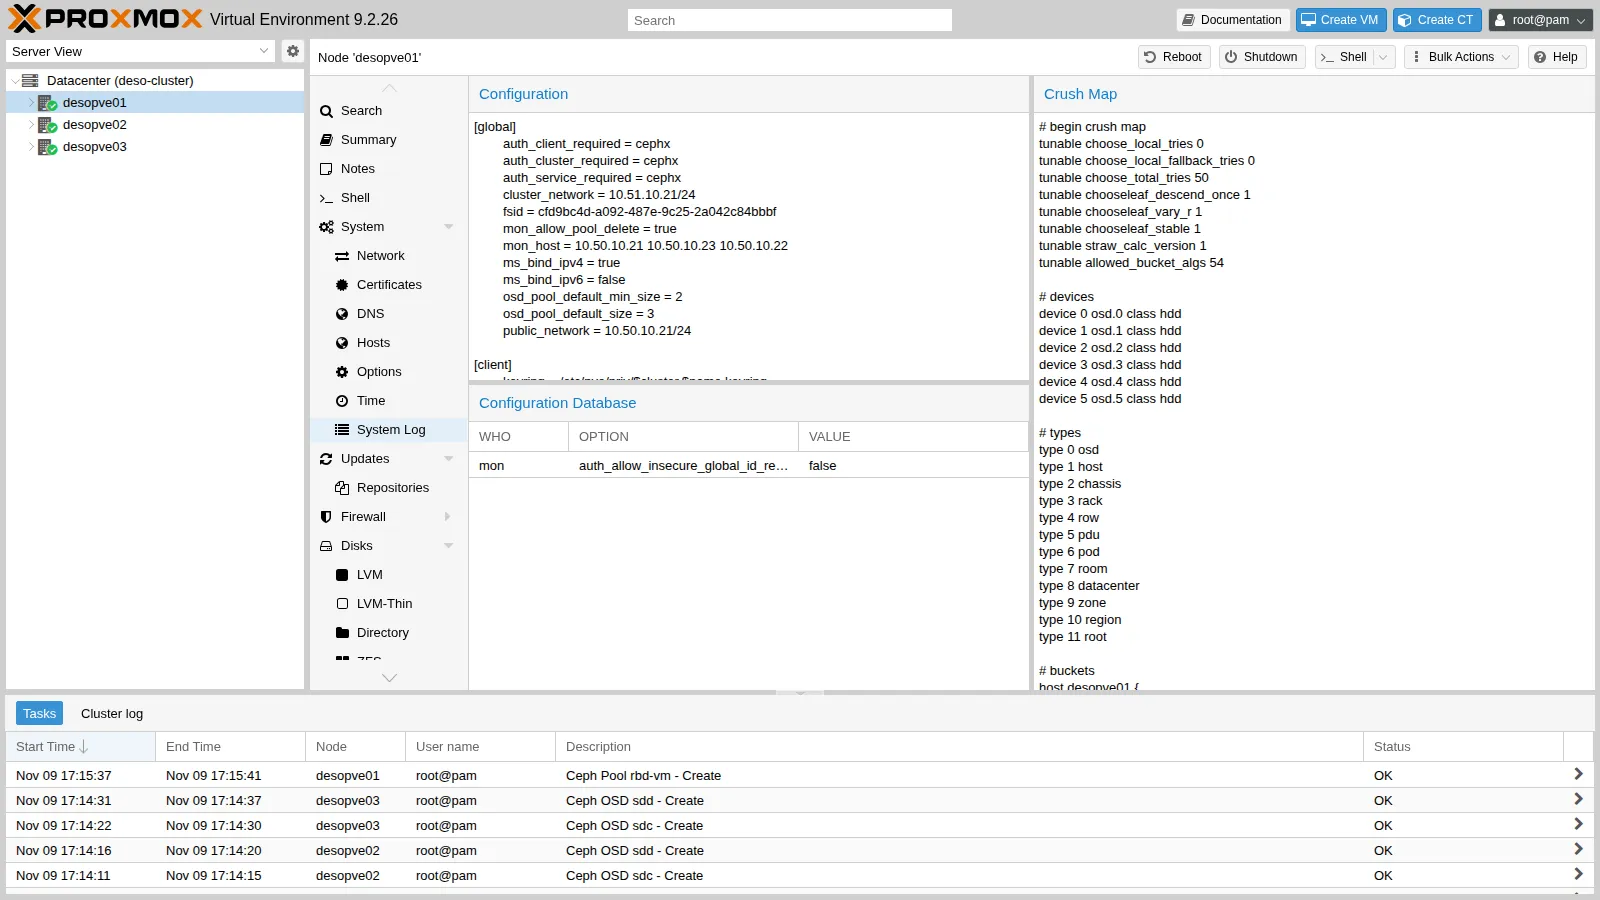
root@desopve01 ceph osd crush rule dump replicated_rule | grep -A2 chooseleafOutput "op": "chooseleaf_firstn","num": 0,"type": "host" -
The node’s Ceph page summarizes the status:
HEALTH_OK, 6 OSDs up and in, all PGsactive+clean, three monitors and three managers.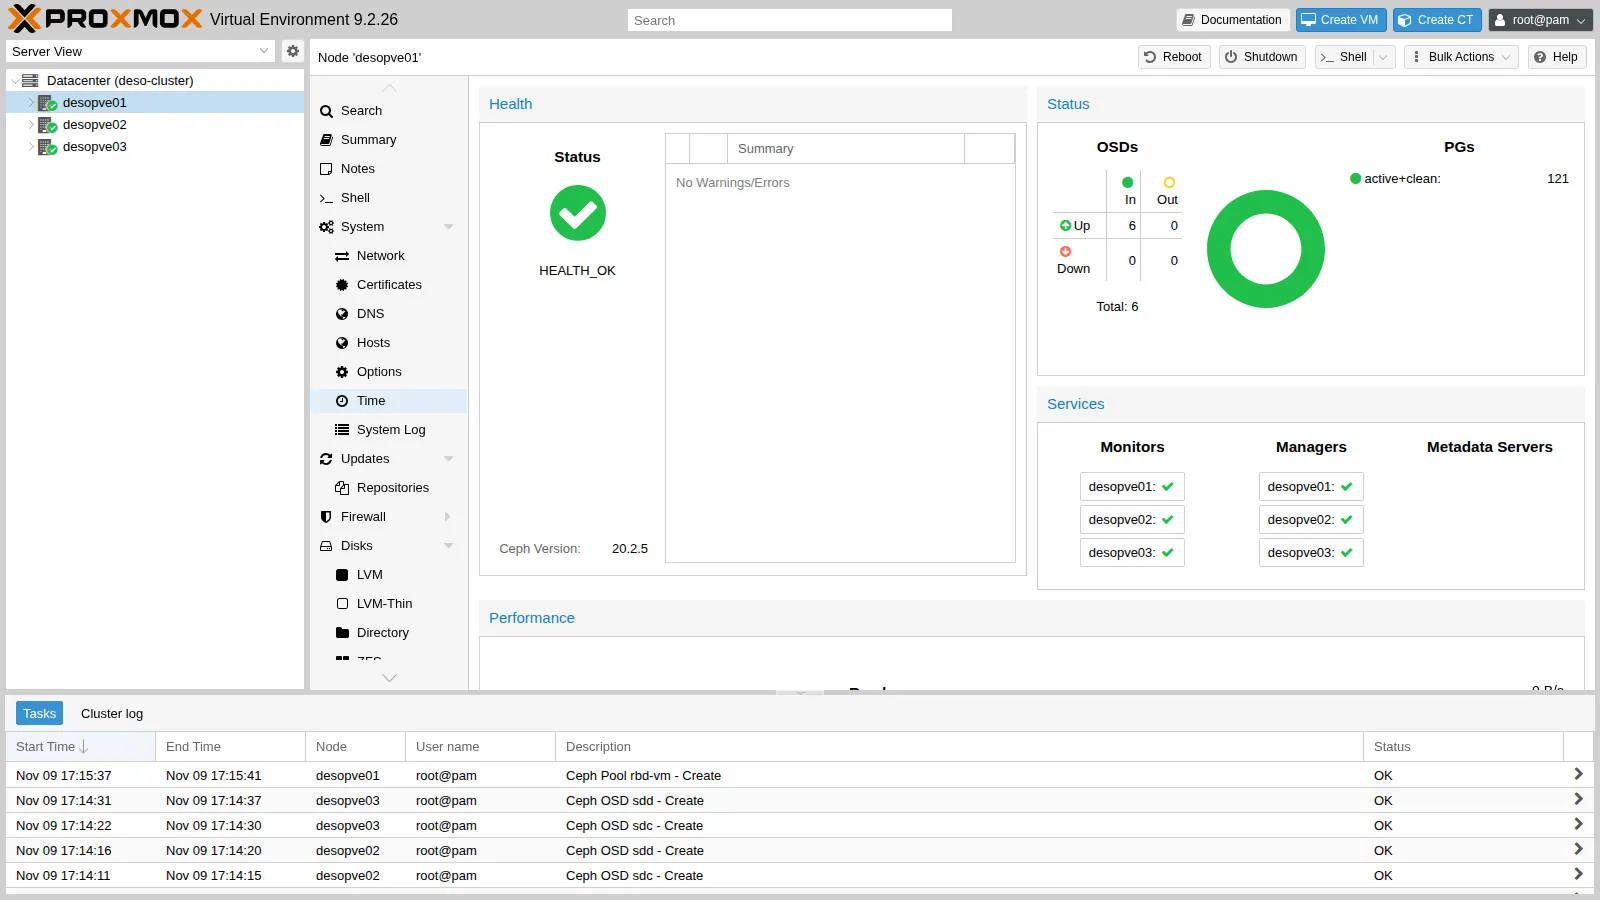
6. A VM on Ceph and migration without copying the disk
Section titled “6. A VM on Ceph and migration without copying the disk”-
Live-move the disk of VM 100 from
local-zfsto the RBD pool (as in lab 08):root@desopve01 time qm disk move 100 scsi0 rbd-vm --delete 1Output mirror-scsi0: Completed successfully.mirror-scsi0: mirror-job finishedremoving source volume 'local-zfs:vm-100-disk-0' after successful copyreal 3m55.737sroot@desopve01 rbd -p rbd-vm ls -lOutput NAME SIZE PARENT FMT PROT LOCKvm-100-disk-0 16 GiB 2 exclroot@desopve01 rbd info rbd-vm/vm-100-disk-0 | grep -E "size|order|features"Output size 16 GiB in 4096 objectsorder 22 (4 MiB objects)features: layering, exclusive-lock, object-map, fast-diff, deep-flatten- The disk is now an RBD image made of 4096 objects of 4 MiB each, every one of them replicated three times.
exclindicates the exclusive lock: only the node running the VM can write to it.
-
Live-migrate the VM to
desopve02: Migrate → Target nodedesopve02. The dialog does not ask for a target storage: the disk is already shared.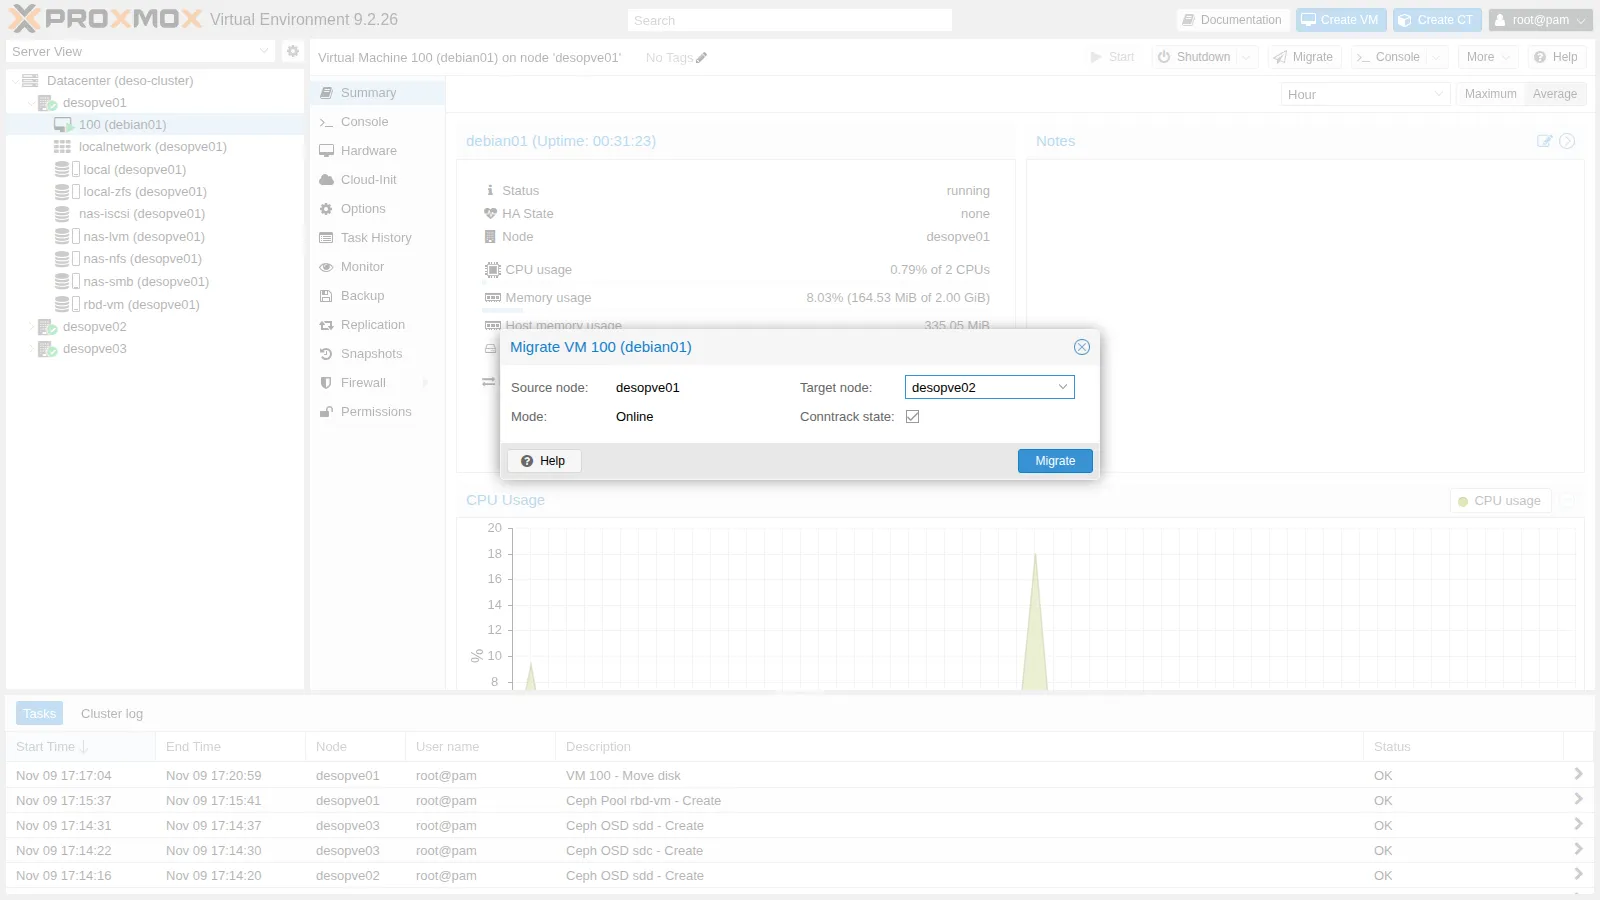
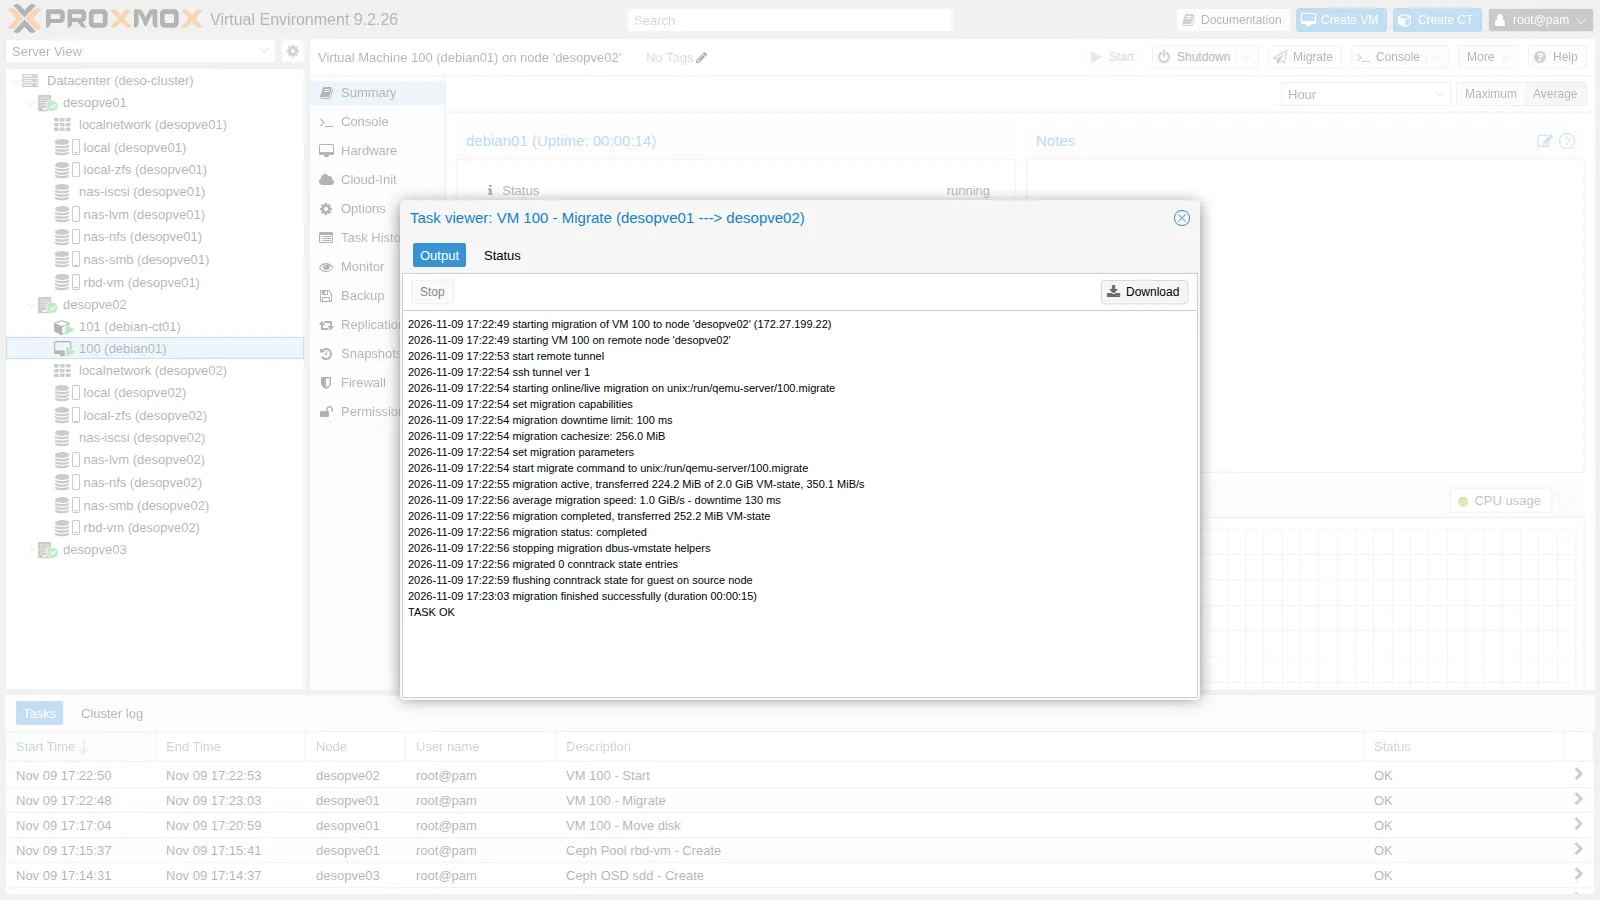 2026-11-09 17:22:54 migration downtime limit: 100 ms2026-11-09 17:22:56 average migration speed: 1.0 GiB/s - downtime 130 ms2026-11-09 17:23:03 migration finished successfully (duration 00:00:15)
Only the VM’s RAM is transferred: the disk stays on Ceph. The three figures in the log measure different things, as Lab 48 explains: the task took 15 seconds; the 130 ms are the downtime QEMU reports for the final switchover, not the pause a client sees; and the
average migration speedis not a measured throughput but the guest’s total RAM divided by the duration of the memory phase in whole seconds, so with 2 GiB of RAM 1.0 GiB/s only says that this phase lasted about 2 seconds. For comparison, in Lab 11 the same VM, with its 16 GiB disk on local storage, took 1 minute 13 seconds, 57 of them for the disk mirror. -
Move the VM back to
desopve01:root@desopve02 qm migrate 100 desopve01 --onlineOutput ...2026-11-09 17:25:55 migration finished successfully (duration 00:00:14)
7. CephFS for ISOs, templates and backups
Section titled “7. CephFS for ISOs, templates and backups”RBD provides block devices for VMs and containers. For files (ISOs, templates, backups) Ceph provides CephFS, a shared file system mounted on all nodes. CephFS needs at least one MDS.
-
Create two metadata servers, one active and one standby:
root@desopve01 pveceph mds createOutput starting service '[email protected]'root@desopve02 pveceph mds createOutput starting service '[email protected]' -
Ceph → CephFS → Create CephFS: Name
cephfs, Placement Groups 128, Add as Storage checked.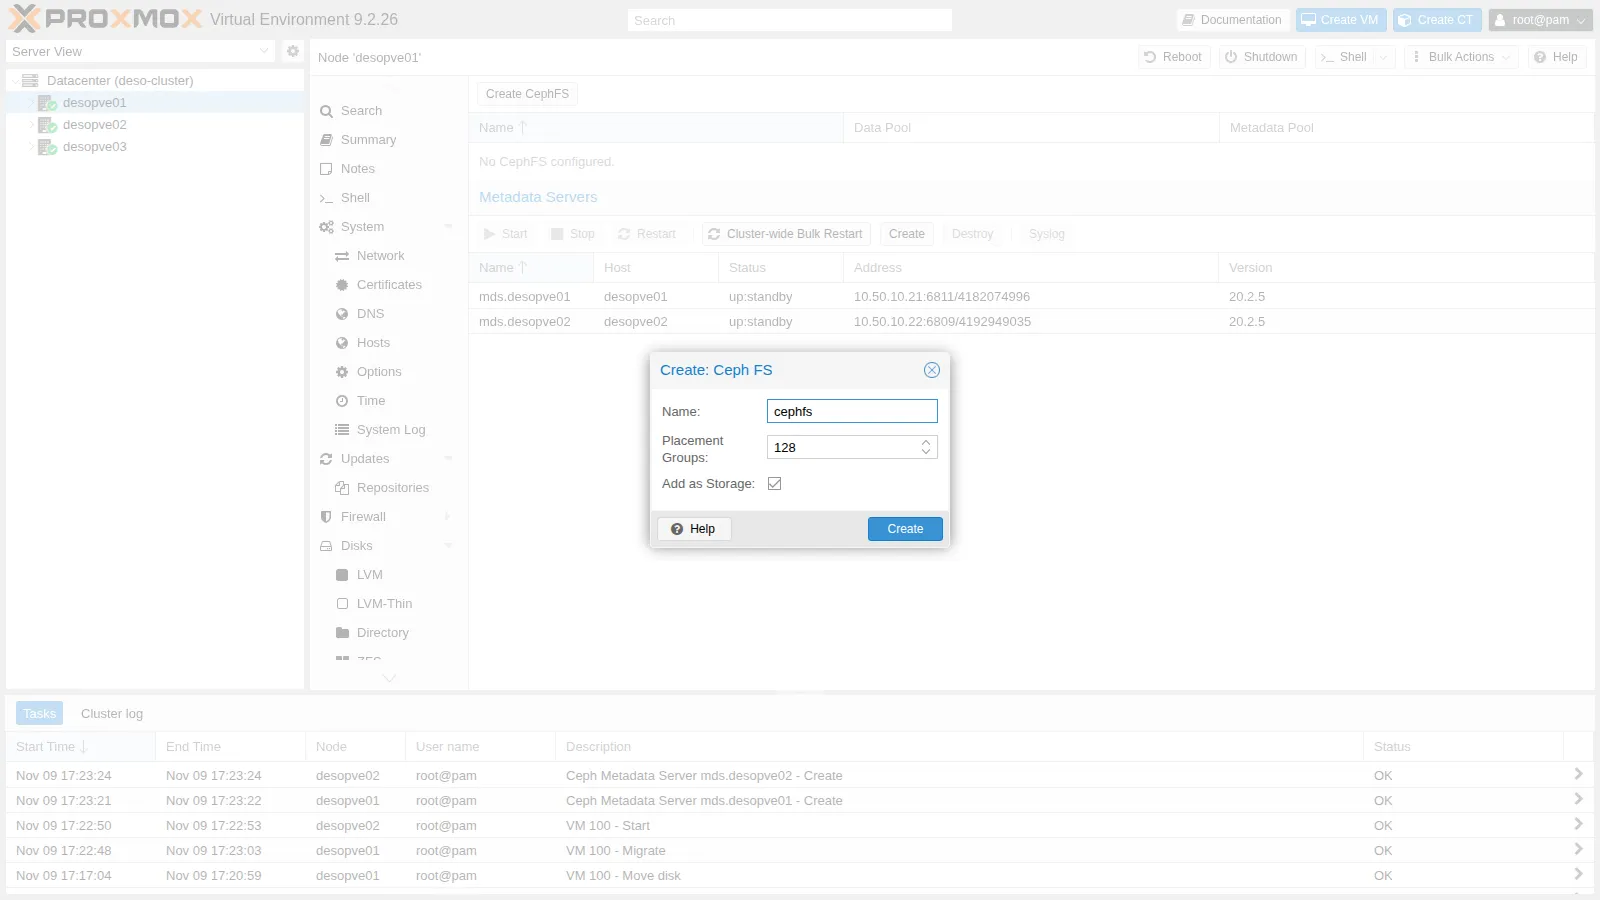
Proxmox creates two pools,
cephfs_datafor the contents andcephfs_metadatafor the metadata, plus thecephfsstorage, mounted at/mnt/pve/cephfson every node.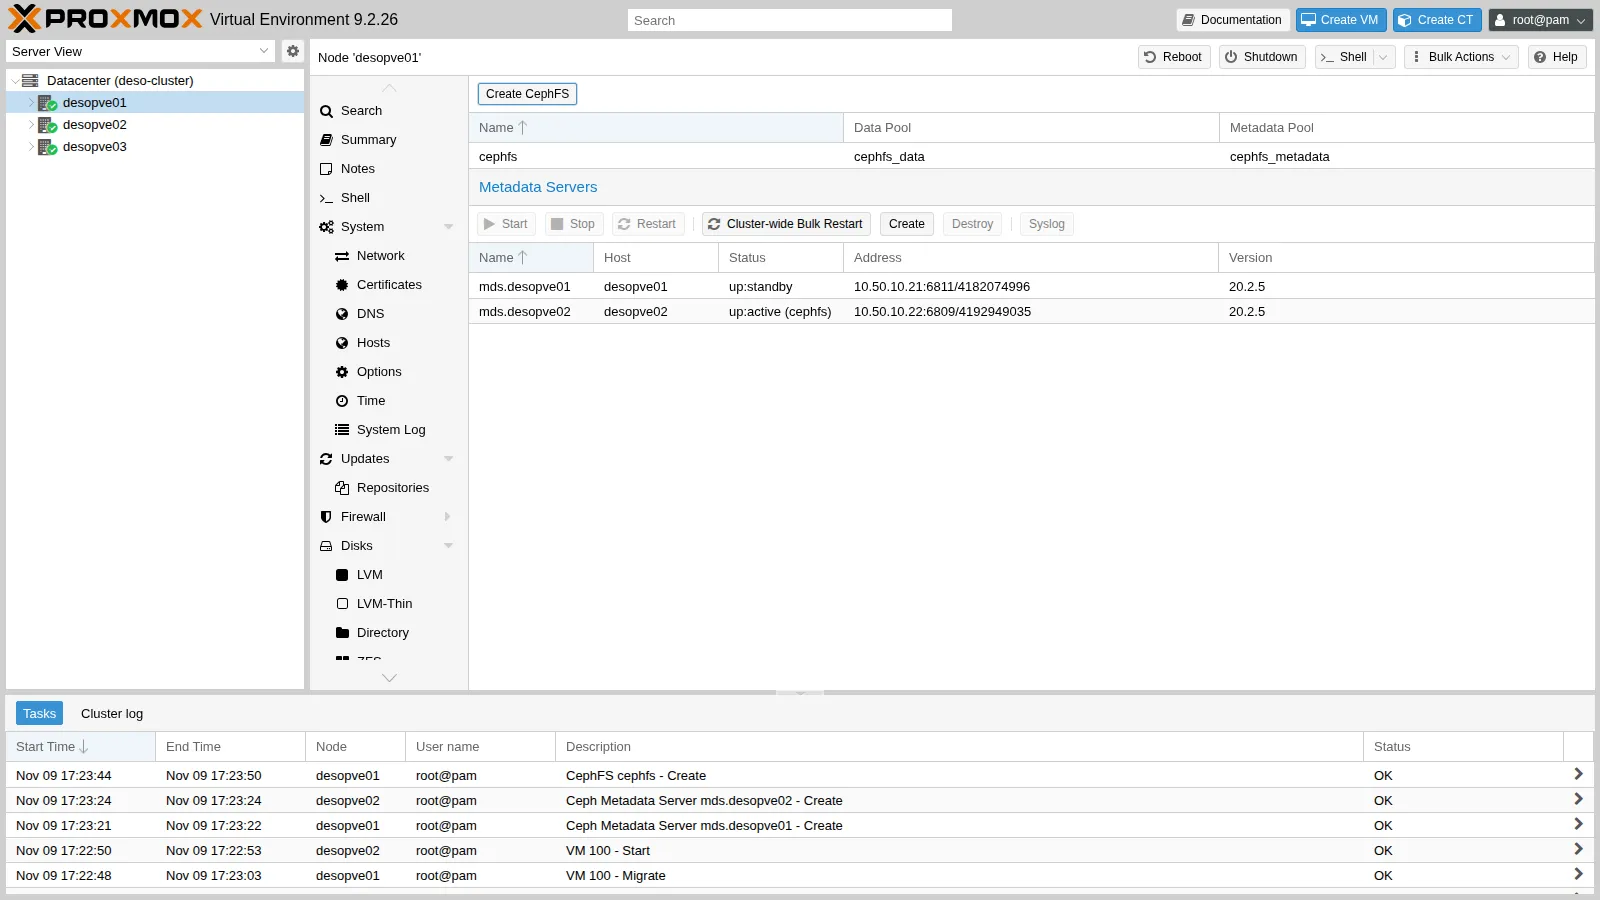
-
Check it and try copying the Debian ISO to it:
root@desopve01 ceph fs statusOutput cephfs - 3 clients======RANK STATE MDS ACTIVITY DNS INOS DIRS CAPS0 active desopve02 Reqs: 0 /s 14 17 16 15POOL TYPE USED AVAILcephfs_metadata metadata 174k 105Gcephfs_data data 0 105GSTANDBY MDSdesopve01root@desopve01 grep -A4 "cephfs: cephfs" /etc/pve/storage.cfgOutput cephfs: cephfspath /mnt/pve/cephfscontent iso,vztmpl,backupfs-name cephfsroot@desopve01 cp /mnt/pve/nas-smb/template/iso/debian-13.7.0-amd64-netinst.iso /mnt/pve/cephfs/template/iso/pvesm list cephfsOutput Volid Format Type Size VMIDcephfs:iso/debian-13.7.0-amd64-netinst.iso iso iso 792723456The ISO is now visible from all three nodes without depending on the NAS.
Verification and tests
Section titled “Verification and tests”-
Overall status:
root@desopve01 ceph -sOutput cluster:id: cfd9bc4d-a092-487e-9c25-2a042c84bbbfhealth: HEALTH_OKservices:mon: 3 daemons, quorum desopve01,desopve03,desopve02 (age 15m) [leader: desopve01]mgr: desopve01(active, since 18m), standbys: desopve03, desopve02mds: 1/1 daemons up, 1 standbyosd: 6 osds: 6 up (since 11m), 6 in (since 11m); 1 remapped pgsdata:volumes: 1/1 healthypools: 4 pools, 183 pgsobjects: 1.71k objects, 6.5 GiBusage: 20 GiB used, 340 GiB / 360 GiB availpgs: 183 active+cleanThe
1 remapped pgsline, like theactive+remapped+backfillingstate that can appear for a few minutes while the pools are being created, means that the autoscaler is changing the number of PGs and moving data around. This is normal and resolves itself. -
How much space there really is:
root@desopve01 ceph dfOutput --- RAW STORAGE ---CLASS SIZE AVAIL USED RAW USED %RAW USEDhdd 360 GiB 340 GiB 20 GiB 20 GiB 5.48TOTAL 360 GiB 340 GiB 20 GiB 20 GiB 5.48--- POOLS ---POOL ID PGS STORED OBJECTS USED %USED MAX AVAIL.mgr 1 1 961 KiB 2 2.8 MiB 0 106 GiBrbd-vm 2 41 6.4 GiB 1.69k 19 GiB 5.71 106 GiBcephfs_data 3 108 0 B 1 0 B 0 106 GiBcephfs_metadata 4 32 52 KiB 22 243 KiB 0 106 GiB- Raw: 6 disks × 60 GiB = 360 GiB.
- STORED versus USED: the VM disk holds 6.4 GiB of data, which take up 19 GiB with three copies.
- MAX AVAIL 106 GiB: about a third of the free space (340 / 3 = 113 GiB), minus the margin Ceph keeps so that the OSDs never fill up (full ratio). With 3-way replication you can use a third of the raw capacity.
-
Distribution across the OSDs:
root@desopve01 ceph osd dfOutput ID CLASS WEIGHT REWEIGHT SIZE RAW USE DATA OMAP META AVAIL %USE VAR PGS STATUS0 hdd 0.05859 1.00000 60 GiB 2.5 GiB 2.5 GiB 289 KiB 61 MiB 57 GiB 4.19 0.77 94 up1 hdd 0.05859 1.00000 60 GiB 4.1 GiB 4.0 GiB 287 KiB 96 MiB 56 GiB 6.76 1.23 88 up2 hdd 0.05859 1.00000 60 GiB 2.6 GiB 2.5 GiB 184 KiB 61 MiB 57 GiB 4.30 0.79 100 up3 hdd 0.05859 1.00000 60 GiB 4.0 GiB 3.9 GiB 281 KiB 96 MiB 56 GiB 6.65 1.21 82 up4 hdd 0.05859 1.00000 60 GiB 3.4 GiB 3.3 GiB 280 KiB 96 MiB 57 GiB 5.61 1.02 86 up5 hdd 0.05859 1.00000 60 GiB 3.2 GiB 3.1 GiB 280 KiB 61 MiB 57 GiB 5.35 0.98 96 upTOTAL 360 GiB 20 GiB 19 GiB 1.6 MiB 473 MiB 340 GiB 5.48Each host holds about a third of the data: this is the effect of the per-host CRUSH rule.
-
Migration: VM 100 moves between nodes without copying its disk: a 15-second task, with 130 ms of downtime reported by QEMU.
Final lab state
Section titled “Final lab state”- Network: on
desopve01-03thenic2card carries two VLANs without a gateway:nic2.50(10.50.10.21-23/24, Ceph public network) andnic2.51(10.51.10.21-23/24, cluster network). - Ceph Tentacle 20.2.5 on
desopve01-03,HEALTH_OK:- 3 MONs and 3 MGRs (active on
desopve01), 2 MDSs (active ondesopve02, standby ondesopve01); - 6 BlueStore OSDs on
/dev/sdcand/dev/sddof each node (osd.0-osd.5), classhdd; - pool
rbd-vm(3/2 replication, autoscaler on) and poolscephfs_data/cephfs_metadata.
- 3 MONs and 3 MGRs (active on
- Cluster storage:
rbd-vm(RBD, VM and container disks) andcephfs(ISOs, templates, backups) are added;cephfsholds the Debian 13.7 ISO. - VM 100
debian01: running ondesopve01, with its disk onrbd-vm:vm-100-disk-0. It is no longer onlocal-zfs. - CT 101: unchanged, running on
desopve02. desopve04: unchanged, outside the cluster.
What you learned
Section titled “What you learned”- Ceph combines the disks of several nodes: the MONs keep the map and the quorum, the OSDs write and replicate the data, the MGRs collect statistics, and the MDSs are needed only for CephFS.
- A pool’s data is split into PGs, and CRUSH distributes them across the hosts according to a rule. With 3/2 replication you can use a third of the raw capacity.
- The Proxmox wizard installs Ceph and writes
ceph.confto/etc/pve, so the whole cluster shares it. The other nodes only need the packages. - Ceph networks should be kept separate from management: with VLANs, a single network card is enough.
- With its disk on RBD, a VM migrates in a few seconds, because only its RAM moves.
- CephFS gives all nodes shared space for ISOs, templates and backups, without an external NAS.