

Lab 09 – LVM and LVM-thin
Dependencies
Section titled “Dependencies”- Previous labs: Lab 08: storage model, thin provisioning.
- Nodes:
desopve04(standalone node,172.27.199.24), used as a storage test bed. - Hardware: four 20 GB disks, to be hot-plugged into the free hot-swap bays of
desopve04in step 2 (see the lab hardware). They will becomesdb,sdc,sddandsde. - Template: the Debian 13 template in the
localstorage ofdesopve04. You can download it from the GUI as in Lab 07, or from the command line:pveam updaterefreshes the list,pveam available --section system | grep debian-13shows the current name (in this labdebian-13-standard_13.6-1_amd64.tar.zst) andpveam download local <name>downloads it. - Addresses:
172.27.199.140for the test container. - Credentials:
root/<lab-password>→ Appendix B.
Objectives
Section titled “Objectives”- Understand the three layers of LVM (PV, VG, LV) and the difference between thick and thin LVM.
- Create a volume group and a thin pool from the web interface and inspect them from the command line.
- Extend a volume group with a new disk.
- See what happens when an overprovisioned thin pool fills up, and how to recover.
- Prevent the problem with monitoring and automatic extension.
How it works
Section titled “How it works”PV, VG and LV
Section titled “PV, VG and LV”LVM (Logical Volume Manager) adds a layer between the disks and the volumes:
disks /dev/sdb /dev/sdc │ │ PV physical volume physical volume pvcreate, pvs └──────┬────────┘ VG volume group (pooled space) vgcreate, vgextend, vgs ┌───────┼────────┐ LV logical volume logical volume lvcreate, lvextend, lvs- A PV is a disk (or a partition) prepared for LVM.
- A VG combines one or more PVs into a single space, which can be grown by adding disks.
- An LV is a “slice” of the VG, seen by the system as a block device: for Proxmox VE, the disk of a VM or a container.
Thick LVM and LVM-thin
Section titled “Thick LVM and LVM-thin”LVM (lvm) |
LVM-thin (lvmthin) |
|
|---|---|---|
| Allocation | thick: the LV takes up its full size right away | thin: blocks are allocated when they are written |
| Overprovisioning | no | yes: the total size of the disks can exceed the pool |
| Snapshots and linked clones | no (in Proxmox VE 9, volume chain as a technology preview: lab 16) | yes, fast |
| Sharing across nodes | yes, on a shared LUN (lab 15) | no, local only |
| Risk | none: the space is guaranteed | full pool: writes fail |
A thin pool is a special LV made of two hidden parts: _tdata, the data, and _tmeta, the map that records which blocks belong to which volume. Both can fill up, and both must be monitored.
A Proxmox VE installation on ext4 (like desopve04, lab 03) uses LVM: the pve VG contains root, swap and the data thin pool, which is the local-lvm storage.
Procedure
Section titled “Procedure”1. The LVM layout of the installation
Section titled “1. The LVM layout of the installation”pvs PV VG Fmt Attr PSize PFree /dev/sda3 pve lvm2 a-- <49.50g <6.13gvgs VG #PV #LV #SN Attr VSize VFree pve 1 3 0 wz--n- <49.50g <6.13glvs LV VG Attr LSize Pool Origin Data% Meta% Move Log Cpy%Sync Convert data pve twi-a-tz-- <13.56g 0.00 1.58 root pve -wi-ao---- 21.68g swap pve -wi-ao---- 6.12gIn the Attr column the first letter gives the type: t is a thin pool, - a regular volume. data is the thin pool of local-lvm, still empty.
2. The node’s disks
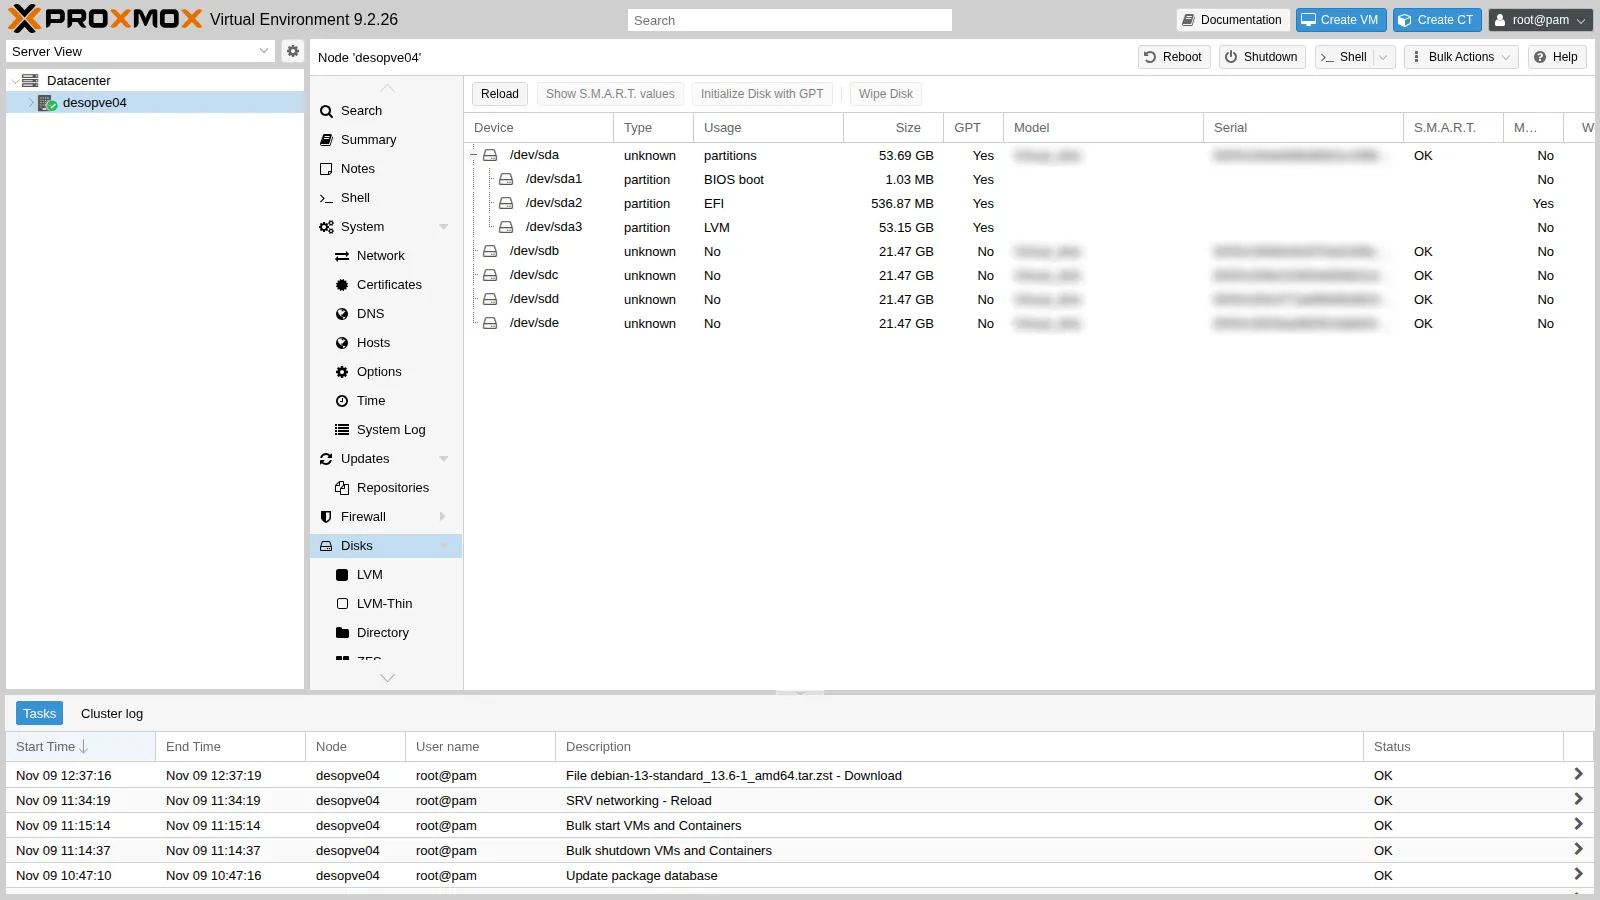
Section titled “2. The node’s disks”Insert the four 20 GB disks into the free hot-swap bays of desopve04, with the node running. The controller reports the new disks to the kernel by itself; if they don’t show up, force a rescan of the SCSI buses:
for h in /sys/class/scsi_host/host*/scan; do echo "- - -" > $h; doneOpen desopve04 → Disks. The four 20 GB disks have Usage No: they are free.
3. Create a volume group from the web interface
Section titled “3. Create a volume group from the web interface”-
Disks → LVM → Create: Volume Group. Disk
/dev/sdb, Namevg-lab09, Add Storage enabled.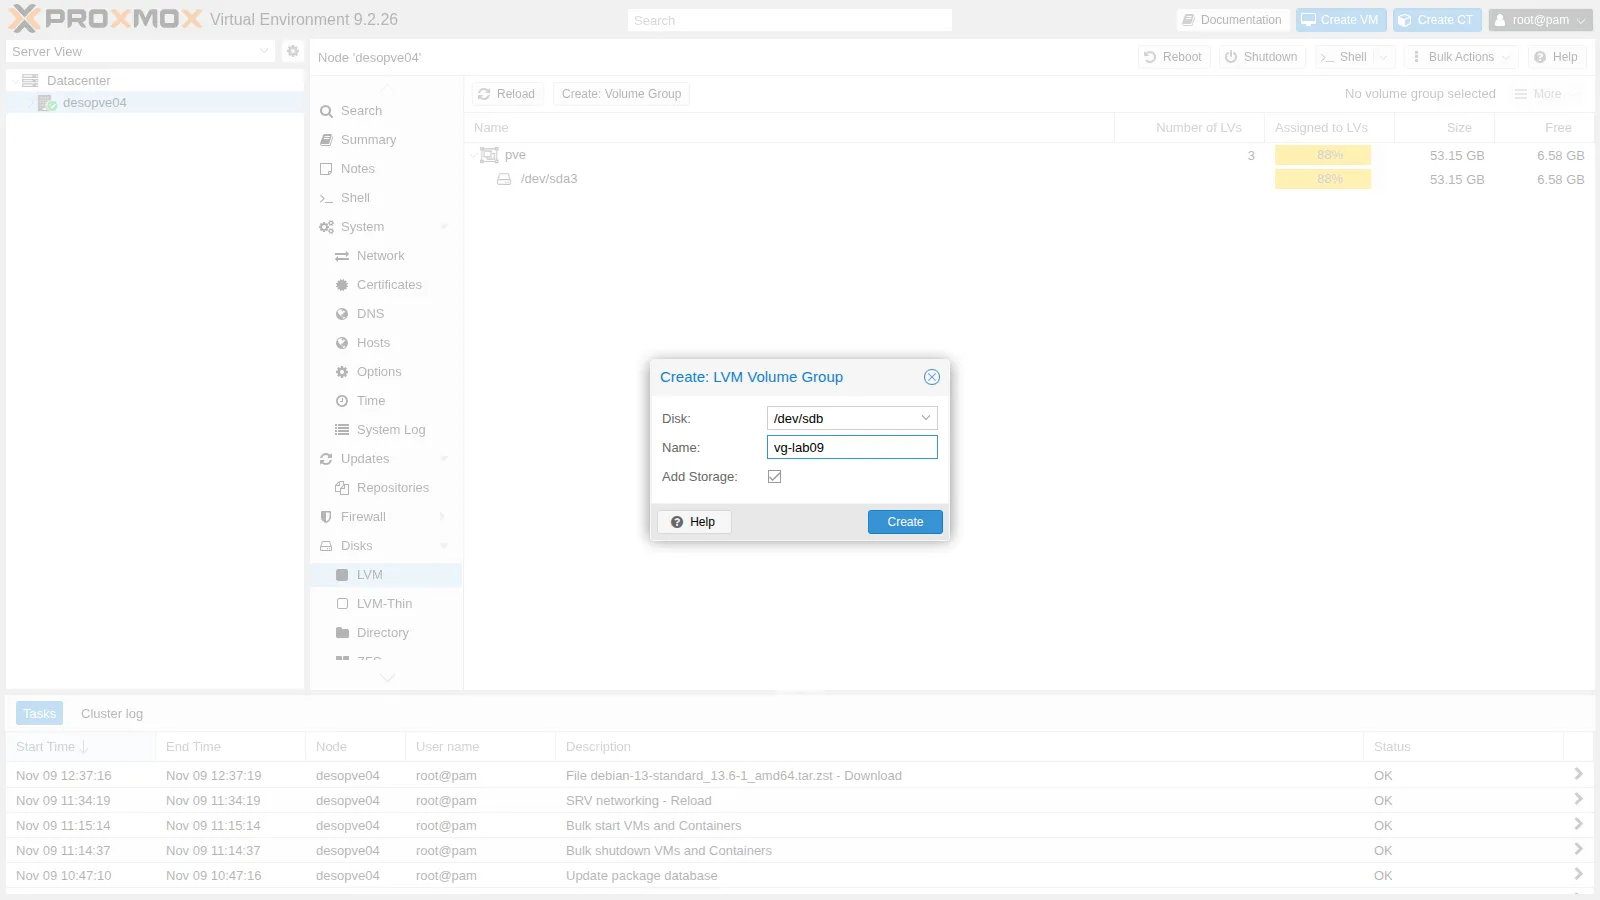
-
Click Create. The new VG appears next to
pve, empty.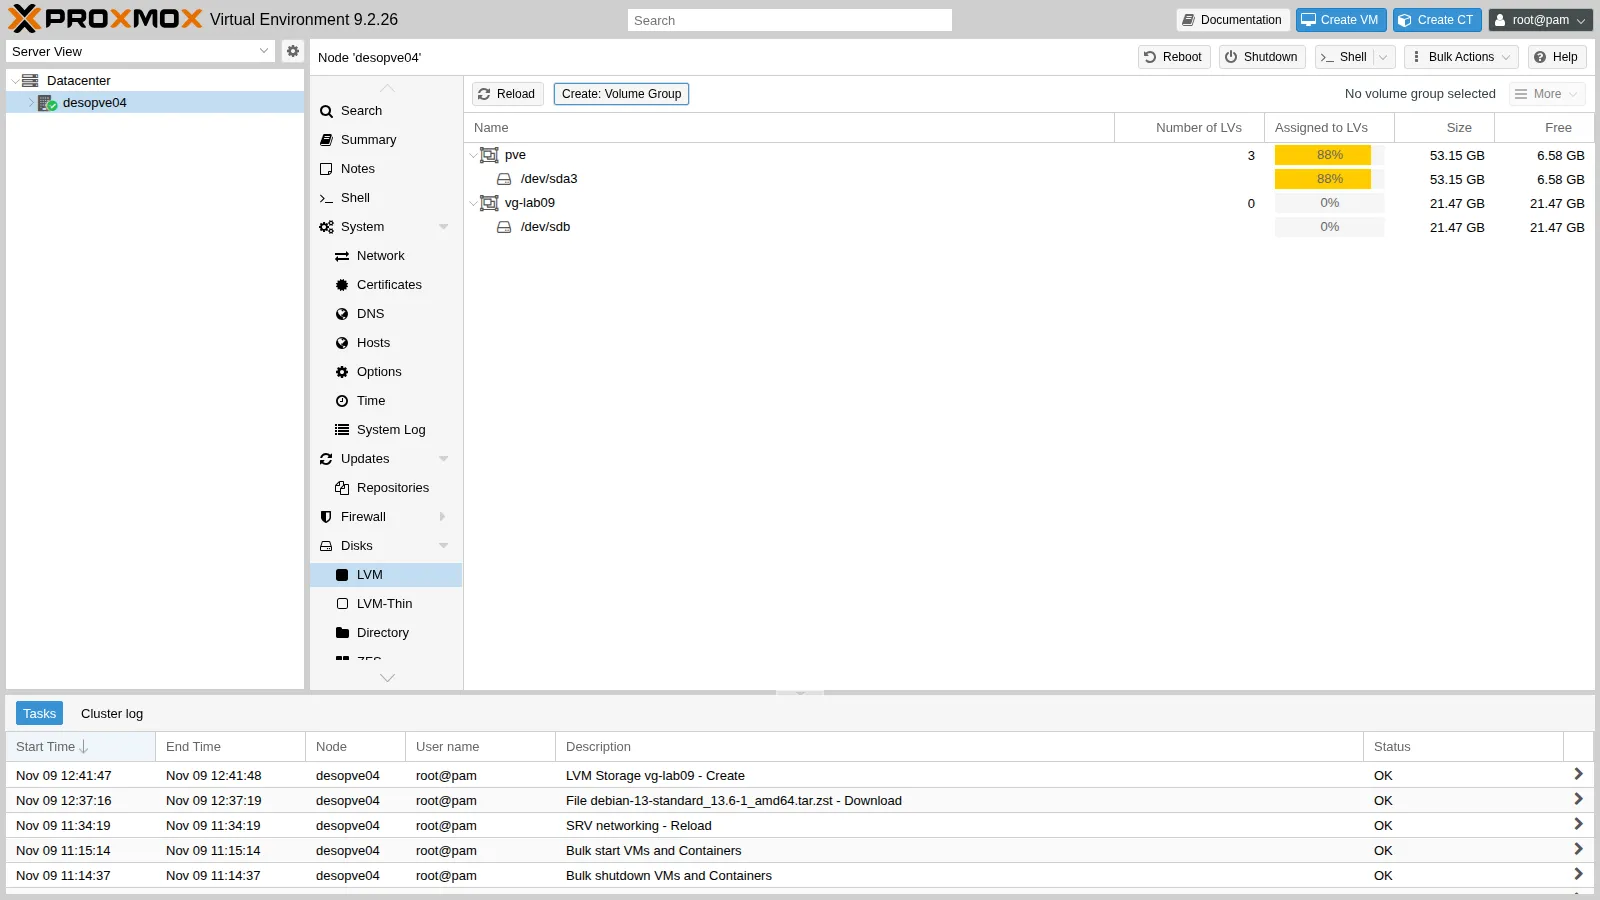
-
Proxmox VE ran
pvcreateandvgcreate, and added anlvmstorage restricted to the node:root@desopve04 grep -A4 "lvm: vg-lab09" /etc/pve/storage.cfgOutput lvm: vg-lab09vgname vg-lab09content images,rootdirnodes desopve04shared 0
4. Thick LVM: all the space is taken up front
Section titled “4. Thick LVM: all the space is taken up front”Allocate a 6 GiB volume (with a test VMID, 990) and look at the free space of the VG:
pvesm alloc vg-lab09 990 vm-990-disk-0 6G Logical volume "vm-990-disk-0" created.successfully created 'vg-lab09:vm-990-disk-0'lvs vg-lab09 LV VG Attr LSize Pool Origin Data% Meta% Move Log Cpy%Sync Convert vm-990-disk-0 vg-lab09 -wi-a----- 6.00gvgs vg-lab09 VG #PV #LV #SN Attr VSize VFree vg-lab09 1 1 0 wz--n- <20.00g <14.00gpvesm free vg-lab09:vm-990-disk-0 Logical volume "vm-990-disk-0" successfully removed.Removed volume 'vg-lab09:vm-990-disk-0'The volume doesn’t contain anything yet, but its 6 GiB are already gone from the VG (VFree from 20 to 14).
5. Extend the volume group with a second disk
Section titled “5. Extend the volume group with a second disk”The web interface creates a VG on a single disk. To grow it, use the command line: pvcreate prepares the disk, vgextend adds it.
pvcreate /dev/sdc Physical volume "/dev/sdc" successfully created.vgextend vg-lab09 /dev/sdc Volume group "vg-lab09" successfully extendedvgs vg-lab09 VG #PV #LV #SN Attr VSize VFree vg-lab09 2 0 0 wz--n- 39.99g 39.99gThe vg-lab09 storage shows the new 40 GiB immediately, without any configuration change: Proxmox VE reads the space from the VG.
6. Create a thin pool from the web interface
Section titled “6. Create a thin pool from the web interface”-
Disks → LVM-Thin → Create: Thinpool. Disk
/dev/sdd, Namelab09-thin.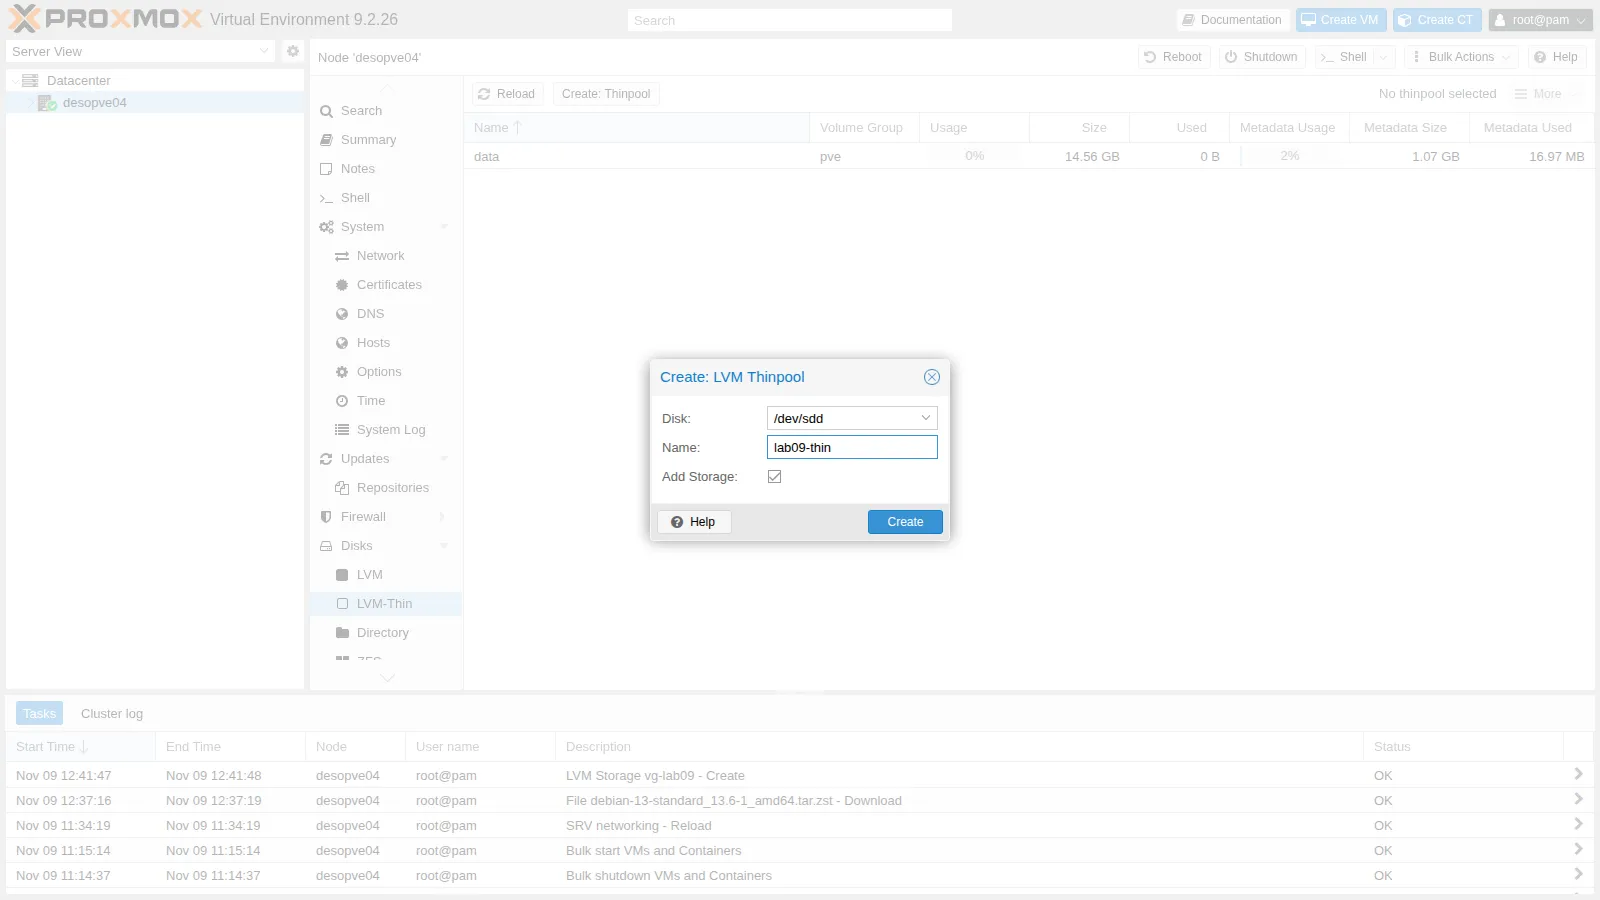
-
The interface creates a
lab09-thinVG on the whole disk and, inside it, a thin pool with the same name. From the command line you can also see the hidden parts of the pool (in square brackets):root@desopve04 lvs -a -o lv_name,vg_name,attr,lv_size,data_percent,metadata_percent lab09-thinOutput LV VG Attr LSize Data% Meta%lab09-thin lab09-thin twi-a-tz-- 16.87g 0.00 1.58[lab09-thin_tdata] lab09-thin Twi-ao---- 16.87g[lab09-thin_tmeta] lab09-thin ewi-ao---- 1.00g[lvol0_pmspare] lab09-thin ewi------- 1.00groot@desopve04 grep -A4 "lvmthin: lab09-thin" /etc/pve/storage.cfgOutput lvmthin: lab09-thinthinpool lab09-thinvgname lab09-thincontent rootdir,imagesnodes desopve04Of the disk’s 20 GB, 16.87 GiB go to data and 1 GiB to metadata, plus 1 GiB of spare space (
pmspare) used to repair the metadata if it gets damaged.
7. Overprovisioning: a 6 GiB disk in a 2 GiB pool
Section titled “7. Overprovisioning: a 6 GiB disk in a 2 GiB pool”To see a pool fill up within minutes, create a small 2 GiB thin pool in the vg-lab09 VG and add it as a storage:
lvcreate --type thin-pool -L 2G -n tp-small vg-lab09 Thin pool volume with chunk size 64.00 KiB can address at most <15.88 TiB of data. Logical volume "tp-small" created.pvesm add lvmthin lab09-small --vgname vg-lab09 --thinpool tp-small --content rootdir,images --nodes desopve04Create a container with a 6 GiB disk on that 2 GiB pool. The nesting=1 option is the one the web interface enables automatically on unprivileged containers: systemd needs it.
pct create 940 local:vztmpl/debian-13-standard_13.6-1_amd64.tar.zst --hostname lab09-ct --rootfs lab09-small:6 --memory 512 --cores 1 --unprivileged 1 --features nesting=1 --ostype debian --net0 name=eth0,bridge=vmbr0,ip=172.27.199.140/24,gw=172.27.199.1...pct start 940lvs -o lv_name,attr,lv_size,pool_lv,data_percent,metadata_percent vg-lab09 LV Attr LSize Pool Data% Meta% tp-small twi-aotz-- 2.00g 31.27 16.02 vm-940-disk-0 Vwi-aotz-- 6.00g tp-small 10.42pct exec 940 -- df -h /Filesystem Size Used Avail Use% Mounted on/dev/mapper/vg--lab09-vm--940--disk--0 5.9G 572M 5.0G 11% /The container sees a 6 GiB disk with 5 GiB free, but the pool has only 2 GiB and has already used 31% of it. This is overprovisioning: it works as long as the data actually written stays below the size of the pool.
Verification and tests
Section titled “Verification and tests”Test 1 – The thin pool fills up
Section titled “Test 1 – The thin pool fills up”Inside the container, write 3 GB of random data: the file system has room, the pool does not.
date +%T; pct exec 940 -- dd if=/dev/urandom of=/root/fill bs=1M count=3000 oflag=direct status=none; echo "dd rc=$?"; date +%T13:50:28dd: error writing '/root/fill': No space left on devicedd rc=113:51:58The write stalled for about a minute and then failed. The kernel log tells what happened:
dmesg | grep thin[ 5759.611992] device-mapper: thin: 252:10: reached low water mark for data device: sending event.[ 5759.614980] device-mapper: thin: 252:10: switching pool to out-of-data-space (queue IO) mode[ 5822.127628] device-mapper: thin: 252:10: switching pool to out-of-data-space (error IO) modedmesg | grep EXT4 | tail -3[ 5822.130654] EXT4-fs (dm-12): failed to convert unwritten extents to written extents -- potential data loss! (inode 1595, error -5)[ 5822.131286] EXT4-fs (dm-12): failed to convert unwritten extents to written extents -- potential data loss! (inode 1566, error -5)[ 5822.131944] EXT4-fs (dm-12): failed to convert unwritten extents to written extents -- potential data loss! (inode 1567, error -5)lvs -o lv_name,attr,lv_size,pool_lv,data_percent,metadata_percent vg-lab09 LV Attr LSize Pool Data% Meta% tp-small twi-aotzD- 2.00g 100.00 29.00 vm-940-disk-0 Vwi-aotz-- 6.00g tp-small 33.33- When the pool fills up, device-mapper queues the writes and waits 60 seconds for someone to extend the pool (
queue IO). - After that minute, it starts rejecting them (
error IO): the container’s file system receives I/O errors and some data is lost. - The
Dat the end of the pool attributes means out of data space.
From the container’s point of view, however, all is well: the file system believes it still has 3.7 GiB free.
pct exec 940 -- df -h /Filesystem Size Used Avail Use% Mounted on/dev/mapper/vg--lab09-vm--940--disk--0 5.9G 1.9G 3.7G 34% /This is the danger of overprovisioning: a guest has no way of knowing that the space “underneath” has run out. With a VM, depending on the disk settings, QEMU either pauses the VM with the io-error status or passes the error on to the guest operating system.
Test 2 – Recover: extend the pool and free up space
Section titled “Test 2 – Recover: extend the pool and free up space”-
The immediate fix is to give the pool more space. The
vg-lab09VG still has almost 38 GiB free:root@desopve04 lvextend -L +4G vg-lab09/tp-smallOutput Rounding size to boundary between physical extents: 8.00 MiB.Size of logical volume vg-lab09/tp-small_tmeta changed from 4.00 MiB (1 extents) to 8.00 MiB (2 extents).Size of logical volume vg-lab09/tp-small_tdata changed from 2.00 GiB (512 extents) to 6.00 GiB (1536 extents).Logical volume vg-lab09/tp-small successfully resized.root@desopve04 dmesg | grep thin | tail -2Output [ 5832.296162] device-mapper: thin: 252:10: switching pool to write mode[ 5832.296168] device-mapper: thin: 252:10: growing the data device from 32768 to 98304 blocksroot@desopve04 lvs -o lv_name,attr,lv_size,data_percent,metadata_percent vg-lab09/tp-smallOutput LV Attr LSize Data% Meta%tp-small twi-aotz-- 6.00g 33.33 19.68The pool switches back to write mode.
lvextendalso grew the metadata: with such a small pool it was only 4 MiB. -
Check the container’s file system, which suffered write errors.
pct fsckchecks it with the container stopped:root@desopve04 pct stop 940pct fsck 940Output fsck from util-linux 2.41.5/dev/mapper/vg--lab09-vm--940--disk--0: clean, 22033/393216 files, 530428/1572864 blocksroot@desopve04 pct start 940pct exec 940 -- ls -lh /root/fillOutput -rw-r--r-- 1 root root 1.3G Nov 9 12:51 /root/fillThe file system is clean, but the file stopped at 1.3 GB instead of the 3 GB requested: the failed writes are lost.
-
Delete the file. In the thin pool, however, the blocks stay allocated until the file system tells the disk which blocks are free again (discard, or trim):
root@desopve04 pct exec 940 -- rm /root/filllvs -o lv_name,data_percent vg-lab09Output LV Data%tp-small 33.34vm-940-disk-0 33.34root@desopve04 pct fstrim 940Output /var/lib/lxc/940/rootfs/: 1.4 GiB (1518882816 bytes) trimmedroot@desopve04 lvs -o lv_name,data_percent vg-lab09Output LV Data%tp-small 11.98vm-940-disk-0 11.98
Test 3 – Prevent: automatic pool extension
Section titled “Test 3 – Prevent: automatic pool extension”LVM can grow a thin pool by itself when it crosses a threshold, provided the VG has free space. This is done by the dmeventd service, which monitors the pools. In the default installation the threshold is 100%, which means the feature is off:
lvmconfig --typeconfig full activation/thin_pool_autoextend_threshold activation/thin_pool_autoextend_percentthin_pool_autoextend_threshold=100thin_pool_autoextend_percent=20Instead of changing the setting for all pools in /etc/lvm/lvm.conf, create a profile and apply it to a single pool: 70% threshold, 50% growth.
cat > /etc/lvm/profile/lab09-autoextend.profile <<EOFactivation { thin_pool_autoextend_threshold=70 thin_pool_autoextend_percent=50}EOFlvcreate --type thin-pool -L 1G -n tp-auto --metadataprofile lab09-autoextend vg-lab09 Thin pool volume with chunk size 64.00 KiB can address at most <15.88 TiB of data. Logical volume "tp-auto" created.lvcreate -V 3G -T vg-lab09/tp-auto -n lv-auto WARNING: You have not turned on protection against thin pools running out of space. WARNING: Set activation/thin_pool_autoextend_threshold below 100 to trigger automatic extension of thin pools before they get full. WARNING: Sum of all thin volume sizes (9.00 GiB) exceeds the size of thin pools (7.00 GiB). Logical volume "lv-auto" created.lvs -o lv_name,lv_size,data_percent,lv_profile,seg_monitor vg-lab09/tp-auto LV LSize Data% LProfile Monitor tp-auto 1.00g 0.00 lab09-autoextend monitoredThe lvcreate warnings are valuable: LVM itself points out that you are overprovisioning and that the protection is off. The warnings refer to the global setting; the new pool uses the profile instead.
Now write 800 MiB to the 3 GiB volume, that is, 78% of the 1 GiB pool:
dd if=/dev/urandom of=/dev/vg-lab09/lv-auto bs=1M count=800 oflag=direct status=nonelvs -o lv_name,lv_size,data_percent vg-lab09/tp-auto vg-lab09/lv-auto LV LSize Data% lv-auto 3.00g 26.04 tp-auto 1.50g 52.08journalctl --since "-2 min" --no-hostname | grep dmeventd | grep -E "changed|resized"Nov 09 13:53:51 dmeventd[440]: Size of logical volume vg-lab09/tp-auto_tdata changed from 1.00 GiB (256 extents) to 1.50 GiB (384 extents).Nov 09 13:53:51 dmeventd[440]: Logical volume vg-lab09/tp-auto successfully resized.Once usage went past 70%, dmeventd grew the pool by 50% (from 1 to 1.5 GiB) and the write succeeded. Automatic extension only works if the VG has free space: it does not replace monitoring, but it buys time.
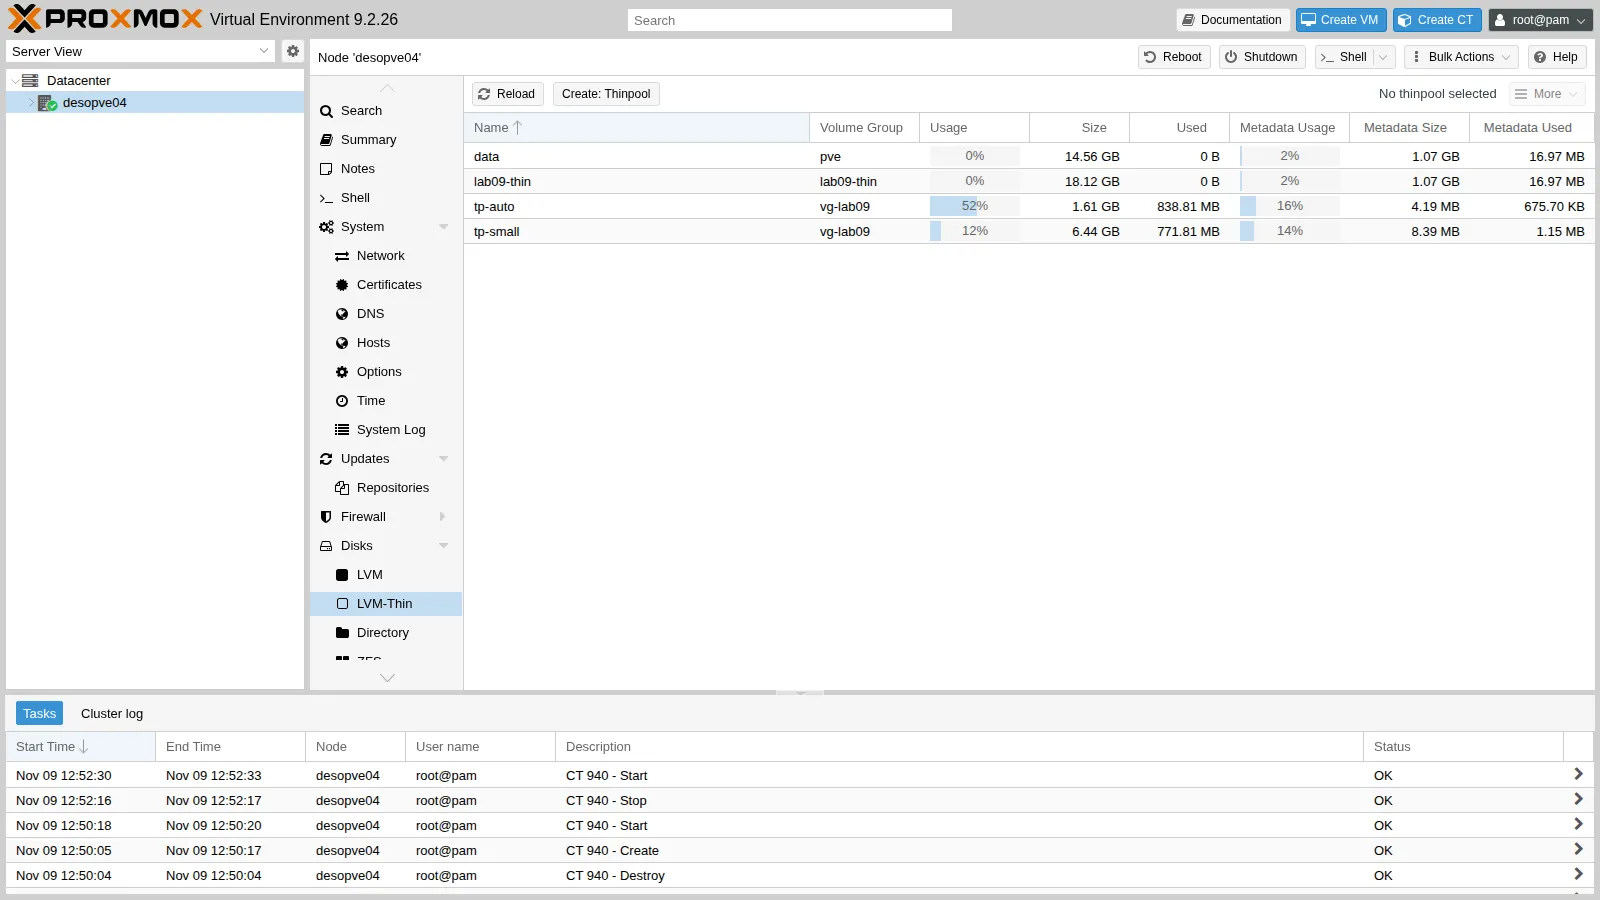
In the web interface, Disks → LVM-Thin shows the data and metadata usage of each pool:
Cleanup
Section titled “Cleanup”-
Remove the container, the test storage and pools, and the profile:
root@desopve04 pct stop 940 && pct destroy 940 --purge 1pvesm remove lab09-smalllvremove -y vg-lab09/lv-auto vg-lab09/tp-auto vg-lab09/tp-smallOutput Logical volume "lv-auto" successfully removed.Logical volume "tp-auto" successfully removed.Logical volume "tp-small" successfully removed.root@desopve04 rm /etc/lvm/profile/lab09-autoextend.profile -
In the web interface, under Disks → LVM-Thin, select
lab09-thinand choose More → Destroy. Type the ID to confirm. Cleanup Storage Configuration removes the storage, Cleanup Disks wipes the LVM labels from the disk. Then, under Disks → LVM, destroy thelab09-thinandvg-lab09VGs in the same way.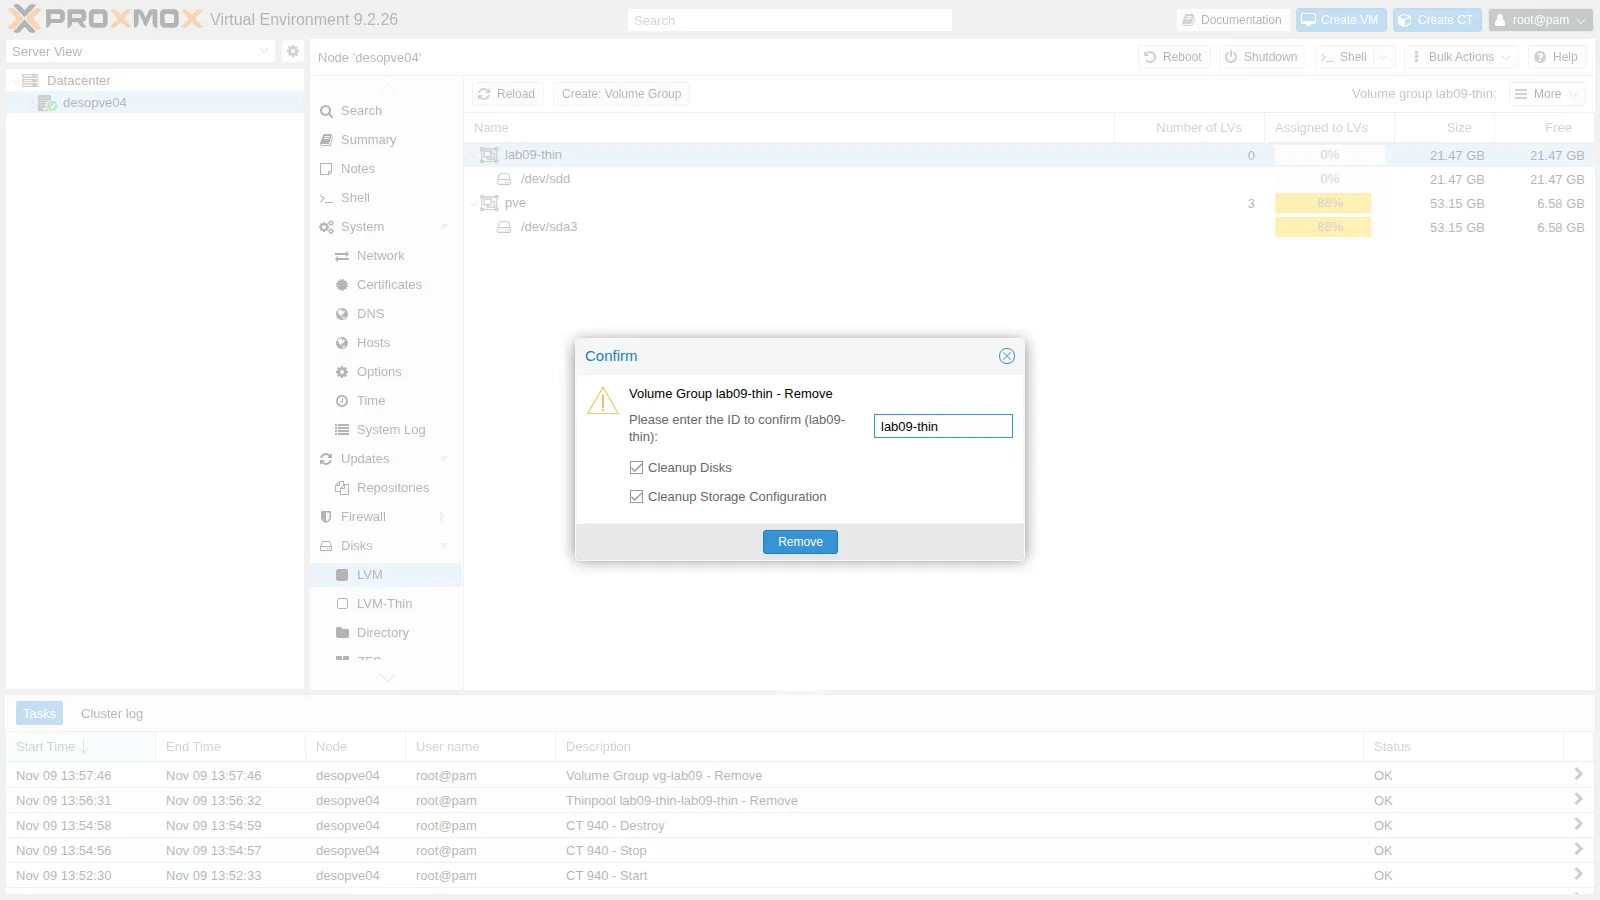
-
If a disk still carries a PV label, remove it from the command line:
root@desopve04 pvremove /dev/sdb /dev/sdcOutput Labels on physical volume "/dev/sdb" successfully wiped.Labels on physical volume "/dev/sdc" successfully wiped.root@desopve04 pvsOutput PV VG Fmt Attr PSize PFree/dev/sda3 pve lvm2 a-- <49.50g <6.13g
- You created a VG and a thin pool from the web interface, and identified them with
pvs,vgsandlvs -a. - You extended a VG with a second disk.
- You saw a full thin pool: writes queued for 60 seconds, then errors and lost data, with the guest completely unaware.
- You recovered the pool with
lvextendand freed up space withpct fstrim. - Automatic extension with an LVM profile grew the pool before it filled up.
Final lab state
Section titled “Final lab state”- Nothing changed on the cluster.
- On
desopve04the storages arelocalandlocal-lvm. The diskssdb,sdc,sddandsdeare empty again, ready for lab 10. - The
debian-13-standard_13.6-1_amd64.tar.zsttemplate stays in thelocalstorage ofdesopve04.
What you learned
Section titled “What you learned”- LVM has three layers: PV (disks), VG (a single, extensible space) and LV (volumes, the guests’ disks).
- Thick LVM reserves the space up front and is safe; LVM-thin allocates on demand and supports snapshots and overprovisioning, but the pool must be monitored.
- A full thin pool blocks writes for 60 seconds and then rejects them: the guests lose data without noticing that the space has run out.
- You recover with
lvextend. The space of deleted files returns to the pool only with discard (pct fstrim, the Discard option for VMs). - Data% and Meta% can be checked with
lvsor on the LVM-Thin page. An LVM profile with a threshold and a percentage enables automatic extension for a single pool.