

Lab 05 – SSH, shell and command-line tools
Dependencies
Section titled “Dependencies”- Previous labs: Lab 02, to use the
desopve-dc01domain controller as the administration workstation, and Lab 04, with the four nodes updated. - Software: the OpenSSH client, already included in Windows Server 2025: there is nothing to install.
- Credentials:
root/<lab-password>on the nodes,PROXMOX\Administratoron the DC → Appendix B.
Objectives
Section titled “Objectives”- Open a shell on a node directly from the web interface.
- Connect over SSH from the administration workstation, verifying the fingerprint of the server key.
- Create a passphrase-protected ED25519 key pair, load it into the Windows SSH agent and distribute it to the four nodes.
- Get to know the Proxmox VE command-line tools:
pvesh,qm,pct,pvesm,pveum,pvenodeandpvecm.
How it works
Section titled “How it works”Three ways to the command line
Section titled “Three ways to the command line”| Way | How to open it | When to use it |
|---|---|---|
| GUI shell | node → Shell | quick tasks, without other programs: it is a terminal in the browser (xterm.js), connected to the node through port 8006 |
| SSH | ssh client to port 22 of the node |
daily work, scripts, file copies (scp) |
| Server console | monitor and keyboard, or the remote console of the management controller | when the node’s network is not working |
The GUI shell opens a root session on the selected node. This is why it is reserved for users with the Sys.Console privilege, as you will see in lab 44.
Server keys and user keys
Section titled “Server keys and user keys”SSH uses two kinds of keys, for different purposes:
- the server key (host key) proves to the client that it is talking to the right server. On the first connection, the client shows its fingerprint. If you accept it, the client saves it in
known_hostsand from then on refuses to connect if the key changes: this is the protection against anyone impersonating the server; - the user key pair replaces the password. The private key stays on your workstation; the public key is copied to the server, into the user’s
authorized_keysfile.
An unprotected private key is worth as much as a password written in a file. This is why we protect it with a passphrase and use the SSH agent (ssh-agent): you type the passphrase only once, when the key is loaded into the agent. On Windows the agent is a service, which keeps the keys, protected by the user account, even after a restart.
On Proxmox VE the /root/.ssh/authorized_keys file is a link to /etc/pve/priv/authorized_keys, inside the cluster file system. As long as the nodes are separate, each one has its own file. When you form the cluster (lab 06), there will be a single file, shared by all the nodes.
Everything goes through the API
Section titled “Everything goes through the API”Proxmox VE is built around a REST API, reachable at https://<nodo>:8006/api2/json/. The web interface is just one of its clients: every click becomes an API call, and every long-running operation becomes a task that you find in the bottom panel.
The command-line tools use the same API:
| Command | What it is for |
|---|---|
pvesh |
direct access to the API: get, create, set, delete, ls on any path |
qm |
virtual machines (QEMU/KVM) |
pct |
containers (LXC) |
pvesm |
storage |
pveum |
users, groups, roles, permissions and tokens |
pvecm |
cluster |
pvenode |
node settings and tasks |
pveversion |
installed versions |
When run as root on the node, they do not ask for credentials. Each command has its own man page (man qm) and, without arguments, shows the list of its subcommands.
Procedure
Section titled “Procedure”1. The shell from the web interface
Section titled “1. The shell from the web interface”-
In the web interface, select the
desopve01node and click Shell. -
In the terminal, run
hostname -f; pveversion; qm list; pct list. The two lists are empty, because there are no VMs or containers yet. The Shell task appears in the Tasks panel at the bottom, running as long as the terminal stays open.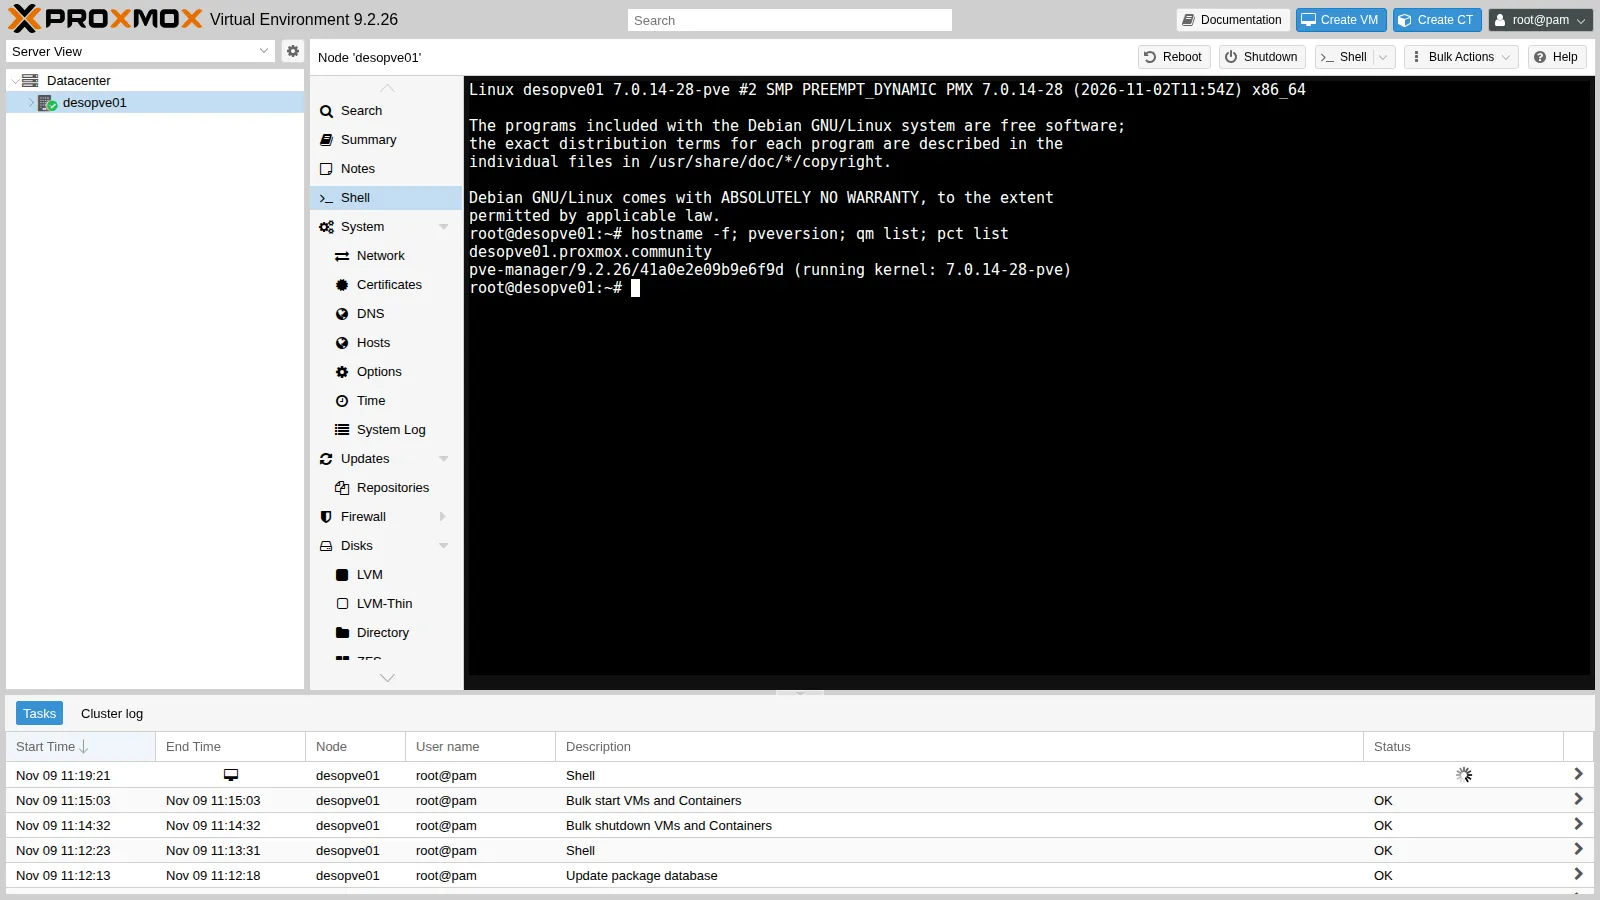
-
Leave the terminal open: you need it in the next step to read the fingerprint of the node key.
root@desopve01 ssh-keygen -lf /etc/ssh/ssh_host_ed25519_key.pubOutput 256 SHA256:p5TwLK+YB4jXj40TfBtjT2Y/g848HB8t3VSoFoKXJIM root@desopve01 (ED25519)
2. First SSH login from the administration workstation
Section titled “2. First SSH login from the administration workstation”-
Connect over Remote Desktop to
desopve-dc01asPROXMOX\Administratorand open Terminal (PowerShell) as administrator. -
Connect to the node:
Terminal window ssh root@desopve01.proxmox.community -
The client does not know the server and shows its fingerprint. Compare it with the one you read in step 1: they must match. Answer
yes, then enter therootpassword.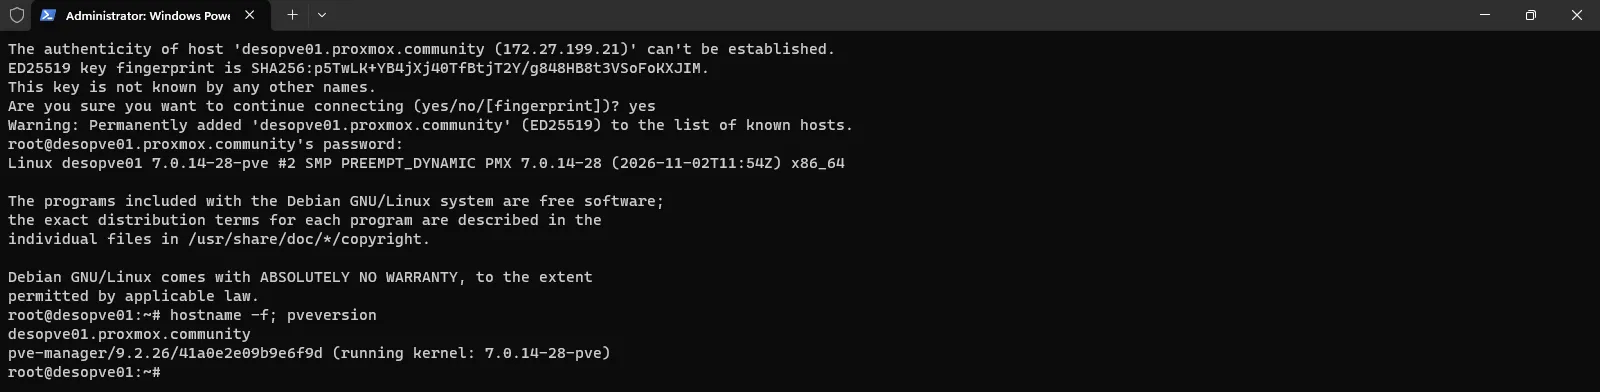
The node key is now saved in
C:\Users\Administrator\.ssh\known_hosts. -
Close the session with
exit.
3. Create the key pair
Section titled “3. Create the key pair”-
Generate an ED25519 key. The comment helps you recognize it when you find it in
authorized_keys:Terminal window -
Press Enter to accept the suggested path (
C:\Users\Administrator/.ssh/id_ed25519), then choose<lab-password>as the passphrase and repeat it (in production, use a passphrase different from the server passwords).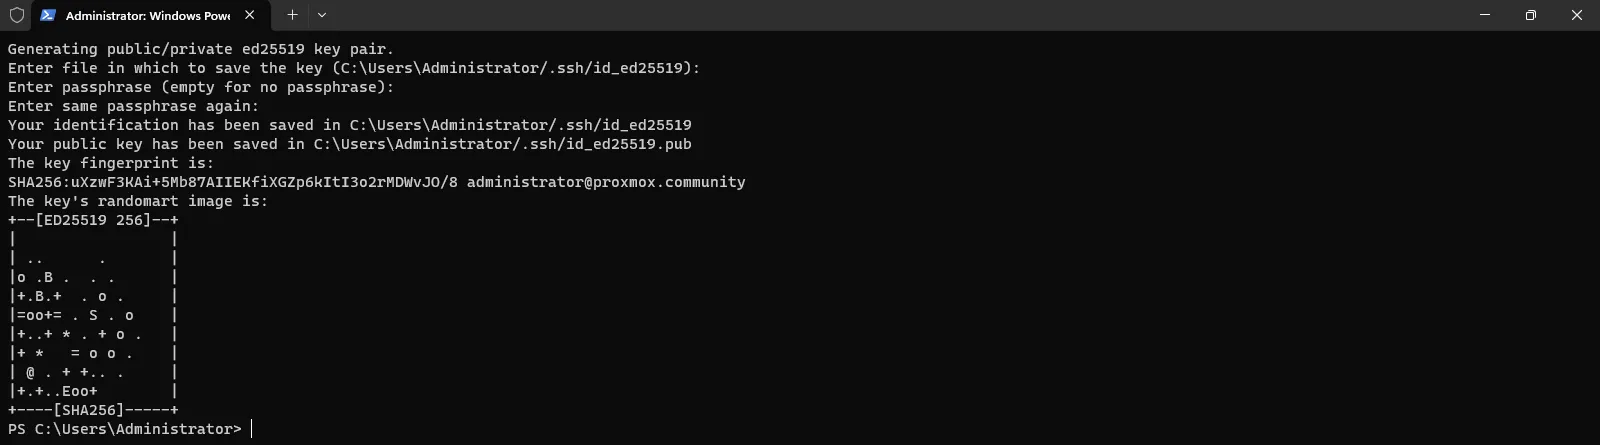
Two files have been created:
id_ed25519, the private key, which you must never copy elsewhere, andid_ed25519.pub, the public key to distribute.
4. Load the key into the SSH agent
Section titled “4. Load the key into the SSH agent”The Windows ssh-agent service is installed but disabled. Set it to start automatically, start it and load the key into it: the passphrase is requested only once.
Get-Service ssh-agent | Set-Service -StartupType Automatic -PassThru | Start-Service; Get-Service ssh-agentssh-addssh-add -l
5. Distribute the public key to the nodes
Section titled “5. Distribute the public key to the nodes”Copy the public key into authorized_keys on all four nodes with a single loop. The root password is requested once per node:
foreach ($n in '01','02','03','04') { Get-Content $env:USERPROFILE\.ssh\id_ed25519.pub | ssh -o StrictHostKeyChecking=accept-new "root@desopve$n.proxmox.community" "tr -d '\r' >> /root/.ssh/authorized_keys" }
Two details of the command:
StrictHostKeyChecking=accept-newsaves the key of nodes never seen before without asking. A changed key is still rejected. This is convenient in the lab; in production, verify the fingerprint of each server as in step 2.- Windows ends lines with CR+LF, Linux with LF only.
tr -d '\r'strips the CR character before appending the key to the file, soauthorized_keysstays clean.
6. Log in without a password
Section titled “6. Log in without a password”Repeat the loop, running a command on each node: no password is requested, because the agent presents the key.
foreach ($n in '01','02','03','04') { ssh "root@desopve$n.proxmox.community" 'hostname -f; uptime -p' }
7. The command-line tools
Section titled “7. The command-line tools”Connect to desopve01 (ssh [email protected]) and try the main commands.
-
pveshqueries the API. The version:root@desopve01 pvesh get /versionOutput ┌─────────┬──────────────────┐│ key │ value │╞═════════╪══════════════════╡│ release │ 9.2 │├─────────┼──────────────────┤│ repoid │ 41a0e2e09b9e6f9d │├─────────┼──────────────────┤│ version │ 9.2.26 │└─────────┴──────────────────┘pvesh lslists the paths under a node. The letters show the allowed methods:Dsubdirectory,rread (get),wmodify (set),ccreate,ddelete.root@desopve01 pvesh ls /nodes/desopve01 | head -12Output -r-c- aplinfoDr--- aptDr--- capabilitiesDr--- cephDr--- certificates-rw-- configDr--- disks-rw-- dnsDr--- firewallDr--- hardware-r-c- hosts-r--- journalThe
--output-formatoption changes the format (text,json,json-pretty,yaml), which is useful in scripts:root@desopve01 pvesh get /nodes --output-format yamlOutput ---- cpu: 0.125779885200898disk: 3614965760id: node/desopve01level: ''maxcpu: 4maxdisk: 51013746688maxmem: 33654243328mem: 2262896640node: desopve01ssl_fingerprint: 14:32:84:88:C7:D8:14:A6:29:17:FA:04:65:09:52:2A:BC:3E:92:77:76:6D:32:04:CB:3F:3A:FC:A5:69:5B:F3status: onlinetype: nodeuptime: 731pvesh usageshows the parameters of a call, for example the creation of a VM (--verbosedescribes them all):root@desopve01 pvesh usage /nodes/desopve01/qemu --command createOutput USAGE: pvesh create /nodes/desopve01/qemu --vmid <integer> [OPTIONS] -
pvesmshows the node storages. With the ZFS installation there arelocal, a directory for ISOs, templates and backups, andlocal-zfs, for VM and container disks:root@desopve01 pvesm statusOutput Name Type Status Total (KiB) Used (KiB) Available (KiB) %local dir active 46288000 128 46287872 0.00%local-zfs zfspool active 46288016 96 46287920 0.00% -
pveummanages users. For now there is onlyroot@pam:root@desopve01 pveum user listOutput ┌──────────┬─────────┬─────────────────────────┬────────┬────────┬───────────┬────────┬──────┬──────────┬────────────┬──────────────────┬────────┬─────────────┐│ userid │ comment │ email │ enable │ expire │ firstname │ groups │ keys │ lastname │ realm-type │ tfa-locked-until │ tokens │ totp-locked │╞══════════╪═════════╪═════════════════════════╪════════╪════════╪═══════════╪════════╪══════╪══════════╪════════════╪══════════════════╪════════╪═════════════╡│ root@pam │ │ [email protected] │ 1 │ 0 │ │ │ │ │ pam │ │ │ │└──────────┴─────────┴─────────────────────────┴────────┴────────┴───────────┴────────┴──────┴──────────┴────────────┴──────────────────┴────────┴─────────────┘ -
pvenode task listshows the latest tasks of the node, the same ones as in the Tasks panel. Each task has a unique identifier (UPID) that contains the node, the type and the user:root@desopve01 pvenode task list --limit 3Output ┌───────────────────────────────────────────────────────────────┬──────────┬────┬──────────┬─────────────────────┬─────────────────────┬────────┐│ UPID │ Type │ ID │ User │ Starttime │ Endtime │ Status │╞═══════════════════════════════════════════════════════════════╪══════════╪════╪══════════╪═════════════════════╪═════════════════════╪════════╡│ UPID:desopve01:00000652:00000730:6AF1AB37:startall::root@pam: │ startall │ │ root@pam │ 2026-11-09 12:15:03 │ 2026-11-09 12:15:03 │ OK │├───────────────────────────────────────────────────────────────┼──────────┼────┼──────────┼─────────────────────┼─────────────────────┼────────┤│ UPID:desopve01:0000098F:00006BCF:6AF1AC39:vncshell::root@pam: │ vncshell │ │ root@pam │ 2026-11-09 12:19:21 │ 2026-11-09 12:19:35 │ OK │├───────────────────────────────────────────────────────────────┼──────────┼────┼──────────┼─────────────────────┼─────────────────────┼────────┤│ UPID:desopve01:0000B1AC:000953A0:6AF1AB18:stopall::root@pam: │ stopall │ │ root@pam │ 2026-11-09 12:14:32 │ 2026-11-09 12:14:32 │ OK │└───────────────────────────────────────────────────────────────┴──────────┴────┴──────────┴─────────────────────┴─────────────────────┴────────┘ -
qmandpctmanage VMs and containers; you will use them from lab 07 on. Without arguments they show the subcommands:root@desopve01 pctOutput ERROR: no command specifiedUSAGE: pct <COMMAND> [ARGS] [OPTIONS]pct clone <vmid> <newid> [OPTIONS]pct create <vmid> <ostemplate> [OPTIONS]pct destroy <vmid> [OPTIONS]… -
pvecmmanages the cluster. For now it returns an error, because the node is not part of a cluster yet: you will create the cluster in lab 06.root@desopve01 pvecm statusOutput Error: Corosync config '/etc/pve/corosync.conf' does not exist - is this node part of a cluster?
Verification and tests
Section titled “Verification and tests”-
From the DC, the loop of step 6 returns the four names without asking for a password.
-
On each node, the DC key is in
authorized_keys, without CR characters:root@desopve01 tail -1 /root/.ssh/authorized_keys | cut -d' ' -f1,3Output ssh-ed25519 [email protected]root@desopve01 grep -c $'\r' /root/.ssh/authorized_keysOutput 0 -
Test: without the agent, you need the passphrase. Empty the agent and connect: the key still works, but now
sshasks for the passphrase. Load the key again withssh-add, and login is automatic again:PowerShell — desopve-dc01 ssh-add -DOutput All identities removed.PowerShell — desopve-dc01 ssh root@desopve02.proxmox.community hostname -fOutput Enter passphrase for key 'C:\Users\Administrator/.ssh/id_ed25519':desopve02.proxmox.communityPowerShell — desopve-dc01 ssh-addOutput Enter passphrase for C:\Users\Administrator/.ssh/id_ed25519:Identity added: C:\Users\Administrator/.ssh/id_ed25519 ([email protected])PowerShell — desopve-dc01 ssh root@desopve02.proxmox.community hostname -fOutput desopve02.proxmox.community
- Key-based SSH login to the four nodes, without a password.
- The
ssh-agentservice on the DC is running and set to start automatically, with the key loaded (ssh-add -l). -
pvesh get /versionreturns9.2.26.
Final lab state
Section titled “Final lab state”- On the DC: key pair
C:\Users\Administrator\.ssh\id_ed25519(with passphrase),ssh-agentservice set to automatic with the key loaded,known_hostswith the keys of the four nodes. - On each node: the
[email protected]public key in/root/.ssh/authorized_keys. The four files are still separate, because the nodes are not in a cluster. - No VMs, no containers;
localandlocal-zfsstorage (localandlocal-lvmondesopve04).
What you learned
Section titled “What you learned”- The three ways to the command line: GUI shell, SSH and console.
- What the server key and the user key pair are for, and why you verify the fingerprint on the first connection.
- How to protect the key with a passphrase without typing it every time, thanks to the SSH agent.
- That the web interface and the
pvesh,qm,pct,pvesm,pveum,pvecmandpvenodecommands use the same API.