

Appendix D – Rebuilding the lab as virtual machines
The manual describes a physical lab: servers, switch, router. If you don’t have the hardware, you can rebuild the same lab inside a single Proxmox VE server with nested virtualization: the Proxmox VE nodes of the lab become VMs, and those VMs in turn run VMs and containers.
This appendix explains how to do it and what changes compared with physical hardware. The key steps were actually tested: a Proxmox VE 9.2 node in a VM, with a nested VM that uses KVM and a VLAN trunk that reaches the rest of the lab.
Dependencies
Section titled “Dependencies”- Previous labs: Lab 01, for the server inventory, the networks, the VLANs and the addressing plan.
- Host server: a Proxmox VE 9.2 server with an Intel VT-x or AMD-V CPU, and enough RAM and disk for all the VMs (see Sizing).
- ISO: the same as in Lab 01, uploaded to the storage of the host server.
- In the test for this appendix: the host server is
desopve03and the test VM ispve-virt01(VMID 801,172.27.199.82), deleted at the end.
Objectives
Section titled “Objectives”- Understand how nested virtualization works and what the host server needs.
- Size the VMs that replace the lab servers.
- Use a VLAN-aware bridge of the host server as the lab switch, with trunks to the node VMs.
- Know which lab results change in a virtual lab.
How it works
Section titled “How it works”Nested virtualization has three levels:
- the host server (level 0) runs Proxmox VE on the hardware;
- the node VMs (level 1) run Proxmox VE as if they were servers: they are the
desopve01-04of the lab; - the VMs and containers of the labs (level 2) run inside the node VMs.
For level 1 to be able to use KVM, the virtual processor of the node VM must expose the virtualization extensions (Intel VT-x or AMD-V). Two things are needed:
- on the host server, the KVM module with nesting enabled (
nested=Y), which is the default value in recent kernels; - on the node VM, the
hostCPU type, which passes all the processor instructions to the VM, including the virtualization ones.
The lab network becomes a VLAN-aware bridge of the host server, which acts as the switch. A VM network card connected to a VLAN-aware bridge without a tag is a trunk port: it receives the untagged traffic of the bridge and all the VLANs allowed by the bridge (bridge-vids, usually 2-4094). The trunks option of the network card limits the VLANs to the listed ones.
The nested VMs go out with their own MAC addresses, different from the one of the node VM’s network card. The Linux bridge learns them as a switch would, but the Proxmox VE firewall on the node VM’s network card, if enabled, has the MAC filter turned on by default: it lets only the MAC address of the network card through and blocks those of the nested VMs. On the network cards of the node VMs, therefore, either leave the firewall off or disable the MAC filter (MAC filter in the firewall options of the VM).
Sizing
Section titled “Sizing”The VMs mirror the inventory of Lab 01:
| VM | vCPU | RAM | Disks | Network cards | Notes |
|---|---|---|---|---|---|
desopve01-03 |
4, type host |
32 GB (minimum 16 GB) | 2 × 50 GB + 2 × 60 GB (+ 1 × 60 GB in Lab 18 on desopve03) |
3 (+ 2 in Lab 20) | VirtIO SCSI single, VirtIO net |
desopve04 |
4, type host |
16 GB | 1 × 50 GB (+ 4 × 20 GB, 1 × 20 GB and 2 × 40 GB in Labs 09, 10 and 18) | 2 (+ 1 in Lab 18, + 1 in Lab 23) | VirtIO SCSI single, VirtIO net |
desopve-dc01 |
4 | 8 GB | 90 GB + 300 GB | 2 | UEFI with Secure Boot and TPM, VirtIO drivers or emulated devices |
desonas |
4 | 16 GB | 32 GB + 2 × 100 GB | 1 | |
desopbs01, desopdm01 |
4 and 2 | 8 GB and 4 GB | 32 GB + 2 × 100 GB, 32 GB | 1 | |
netsvc |
2 | 2 GB | 20 GB | 2 | one network card on the lab bridge, one on the bridge with the Internet uplink |
rtr-core |
1 | 512 MB | 128 MB | 1-2 | MikroTik CHR, imported as in Lab 26 |
esxi8 (Lab 50 only) |
4, type host |
16 GB | 200 GB + 150 GB | 1 |
In total you need about 170 GB of RAM and 2.2 TB of disk, which take up much less with thin provisioning. With 16 GB per node you go down to about 120 GB of RAM: enough for all the labs except Ceph and HA, which become slow with less memory.
Two tips about the disks:
- Different serial numbers. ZFS, Ceph and TrueNAS identify disks by their serial number. The disks of a Proxmox VE VM each have a different one (
drive-scsi0,drive-scsi1…); if you want more realistic values, set theserial=option of each disk. - Disks added during the labs. Where the manual inserts a disk into a hot-swap bay, in the virtual lab you add the disk to the node VM while it is running (
qm set <vmid> --scsiN <storage>:<GB>). Network cards are hot-plugged too, something you don’t do on a physical server.
Procedure
Section titled “Procedure”1. The host server
Section titled “1. The host server”-
Check that nesting is enabled in the KVM module:
root@desopve03 cat /sys/module/kvm_intel/parameters/nestedOutput YOn AMD processors the file is
/sys/module/kvm_amd/parameters/nested. If the answer isN, enable it and reboot the host server:Terminal window echo "options kvm_intel nested=Y" > /etc/modprobe.d/kvm-intel.conf -
Prepare the bridges. For an isolated lab, a VLAN-aware bridge without physical ports, acting as the lab switch, is enough, plus the existing bridge with the uplink to your network, where only the second network card of
netsvcgoes. In/etc/network/interfacesof the host server:auto vmbrlabiface vmbrlab inet manualbridge-ports nonebridge-stp offbridge-fd 0bridge-vlan-aware yesbridge-vids 2-4094#switch del laboratorioApply with
ifreload -a. In the test for this appendix the host server is a lab node, and instead ofvmbrlabits VLAN-aware bridgesvmbr0(management) andvmbr1(VM VLANs) were used.
2. The node VM
Section titled “2. The node VM”The test uses a small node VM (2 vCPUs, 4 GB, one disk), installed automatically as in Appendix A: an answer file with fqdn = "pve-virt01.proxmox.community", cidr = "172.27.199.82/24", gateway 172.27.199.1, DNS 172.27.199.20, ext4 file system on sda, and the ISO prepared with proxmox-auto-install-assistant prepare-iso. For the nodes of the complete lab, use the resources in the Sizing table and, if you prefer, the guided installation of Lab 03.
-
Create the VM with the
hostCPU type and start it:root@desopve03 qm create 801 --name pve-virt01 --memory 4096 --cores 2 --cpu host --machine q35 \--bios ovmf --efidisk0 local-zfs:1,efitype=4m,pre-enrolled-keys=0 --scsihw virtio-scsi-single \--scsi0 local-zfs:32,discard=on,iothread=1 --net0 virtio,bridge=vmbr0 \--ide2 local:iso/pve92-auto.iso,media=cdrom --boot "order=scsi0;ide2" --ostype l26qm start 801About five minutes later the installation is complete and the node answers over SSH.
-
Add the trunk network card for the VM VLANs.
trunks=10;20lets only VLANs 10 and 20 through:root@desopve03 qm set 801 --net1 "virtio,bridge=vmbr1,trunks=10;20"Output update VM 801: -net1 virtio,bridge=vmbr1,trunks=10;20The configuration of the node VM:
root@desopve03 qm config 801Output bios: ovmfboot: order=scsi0;ide2cores: 2cpu: hostefidisk0: local-zfs:vm-801-disk-0,efitype=4m,pre-enrolled-keys=0,size=1Mide2: local:iso/pve92-auto.iso,media=cdrom,size=1667264Kmachine: q35memory: 4096name: pve-virt01net0: virtio=BC:24:11:2E:A8:FA,bridge=vmbr0net1: virtio=BC:24:11:62:89:7F,bridge=vmbr1,trunks=10;20ostype: l26scsi0: local-zfs:vm-801-disk-1,discard=on,iothread=1,size=32Gscsihw: virtio-scsi-single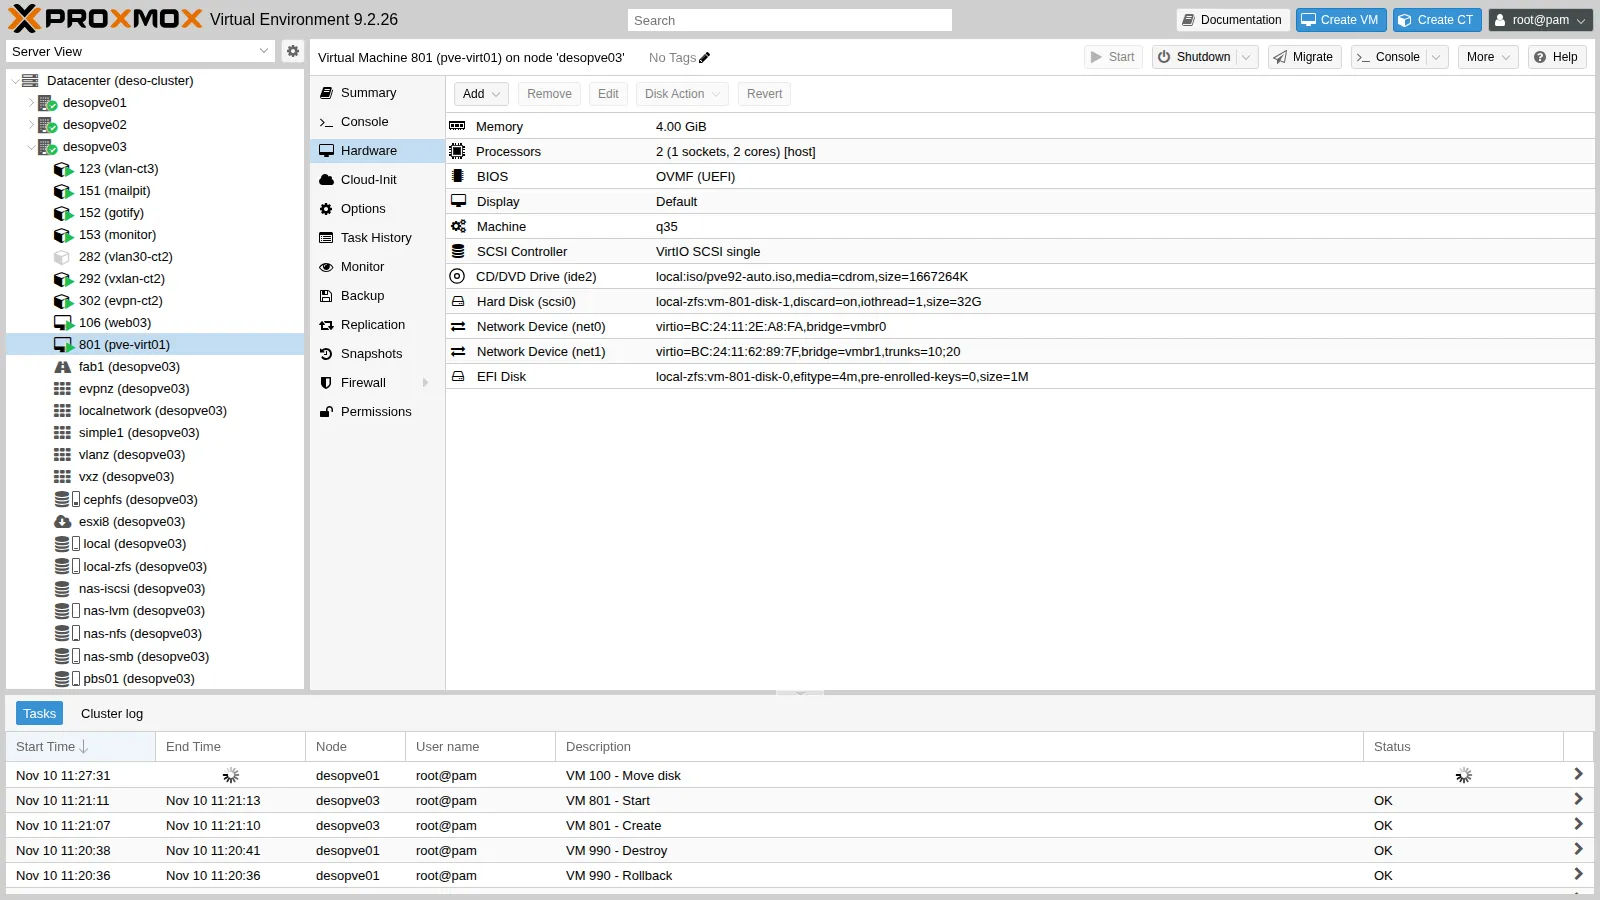
3. Checks inside the node VM
Section titled “3. Checks inside the node VM”-
The node runs Proxmox VE 9.2 and sees the virtualization extensions:
root@pve-virt01 hostname -f; pveversionOutput pve-virt01.proxmox.communitypve-manager/9.2.2/b9984c6d90a4bd80 (running kernel: 7.0.2-6-pve)root@pve-virt01 lscpu | grep -E "Virtualization|Hypervisor vendor"Output Virtualization: VT-xHypervisor vendor: KVMVirtualization type: fullroot@pve-virt01 ls -l /dev/kvmOutput crw-rw---- 1 root kvm 10, 232 Nov 10 11:26 /dev/kvmVirtualization: VT-xand the/dev/kvmdevice show that KVM is available at level 1 as well. The node has just been installed, so it is at the ISO version (9.2.2): Lab 04 would bring it to the latest 9.2.x. -
A nested VM starts with KVM acceleration. The test VM has no disks: it only needs to start.
root@pve-virt01 qm create 100 --name test-l2 --memory 256 --cores 1 --net0 virtio,bridge=vmbr0qm start 100qm status 100Output status: runningroot@pve-virt01 qm monitor 100qm monitor info kvmOutput kvm support: enabled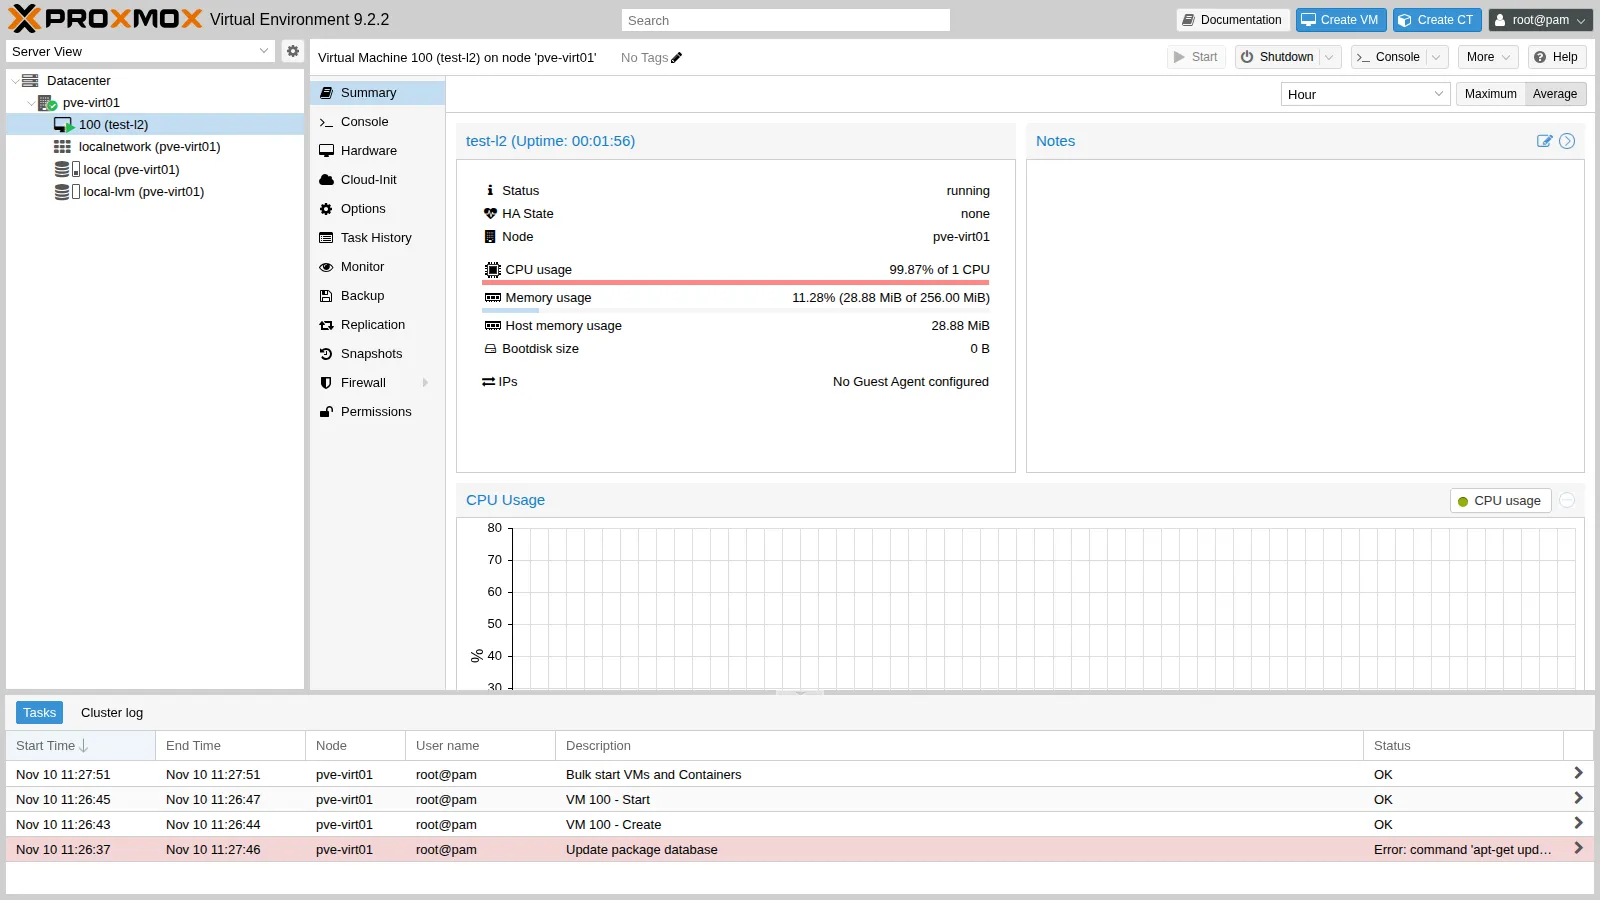
Without a disk, the firmware keeps looking for a boot device forever and the VM uses 100% of its CPU: this is normal. The task list also shows an Update package database error: the freshly installed node does not have the APT proxy yet, which is configured in Lab 04.
-
The trunk carries the allowed VLANs to the rest of the lab. Inside the node VM the second network card is
ens19: a temporary interface on VLAN 10 reaches the VLAN gateway (router01, Lab 26) and a container on another node:root@pve-virt01 ip link set ens19 upip link add link ens19 name ens19.10 type vlan id 10ip addr add 10.10.10.82/24 dev ens19.10ip link set ens19.10 upping -c3 -W1 10.10.10.1Output PING 10.10.10.1 (10.10.10.1) 56(84) bytes of data.64 bytes from 10.10.10.1: icmp_seq=1 ttl=64 time=3.86 ms64 bytes from 10.10.10.1: icmp_seq=2 ttl=64 time=0.930 ms64 bytes from 10.10.10.1: icmp_seq=3 ttl=64 time=1.46 ms--- 10.10.10.1 ping statistics ---3 packets transmitted, 3 received, 0% packet loss, time 2003msrtt min/avg/max/mdev = 0.930/2.083/3.860/1.274 msroot@pve-virt01 ping -c3 -W1 10.10.10.122Output PING 10.10.10.122 (10.10.10.122) 56(84) bytes of data.64 bytes from 10.10.10.122: icmp_seq=1 ttl=64 time=2.66 ms64 bytes from 10.10.10.122: icmp_seq=2 ttl=64 time=1.61 ms64 bytes from 10.10.10.122: icmp_seq=3 ttl=64 time=0.821 ms--- 10.10.10.122 ping statistics ---3 packets transmitted, 3 received, 0% packet loss, time 2005msrtt min/avg/max/mdev = 0.821/1.697/2.661/0.753 ms -
A VLAN not listed in
trunksdoes not pass. VLAN 100 is the migration network of Lab 22:root@pve-virt01 ip link add link ens19 name ens19.100 type vlan id 100ip addr add 10.100.10.82/24 dev ens19.100ip link set ens19.100 upping -c3 -W1 10.100.10.21Output PING 10.100.10.21 (10.100.10.21) 56(84) bytes of data.--- 10.100.10.21 ping statistics ---3 packets transmitted, 0 received, 100% packet loss, time 2025msFor the node VMs of the complete lab, leave the network cards without
trunks, so that all the VLANs of the bridge pass, as on the trunk ports of the physical switch.
4. Cleaning up the test
Section titled “4. Cleaning up the test”The test VM has done its job. The prepared ISO contains the root password in clear text, so it must be destroyed with shred:
qm stop 801 && qm destroy 801 --purge 1 --destroy-unreferenced-disks 1purging VM 801 from related configurations..shred -u /var/lib/vz/template/iso/pve92-auto.iso /dev/shm/answer.tomlrm -f /var/lib/vz/template/iso/proxmox-ve_9.2-1.isoapt remove proxmox-auto-install-assistantWhat changes compared with physical servers
Section titled “What changes compared with physical servers”Proxmox VE behaves the same way, but some lab results change:
- Performance. CPU, disks and network go through two levels of virtualization: the benchmark figures (Lab 19, Lab 34) are lower and vary more from one test to the next. The multiqueue of VirtIO network cards, which helps on hardware, may bring no advantage in a virtual lab.
- Ceph. With slow disks Ceph often reports
BLUESTORE_SLOW_OP_ALERT. The warning stays visible for 24 hours: withceph config set osd bluestore_slow_ops_warn_lifetime 600it disappears 10 minutes after the last occurrence. - Boot times. The first boot of a VM with UEFI firmware (OVMF) can take a few minutes, and the Press any key to boot from CD message times out before you see it: boot from the ISO with the firmware Boot Manager. Installing Windows Server takes much longer.
- MTU and VLANs. The bridge of the host server decides which frames pass: for the QinQ tests of Lab 28 and for any jumbo frames, raise the MTU of the bridge and of the network cards of the node VMs.
- Failures. Instead of the management controller of the physical servers, to power off a node abruptly use
qm stop <vmid>on the host server, andqm startto power it back on. HA fencing (Lab 49) works with the software watchdog just as on hardware. - New hardware. Disks and network cards are added with the VM running: on hardware, by contrast, cards are installed with the server powered off.
Verification and tests
Section titled “Verification and tests”- On the host server
nestedisY. - Inside the node VM
lscpushowsVirtualization: VT-x(orAMD-V) and/dev/kvmexists. - A nested VM starts and
info kvmanswerskvm support: enabled. - From the node VM the allowed VLANs reach the rest of the lab, while those excluded by
trunksdo not.
Final lab state
Section titled “Final lab state”- The test VM 801
pve-virt01has been deleted, together with its disks. - The ISOs and the answer file have been destroyed, and the automated installation assistant has been removed from
desopve03.
What you learned
Section titled “What you learned”- Nested virtualization requires nesting to be enabled in the KVM module of the host server and the
hostCPU type in the node VMs. - A VLAN-aware bridge acts as a switch: a network card without a tag is a trunk, and
trunksselects the VLANs that pass. - The MAC filter of the Proxmox VE firewall must be turned off on the network cards of the node VMs, otherwise the nested VMs stay isolated.
- In a virtual lab the labs work the same way, but performance, boot times and failure simulation change.