

Lab 07 – First VM and first container
Dependencies
Section titled “Dependencies”- Previous labs: Lab 06: the
deso-clustercluster with three nodes. - Services: proxy
proxy.proxmox.community:3128to download ISOs and templates, DNS172.27.199.20. - Addresses:
172.27.199.100for the VM and172.27.199.101for the container, from the range reserved for the lab guests (Appendix B). - Credentials:
root/<lab-password>→ Appendix B.
Objectives
Section titled “Objectives”- Download an ISO directly to the node, verifying its SHA-256 checksum.
- Create a virtual machine with the wizard and understand each tab.
- Install Debian 13 in the VM from the console of the web interface.
- Download a template and create an LXC container.
- Verify the network and Internet access of the VM and the container.
How it works
Section titled “How it works”VMs and containers
Section titled “VMs and containers”Proxmox VE runs two kinds of guests:
| Virtual machine (VM) | Container (CT) | |
|---|---|---|
| Technology | KVM and QEMU: complete virtual hardware | LXC: isolated processes on the node’s kernel |
| Operating system | any (Linux, Windows, BSD…) with its own kernel | Linux only, shares the node’s kernel |
| Boots from | ISO or disk image, with an installer | ready-made template, in a few seconds |
| Isolation | maximum | good, but the kernel is shared |
| Resources | more memory and disk | very lightweight |
| Commands | qm |
pct |
VMs and containers share the IDs (VMID) at cluster level: the same number cannot be used twice. In the manual we use a simple convention: the guest with ID 1xx has the address 172.27.199.1xx.
The node storages
Section titled “The node storages”A ZFS installation creates two local storages:
local, a directory (/var/lib/vz) for files: ISOs intemplate/iso, container templates intemplate/cache, backups;local-zfs, a ZFS pool for VM and container disks: each disk is a zvol (VM) or a dataset (container).
They are local storages: an ISO downloaded on desopve01 is not visible on desopve02. Shared storage arrives in track A.
Downloading from the node
Section titled “Downloading from the node”Download from URL has the node download the file directly, through the datacenter proxy (lab 04), instead of uploading it from your browser. If you provide the checksum of the file, the node verifies it and discards the download if it does not match.
Procedure
Section titled “Procedure”1. Download the Debian ISO
Section titled “1. Download the Debian ISO”-
Read the checksum of the current netinst ISO from the
SHA256SUMSfile published by Debian. The browser on the domain controller cannot reach the Internet, so download the file from the node through the proxy, in the Shell ofdesopve01or over SSH:root@desopve01 curl -s -x http://proxy.proxmox.community:3128 https://cdimage.debian.org/debian-cd/current/amd64/iso-cd/SHA256SUMS | grep netinstOutput a7ef94ac2fb9a7fec454552abd629b7cc9d5155c886165a45649f5ce6167e355 debian-13.7.0-amd64-netinst.isod33ed0c64bde5ff43445c0c530f9da599954d8585771c55345cb840d7997d4a7 debian-edu-13.7.0-amd64-netinst.isod6d4e0d038936230229a66b7c1765452e73c72a962e79dbb99544882295271e8 debian-mac-13.7.0-amd64-netinst.isoYou need the first line, the one for
debian-13.7.0-amd64-netinst.iso. When Debian publishes a newer release, thecurrent/folder contains the new ISO: use the name and the checksum you read in the file (older releases remain inhttps://cdimage.debian.org/cdimage/archive/). -
In the web interface, select the
local (desopve01)storage → ISO Images → Download from URL. -
Paste the URL
https://cdimage.debian.org/debian-cd/current/amd64/iso-cd/debian-13.7.0-amd64-netinst.isoand click Query URL: the file name, size and type appear. -
Check Advanced, choose Hash algorithm
SHA-256and paste the checksum into Checksum.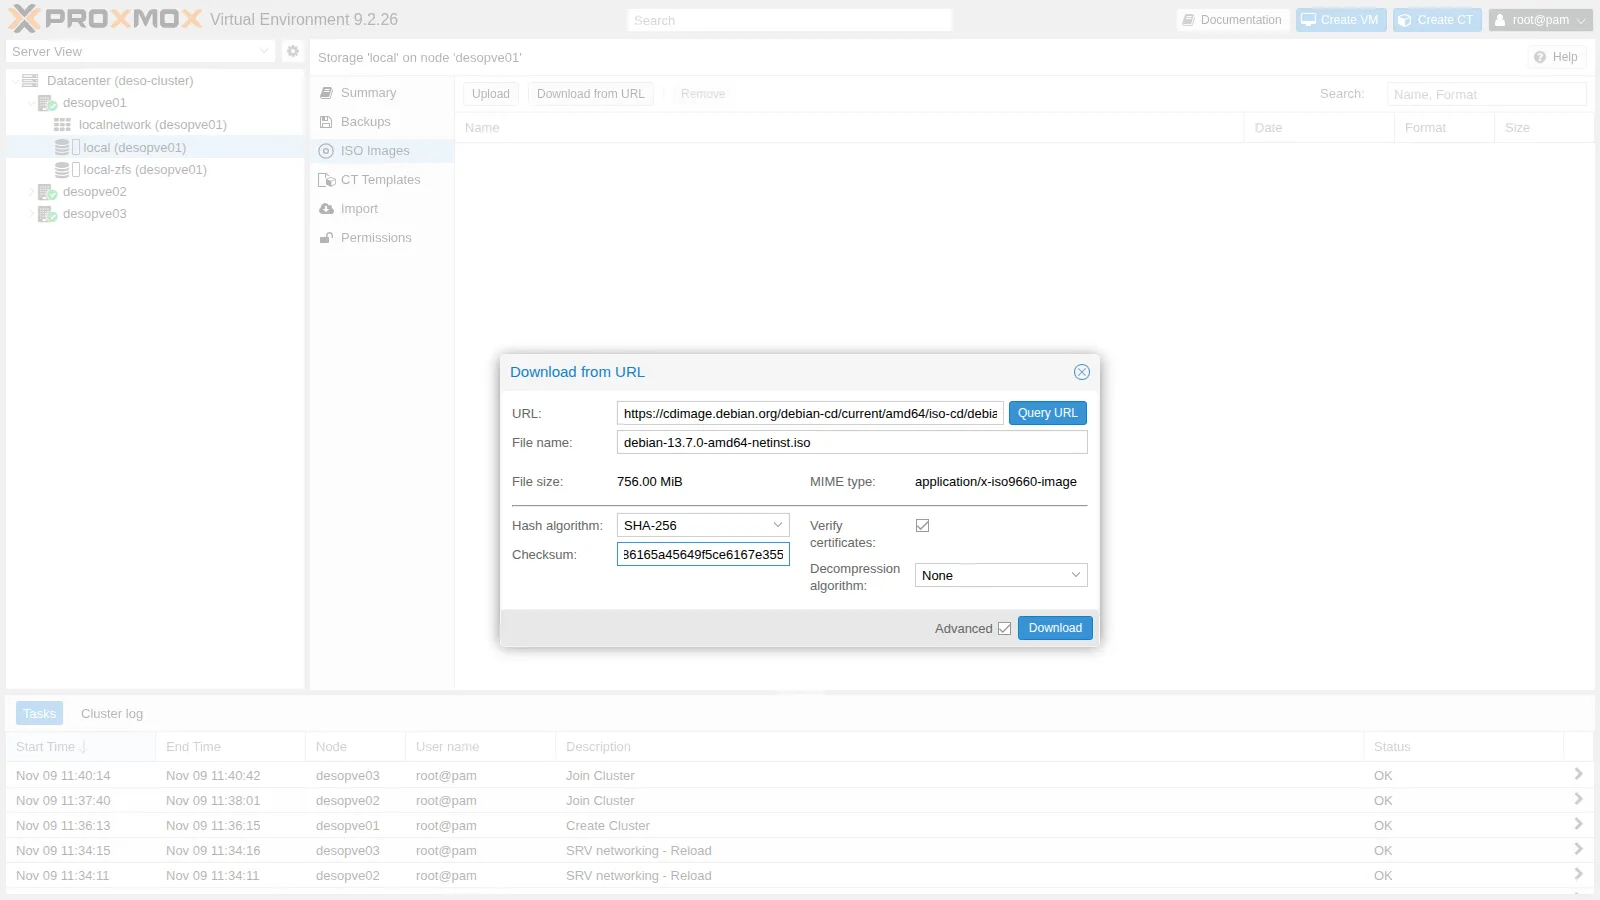
-
Click Download. The task log ends with the checksum verification:
2026-11-09 12:48:27 (56.9 MB/s) - '/var/lib/vz/template/iso/debian-13.7.0-amd64-netinst.iso.tmp_dwnl.8549' saved [792723456/792723456]calculating checksum...OK, checksum verifieddownload of 'https://cdimage.debian.org/debian-cd/current/amd64/iso-cd/debian-13.7.0-amd64-netinst.iso' to '/var/lib/vz/template/iso/debian-13.7.0-amd64-netinst.iso' finishedTASK OK
2. Create the VM
Section titled “2. Create the VM”Click Create VM at the top right. The wizard has eight tabs.
-
General. The Node is the one on which you create the VM (
desopve01); the suggested VM ID is the first free one (100). For Name, usedebian01.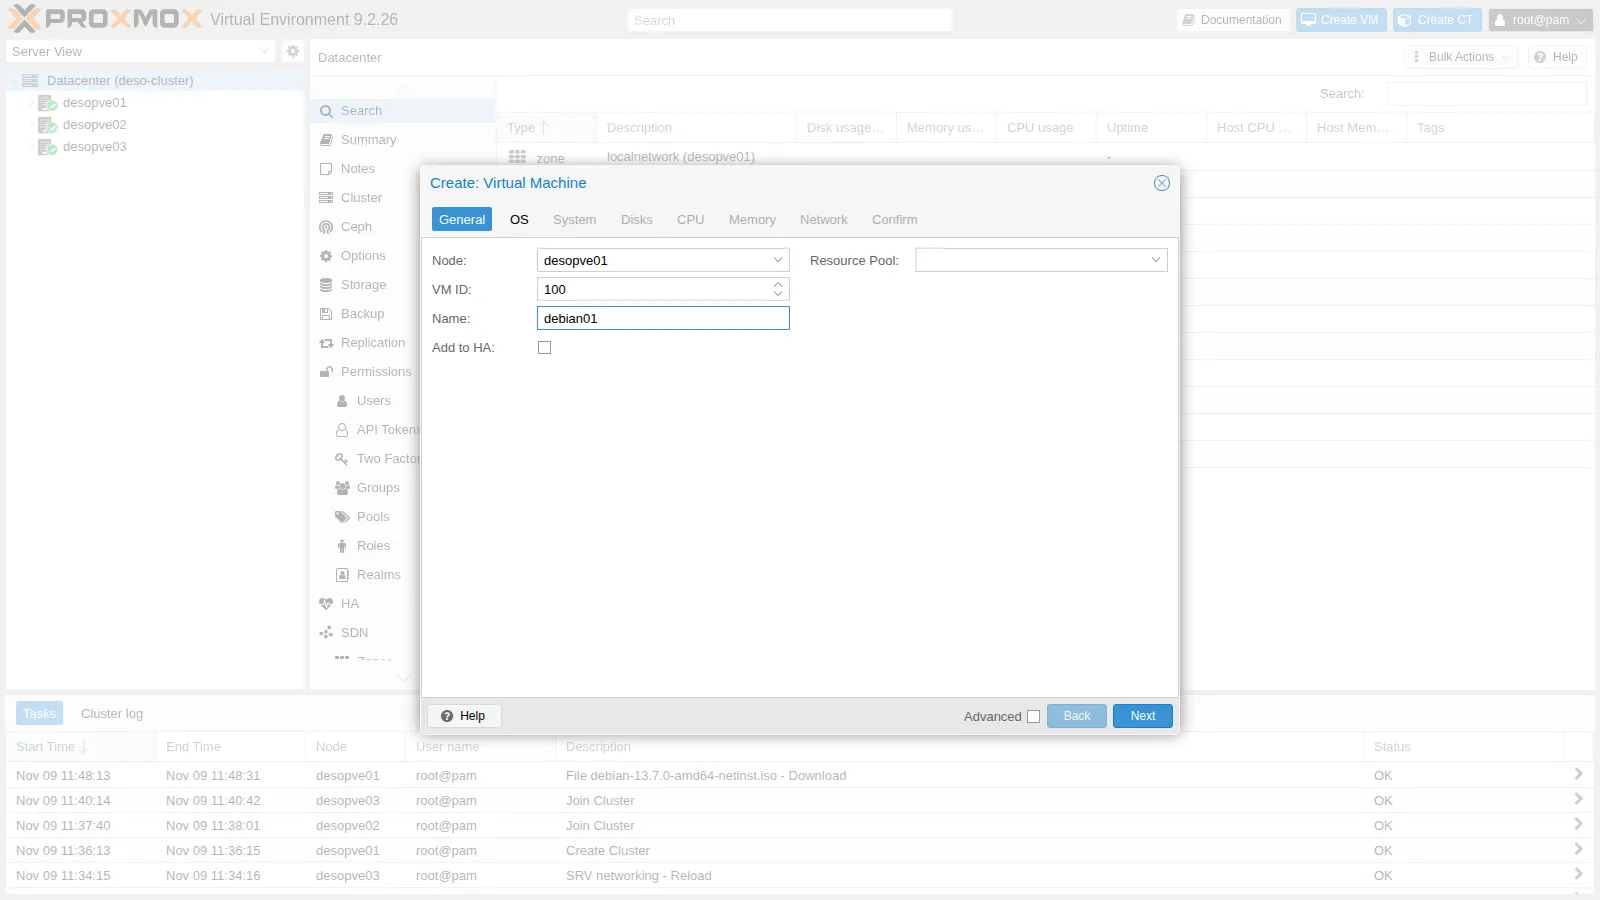
-
OS. Choose Use CD/DVD disc image file (iso), storage
local, ISOdebian-13.7.0-amd64-netinst.iso. Proxmox VE uses the Guest OS (Linux, kernel7.x - 2.6) to choose the best default values.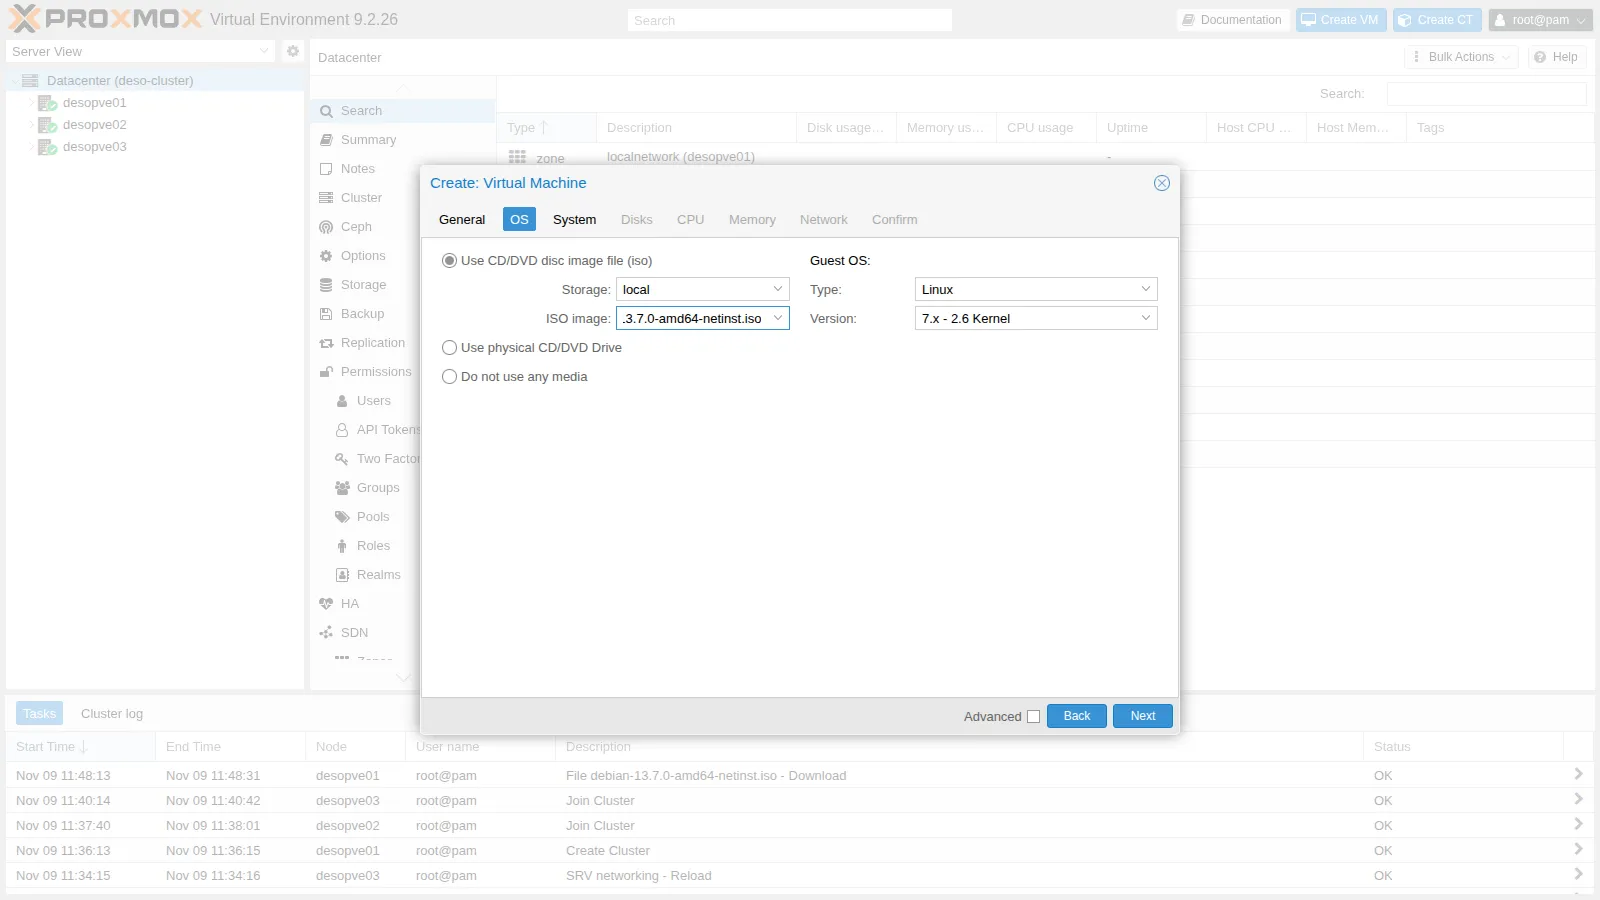
-
System. Leave the default values: graphic card
Default, machinei440fx, firmwareSeaBIOS, disk controller VirtIO SCSI single. You will enable the Qemu Agent option in lab 38. -
Disks. Disk
scsi0on thelocal-zfsstorage, Disk size16GiB. IO thread is already enabled: the disk has its own I/O thread (lab 37).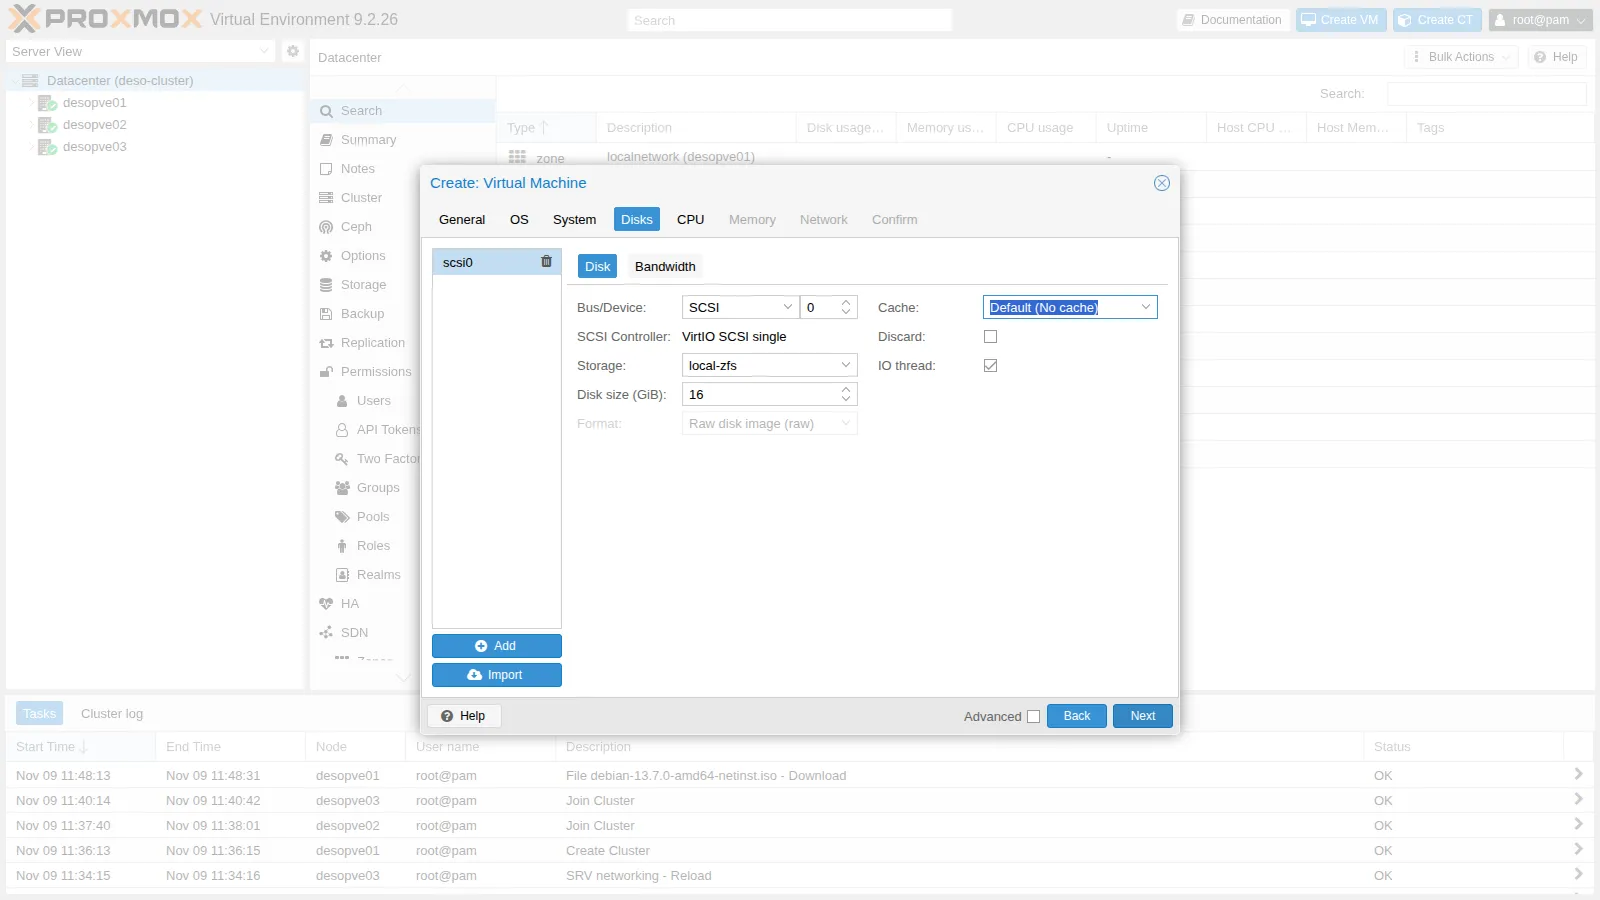
-
CPU. Cores
2. The default Type,x86-64-v2-AES, is a generic CPU model that lets you migrate the VM between nodes with different processors (lab 35).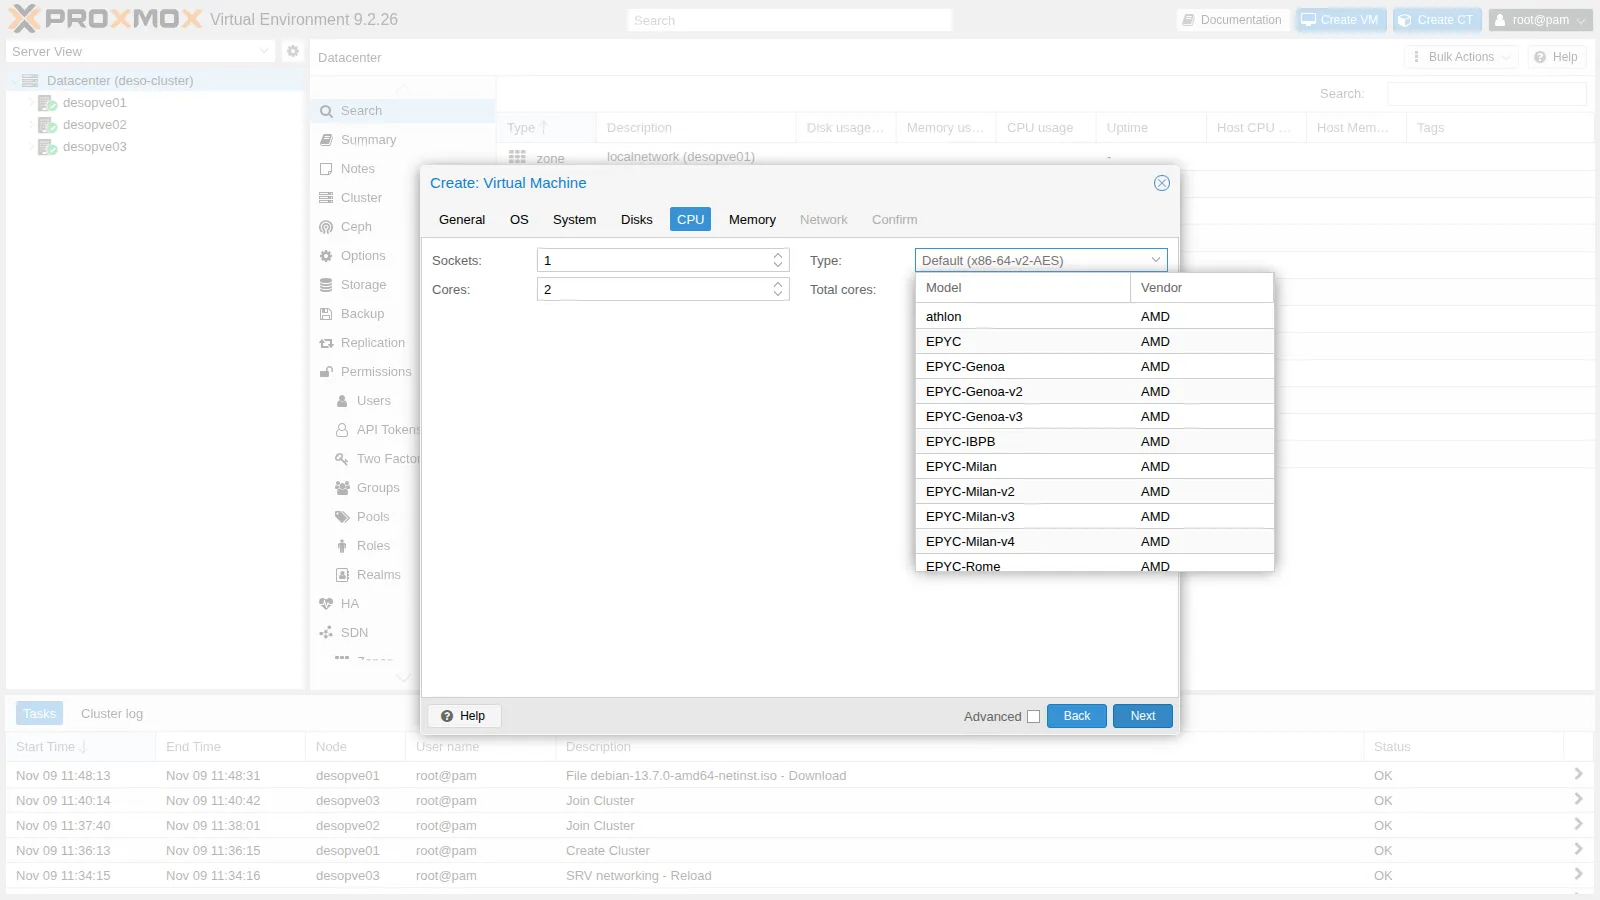
-
Memory. Leave
2048MiB. -
Network. Bridge
vmbr0, model VirtIO (paravirtualized), firewall enabled: the VM is connected to the management network the way a physical server is connected to the switch.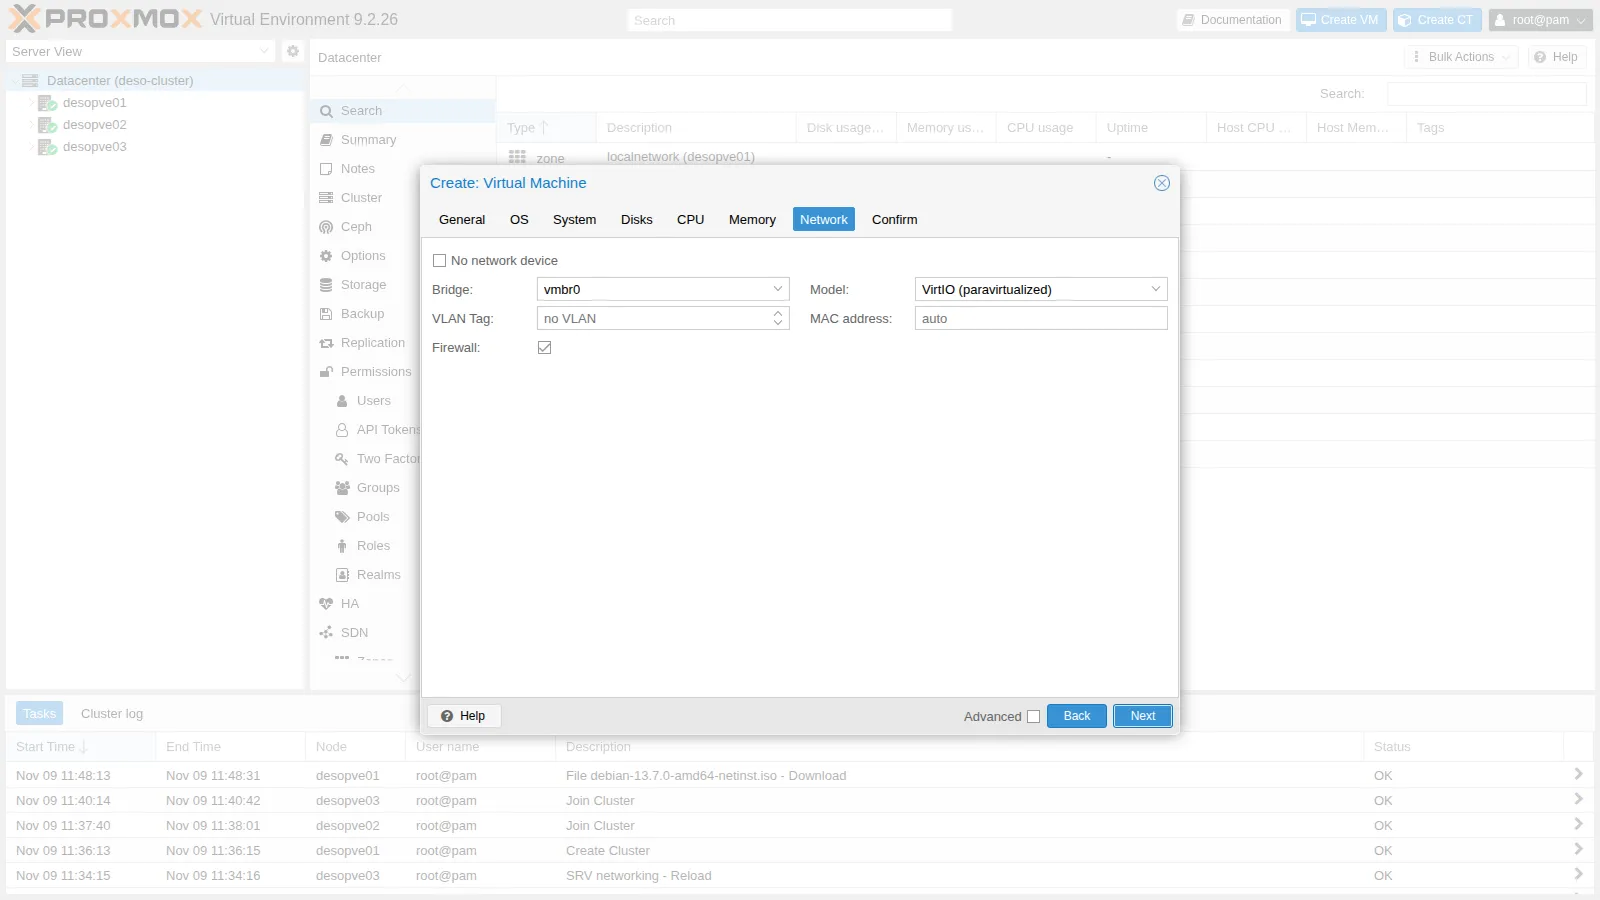
-
Confirm. The summary shows the parameters that will be passed to the API. Leave Start after created unchecked and click Finish.
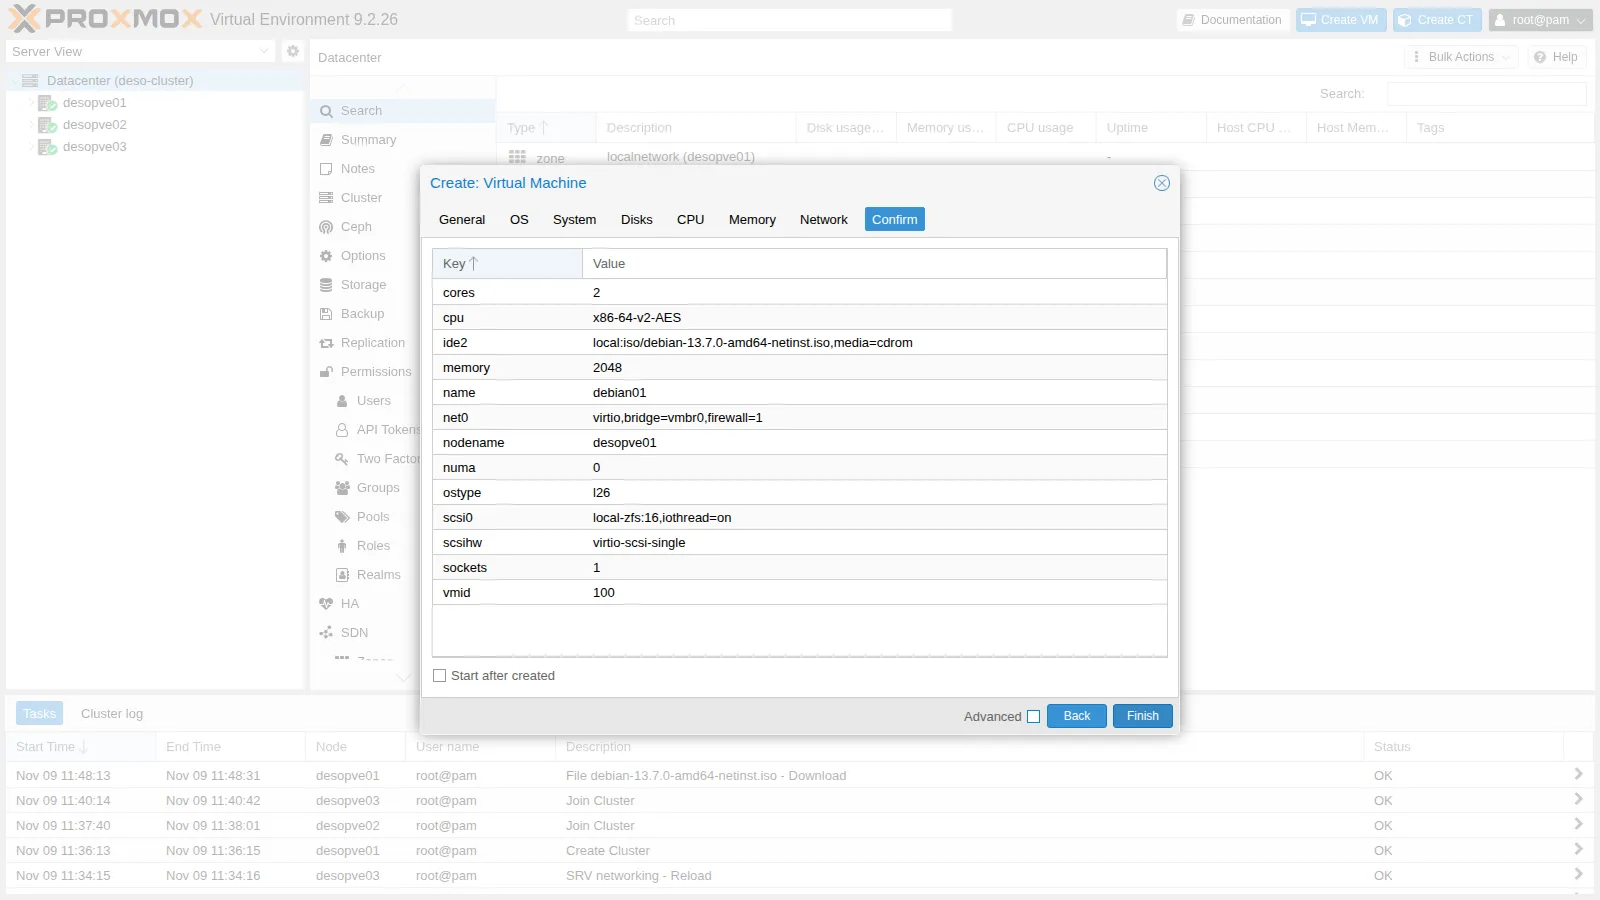
The VM 100 (debian01) appears in the tree under desopve01. Its configuration is a plain text file, /etc/pve/qemu-server/100.conf, shared across the cluster:
qm config 100boot: order=scsi0;ide2;net0cores: 2cpu: x86-64-v2-AESide2: local:iso/debian-13.7.0-amd64-netinst.iso,media=cdrom,size=756Mmemory: 2048meta: creation-qemu=11.1.3,ctime=1794225060name: debian01net0: virtio=BC:24:11:2B:FF:8A,bridge=vmbr0,firewall=1numa: 0ostype: l26scsi0: local-zfs:vm-100-disk-0,iothread=1,size=16Gscsihw: virtio-scsi-singlesmbios1: uuid=ce65e842-1c38-47f2-9112-da688d1a8025sockets: 1vmgenid: f52461b5-dbdf-4245-83ba-9897b7d1eacdThe boot order (boot) tries the disk first and then the CD: as long as the disk is empty, the VM boots from the ISO; after the installation it boots from the disk.
3. Install Debian from the console
Section titled “3. Install Debian from the console”-
Select the VM, click Start and open Console: it is the VM screen in the browser (noVNC). In the menu, choose Install (the text-mode installer) and press Enter.
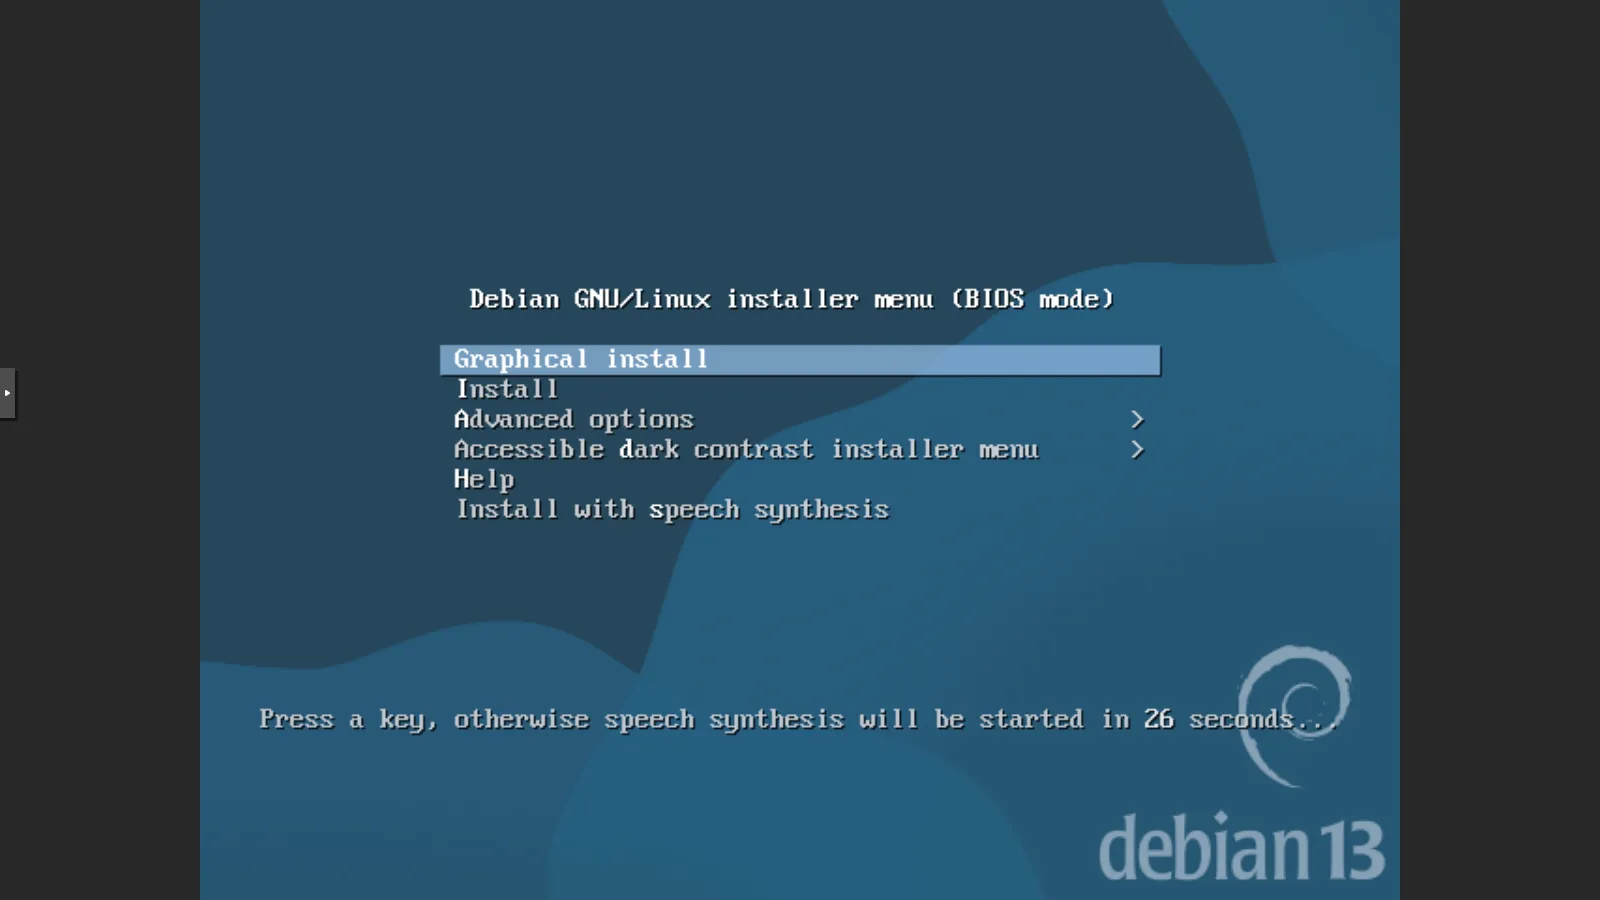
-
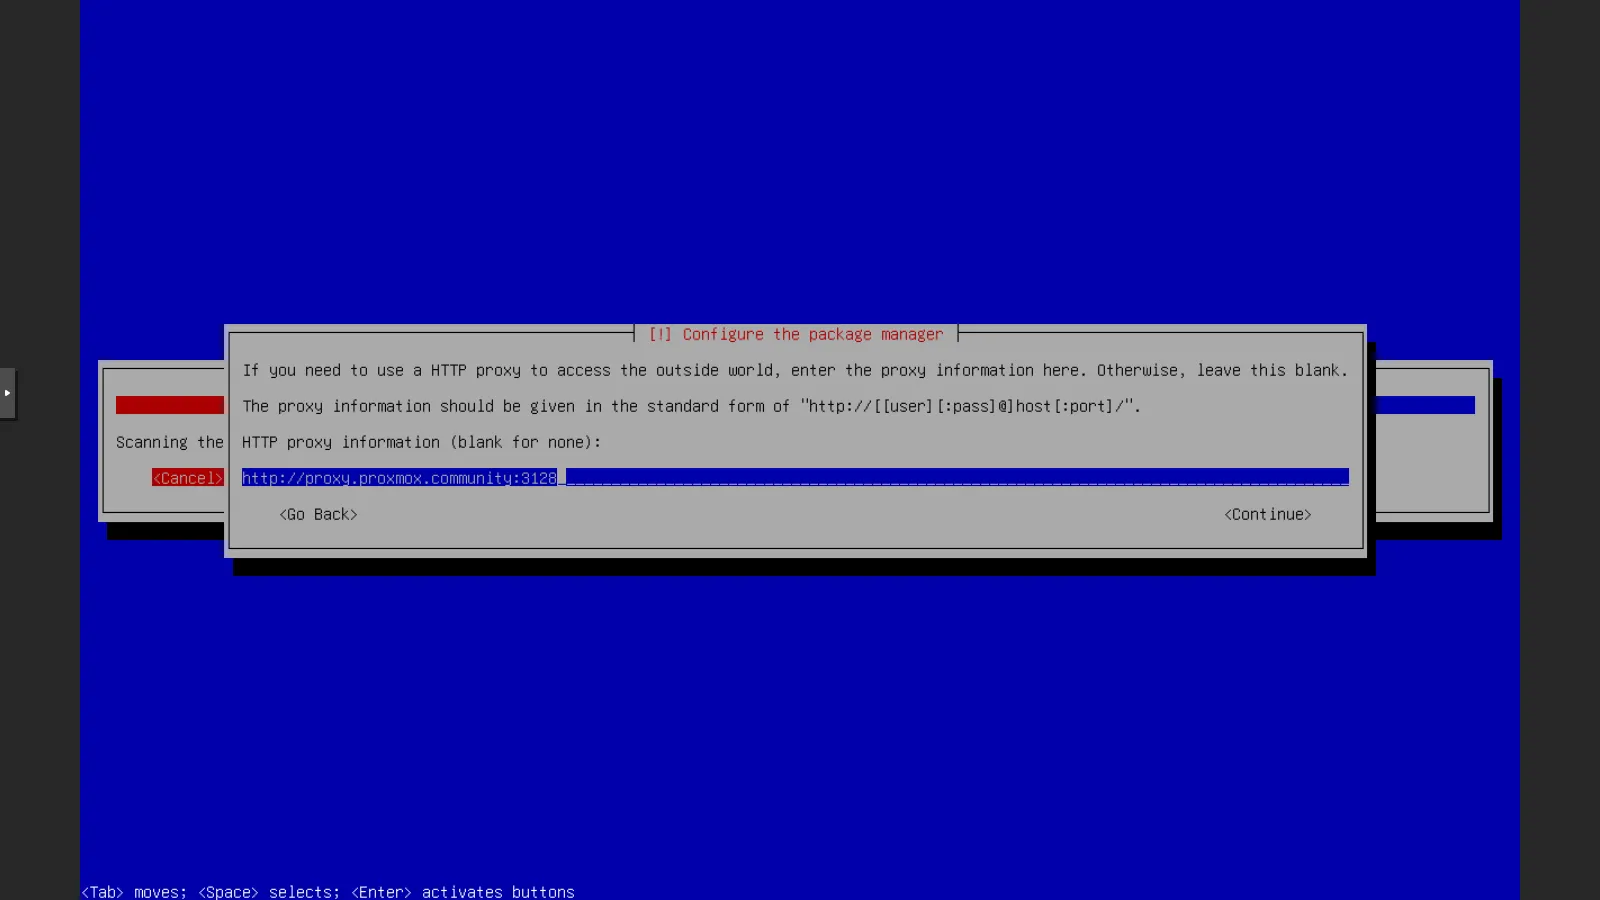
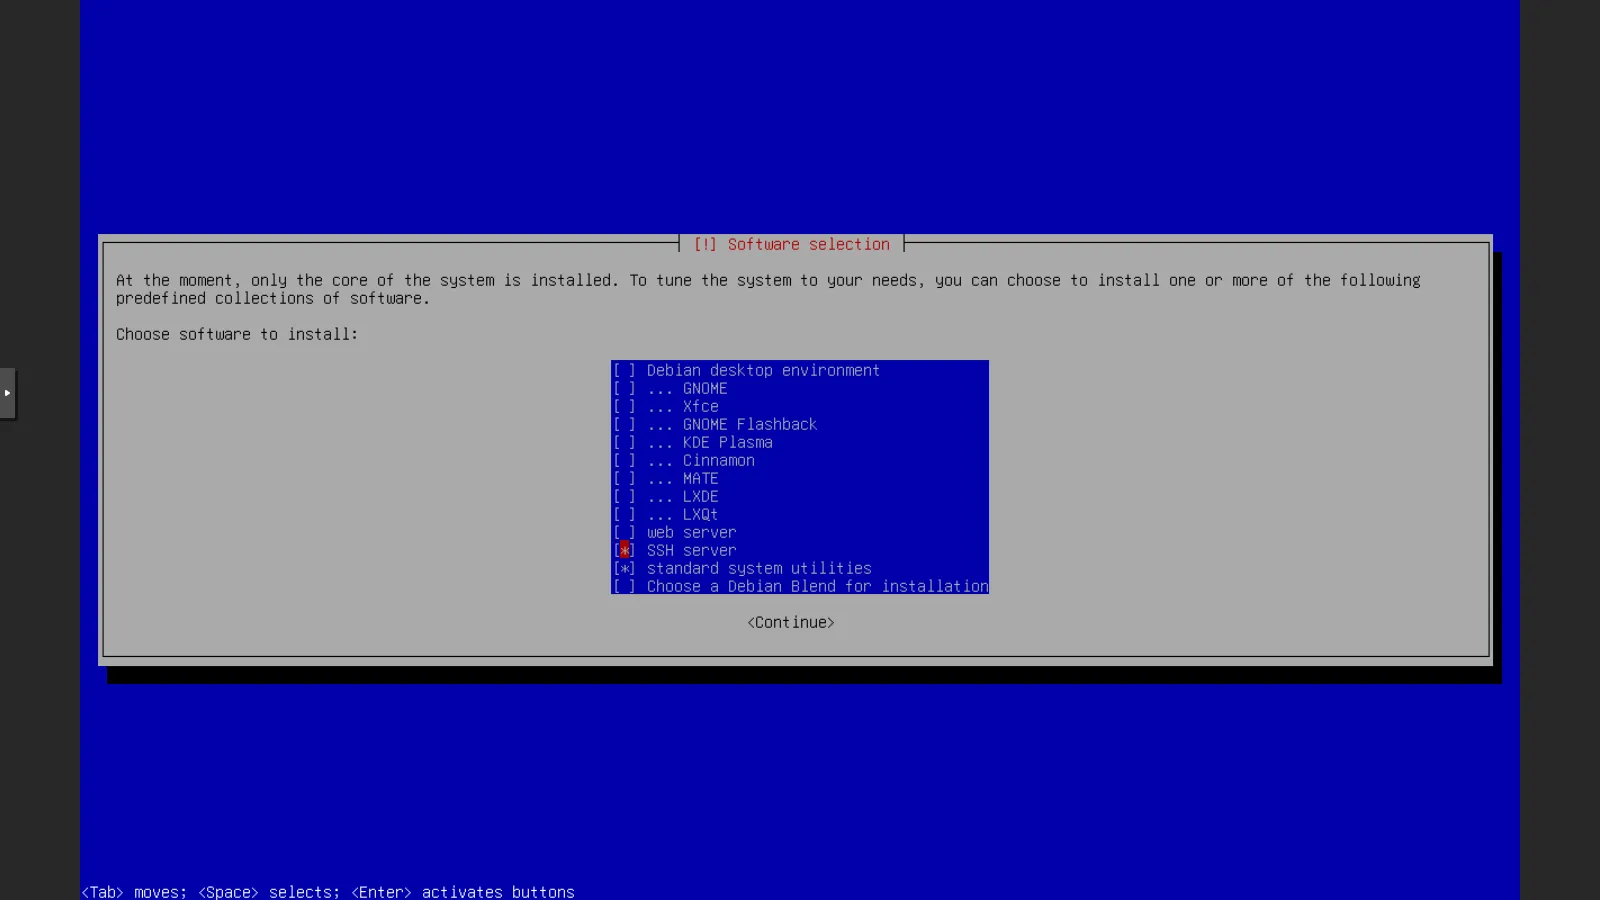
Answer the installer’s questions:
Question Answer Language EnglishLocation other→Europe→ItalyLocale United States – en_US.UTF-8Keymap ItalianNetwork configuration DHCP does not respond (there is no DHCP server on the lab network): Cancel, then Configure network manually IP address 172.27.199.100/24Gateway 172.27.199.1(suggested)Name server 172.27.199.20Hostname / Domain debian01/proxmox.communityRoot password <lab-password>User full name Lab User, usernamelabuser, password<lab-password>Time from the Internet the installer tries to contact a public NTP server: Cancel Partitioning Guided – use entire disk, the 17.2 GB QEMU HARDDISKdisk, All files in one partition, confirm with YesPackage manager mirror in Italy, deb.debian.orgHTTP proxy http://proxy.proxmox.community:3128Popularity contest No Software only SSH server and standard system utilities GRUB Yes, on the /dev/sdadiskThe disk shows up as
QEMU HARDDISK: it is the virtual disk that Proxmox VE presents to the VM. These are the most important screens: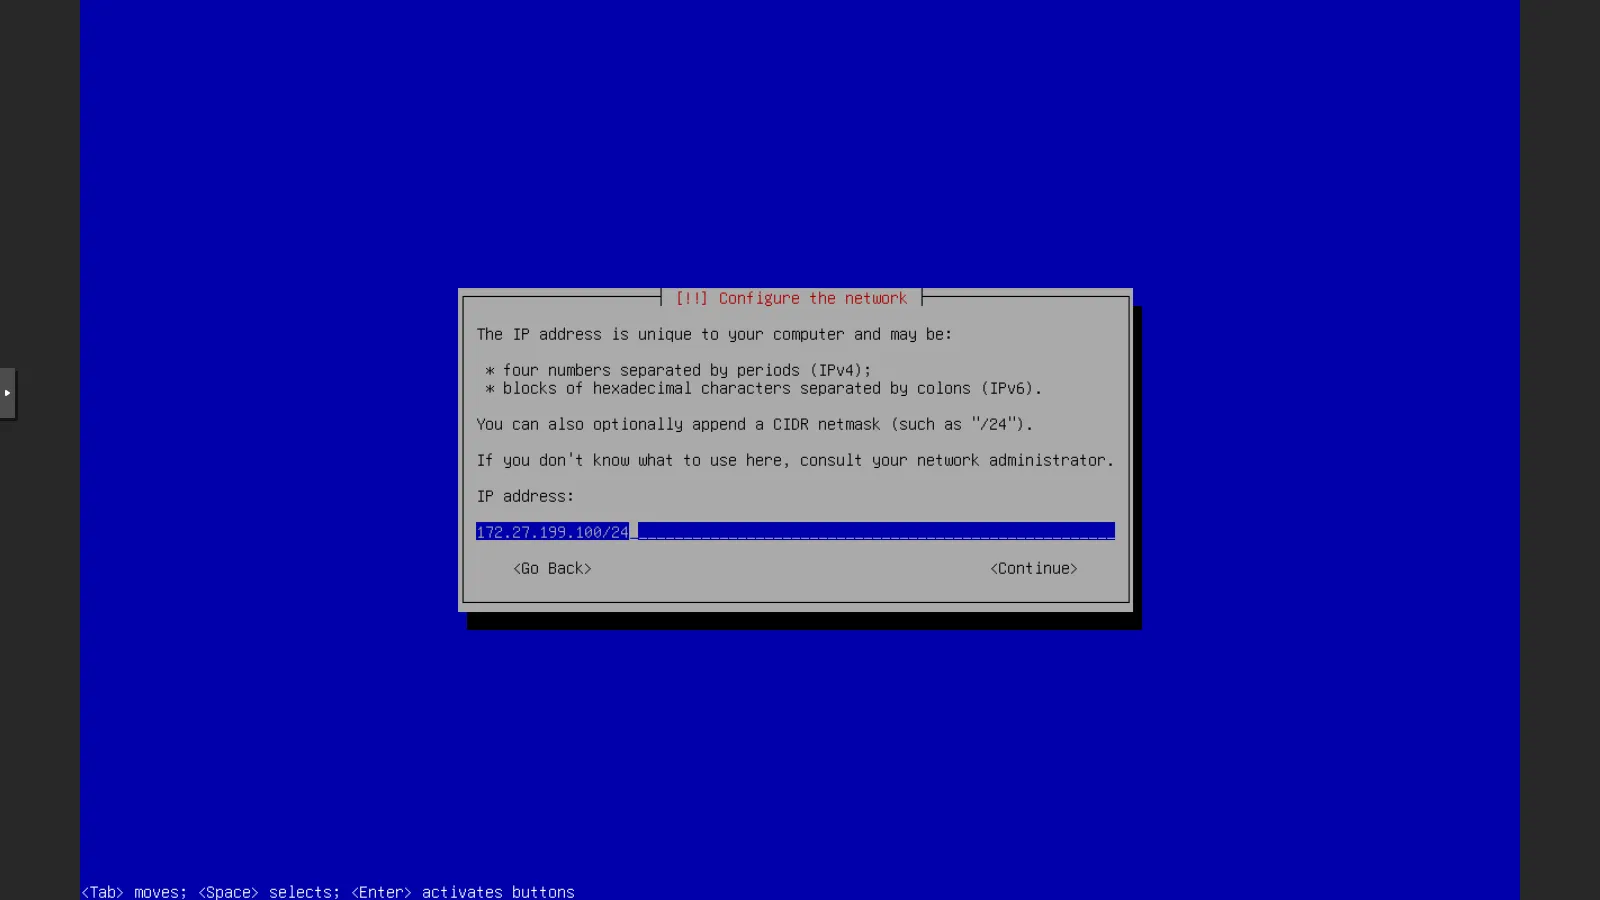
-
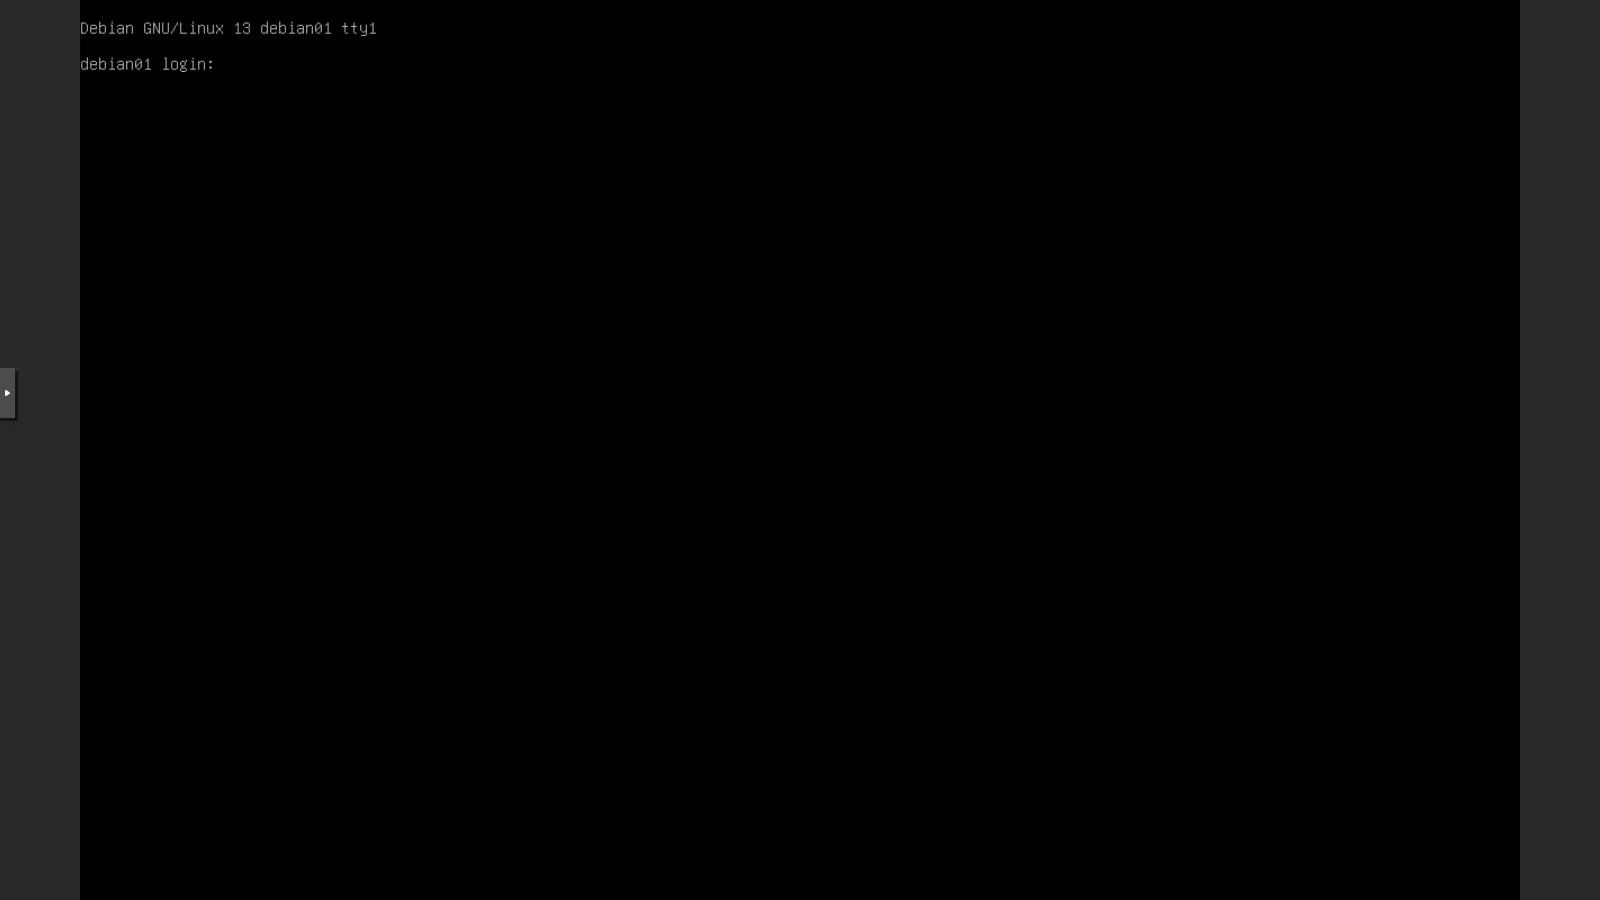
When the installer asks you to reboot, select Continue. The VM restarts from the disk and shows the login prompt.
-
Detach the ISO from the VM. In the GUI, the same setting is in Hardware → CD/DVD Drive → Do not use any media:
root@desopve01 qm set 100 --ide2 none,media=cdromOutput update VM 100: -ide2 none,media=cdrom -
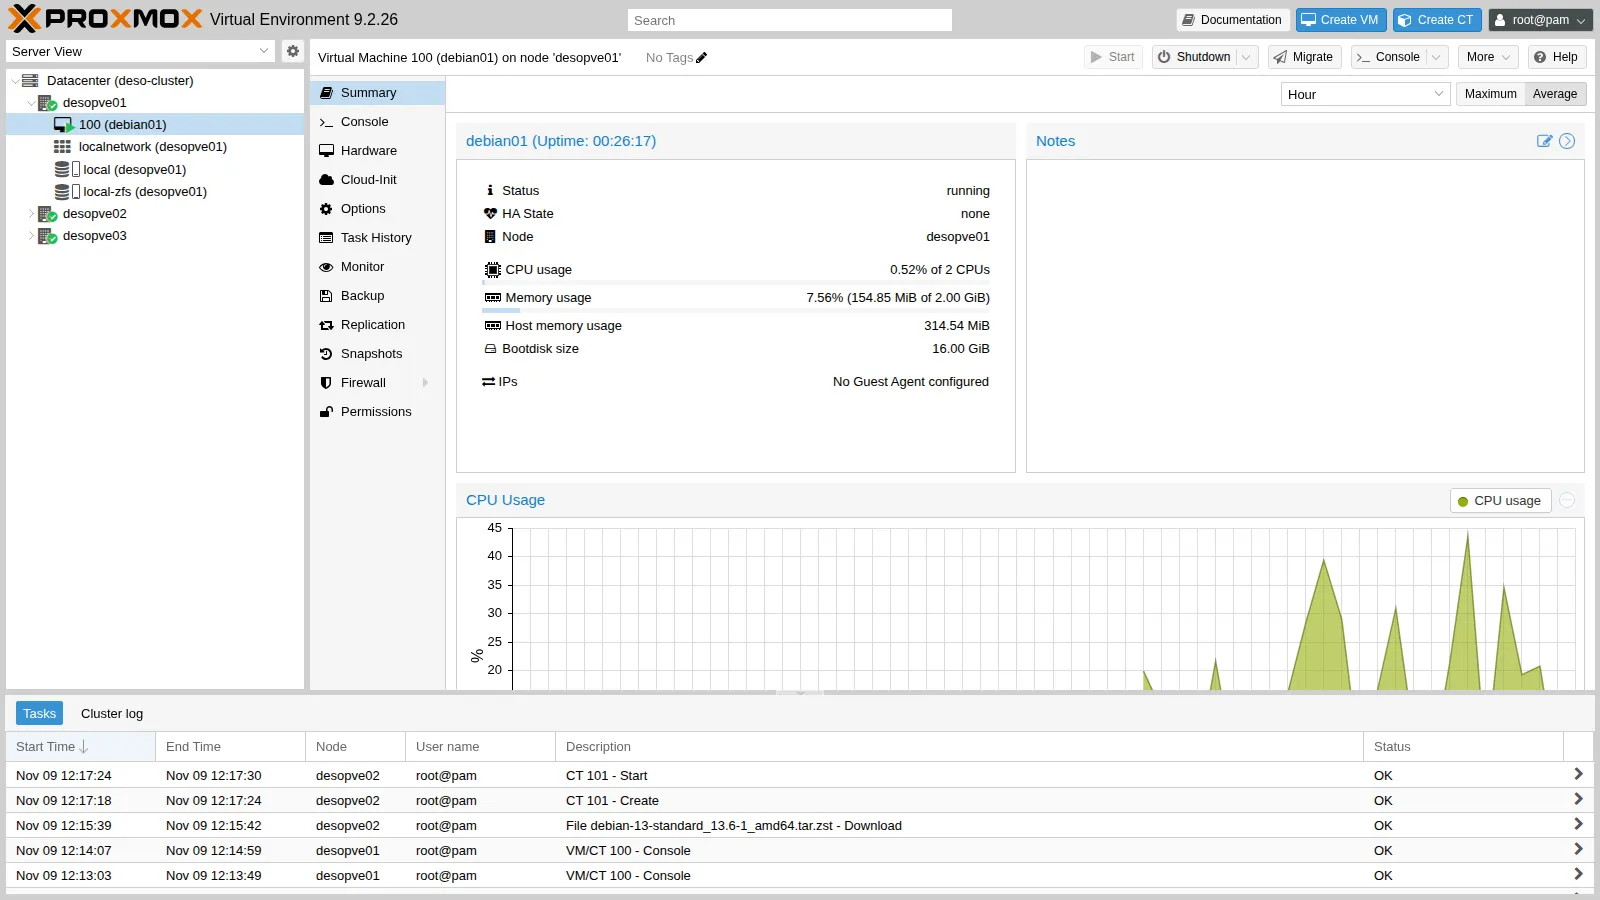
The VM Summary shows the status, the node, and the CPU, memory and disk usage.
4. Download a container template
Section titled “4. Download a container template”-
Select the
local (desopve02)storage → CT Templates → Templates. The list contains the official Proxmox templates: operating systems (system) and ready-made applications (turnkeylinux). -
Search for
debian-13, select debian-13-standard and click Download.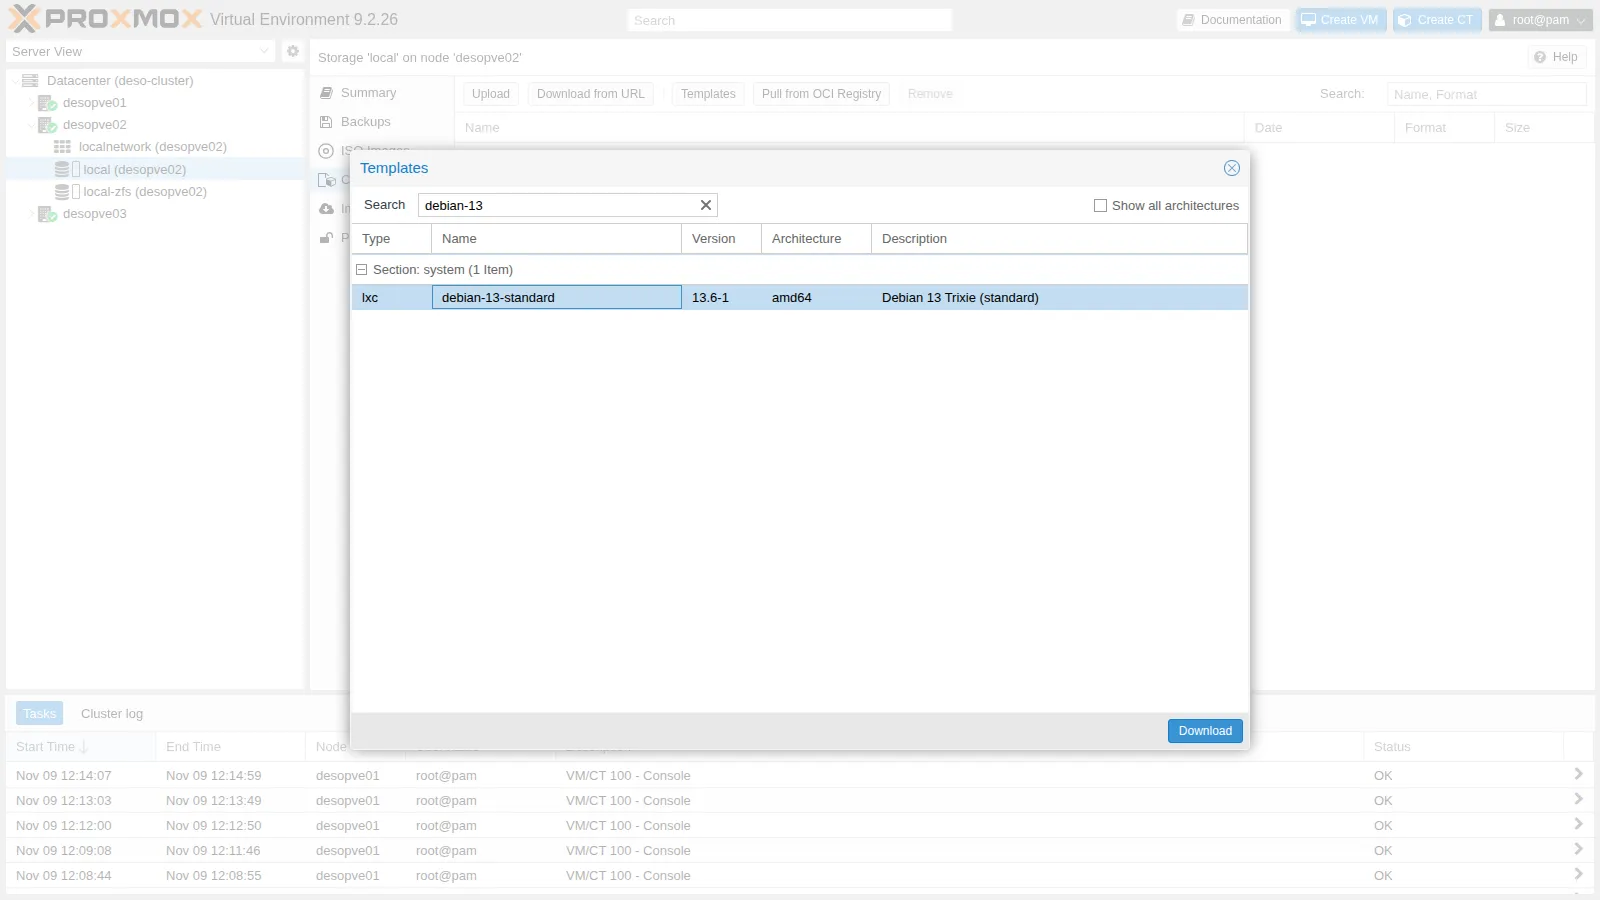
Here too the node verifies the checksum of the file:
calculating checksum...OK, checksum verifieddownload of 'http://download.proxmox.com/images/system/debian-13-standard_13.6-1_amd64.tar.zst' to '/var/lib/vz/template/cache/debian-13-standard_13.6-1_amd64.tar.zst' finishedTASK OK
5. Create the container
Section titled “5. Create the container”Click Create CT.
-
General. Node
desopve02: from the interface of one node you can create guests on any node of the cluster. Then CT ID101, Hostnamedebian-ct01and therootpassword of the container. Unprivileged container is enabled: therootuser of the container maps to an unprivileged user on the node, which is the secure setting (lab 41).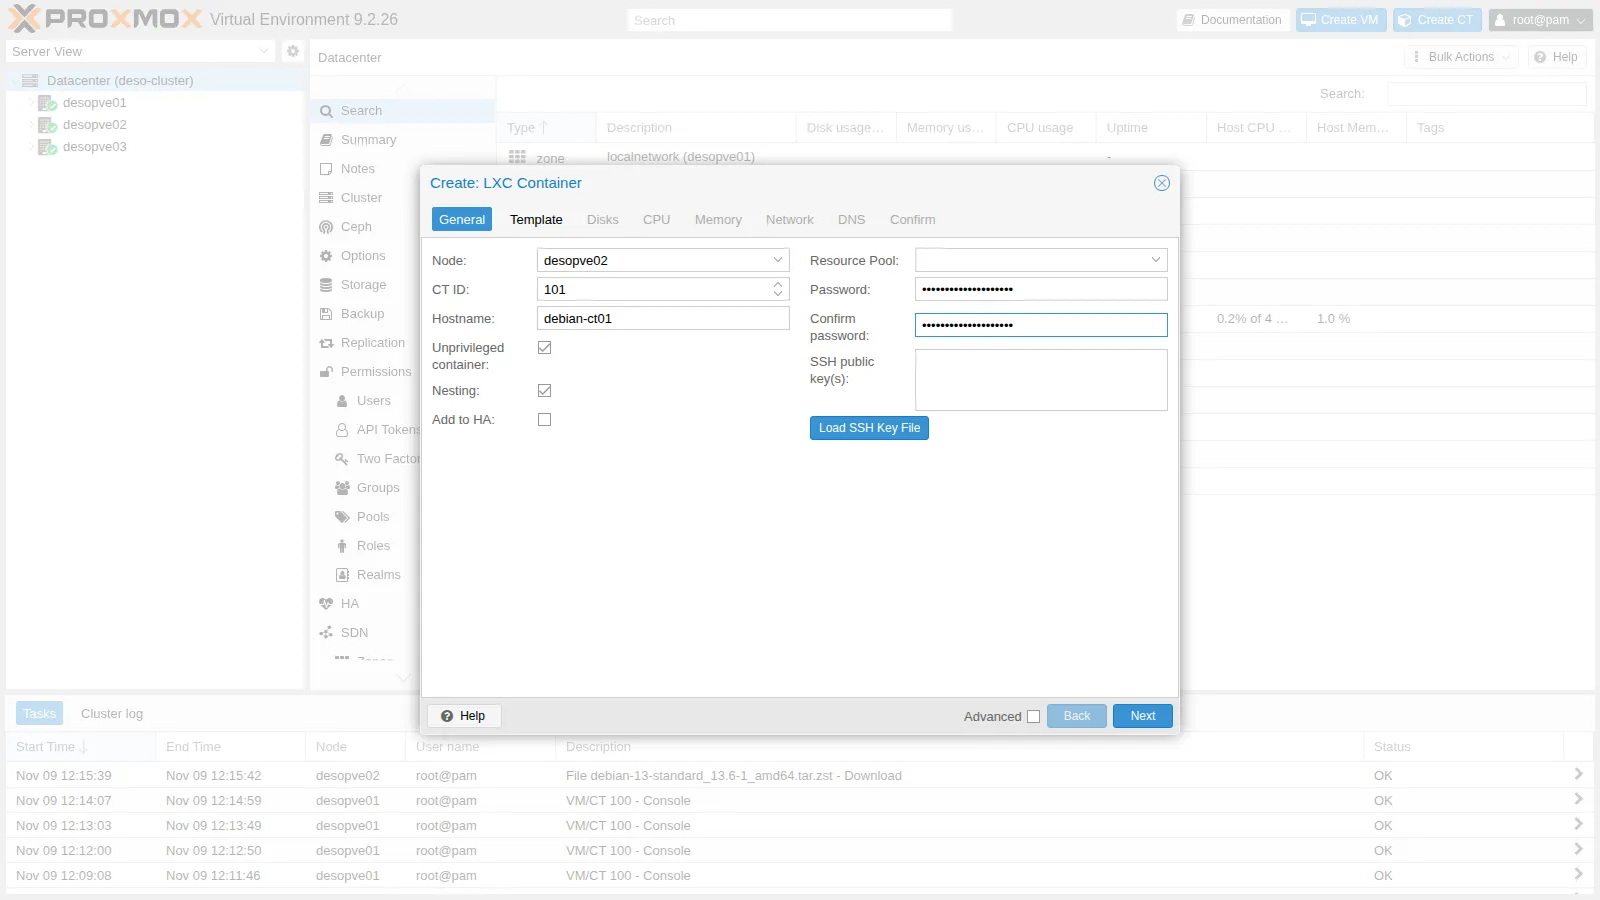
-
Template. Storage
local, templatedebian-13-standard_13.6-1_amd64.tar.zst. -
Disks. Root disk on
local-zfs,8GiB. -
CPU and Memory.
1core,1024MiB of memory and512MiB of swap. -
Network.
eth0on thevmbr0bridge, static IPv4172.27.199.101/24, gateway172.27.199.1.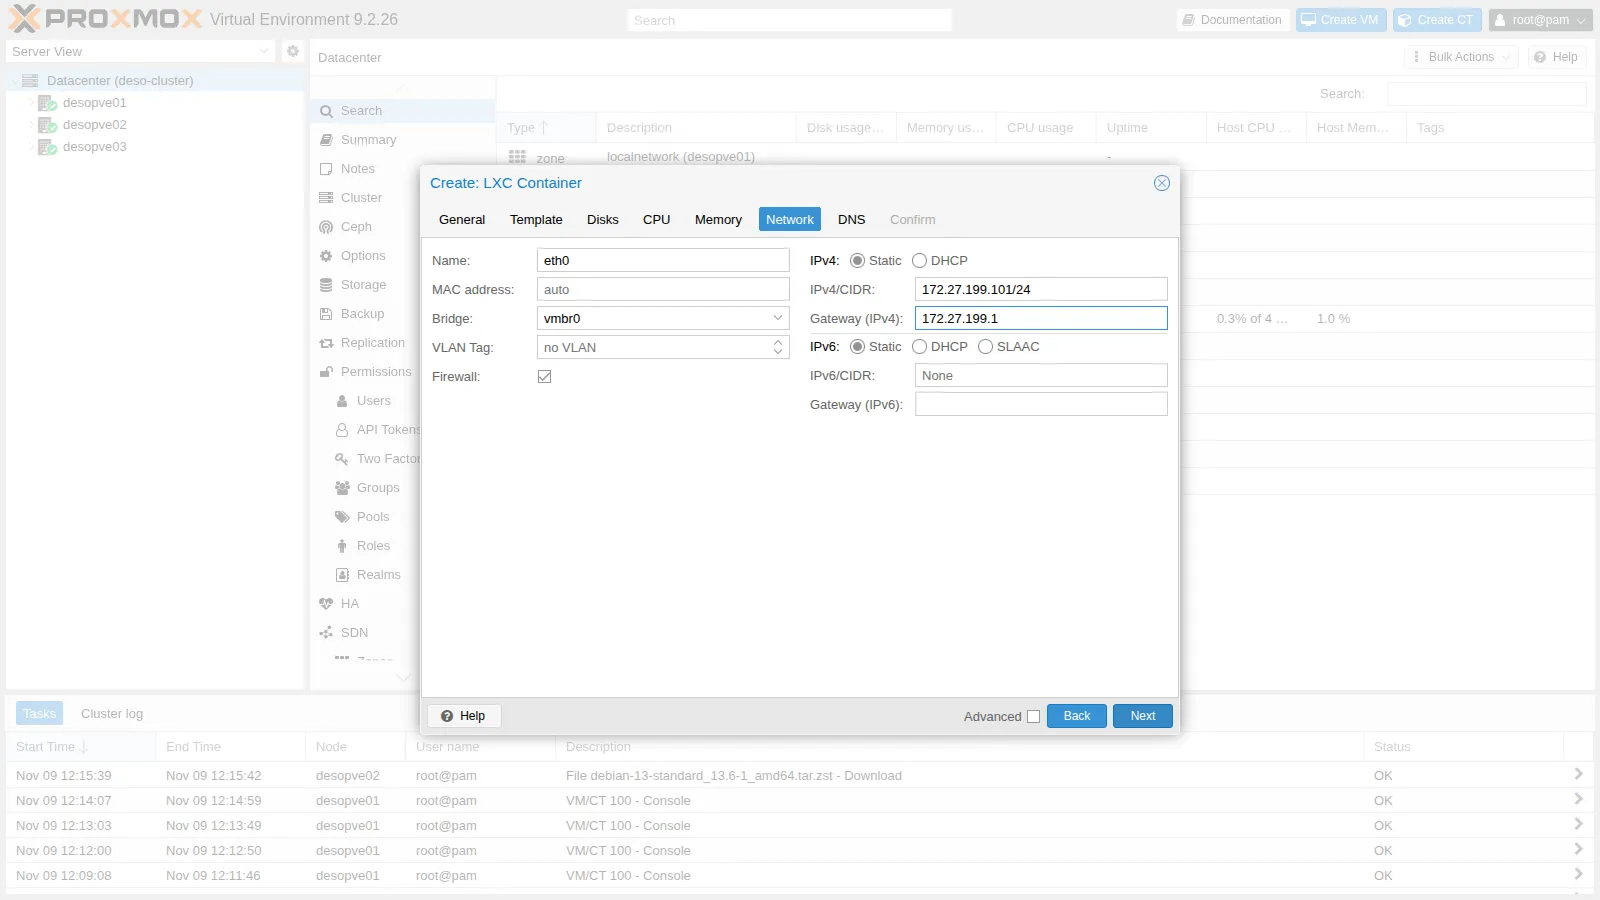
-
DNS. Leave the fields empty: the container uses the DNS settings of the node.
-
Confirm. Check Start after created and click Finish.
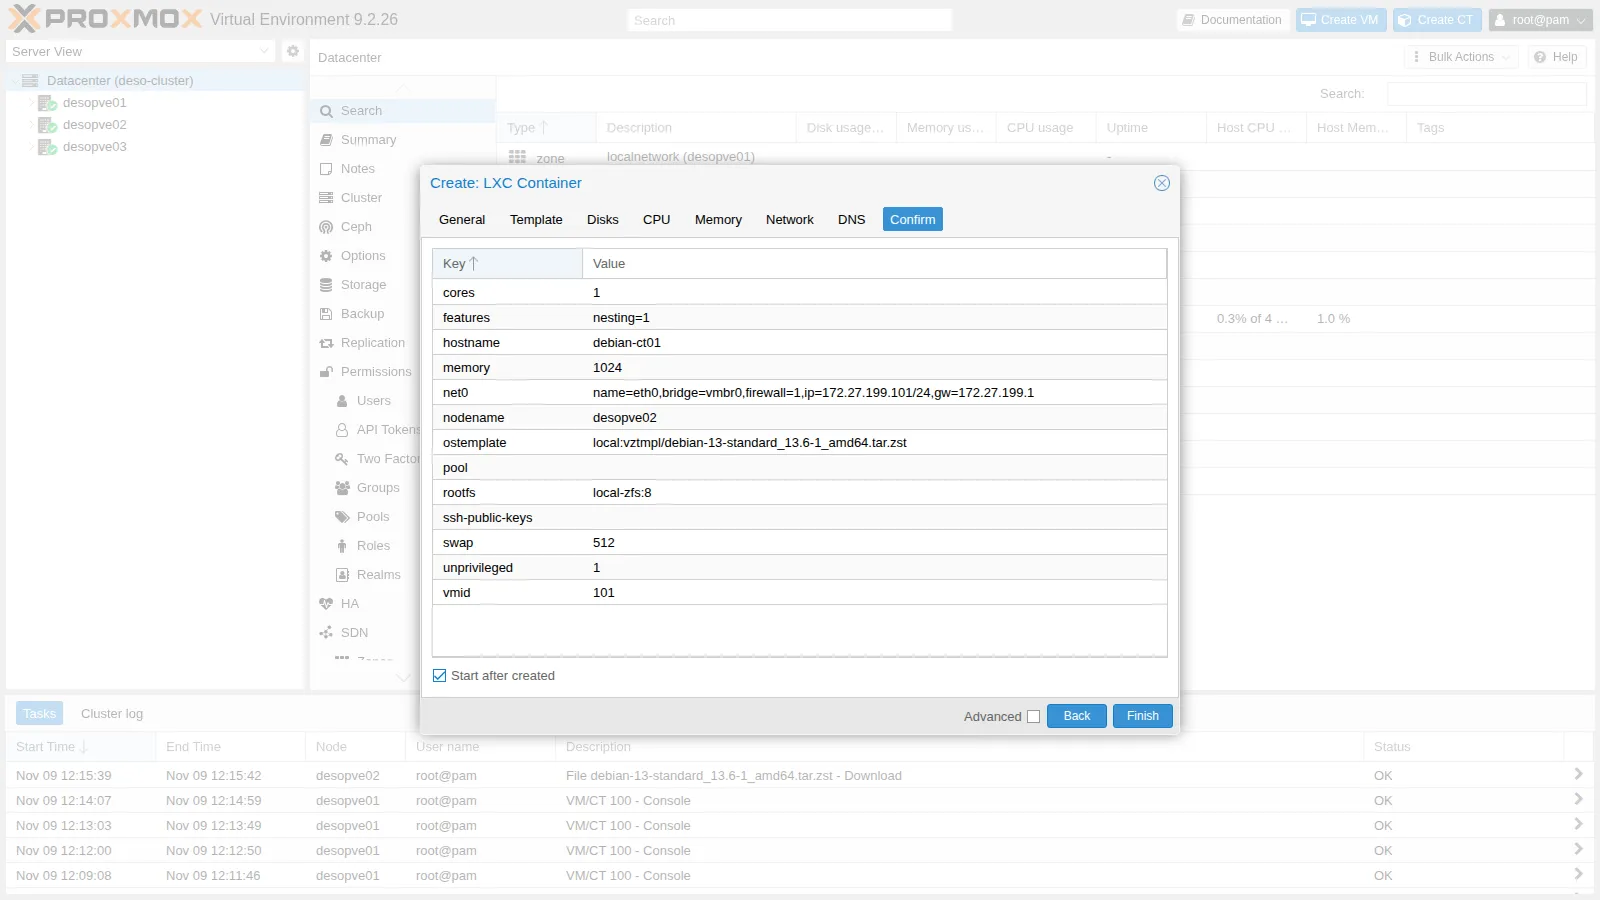
The task extracts the template and generates the SSH keys of the container. In a few seconds the container is running:
extracting archive '/var/lib/vz/template/cache/debian-13-standard_13.6-1_amd64.tar.zst'Total bytes read: 553512960 (528MiB, 104MiB/s)Detected container architecture: amd64Creating SSH host key 'ssh_host_ecdsa_key' - this may take some time ...done: SHA256:zekotr1oKXgAGnFNcwI/uCX1MRKZbSEfKtC+vRdWoMI root@debian-ct01Creating SSH host key 'ssh_host_ed25519_key' - this may take some time ...done: SHA256:PXwzhEQ7pwnOUkqgq+wMtoRDt/a9+nwCVSdX2l3EZMs root@debian-ct01Creating SSH host key 'ssh_host_rsa_key' - this may take some time ...done: SHA256:NJOZQVV8VkmI73UewHxOJdUD/uEWL4Pp3rElO8yJA1Y root@debian-ct01TASK OK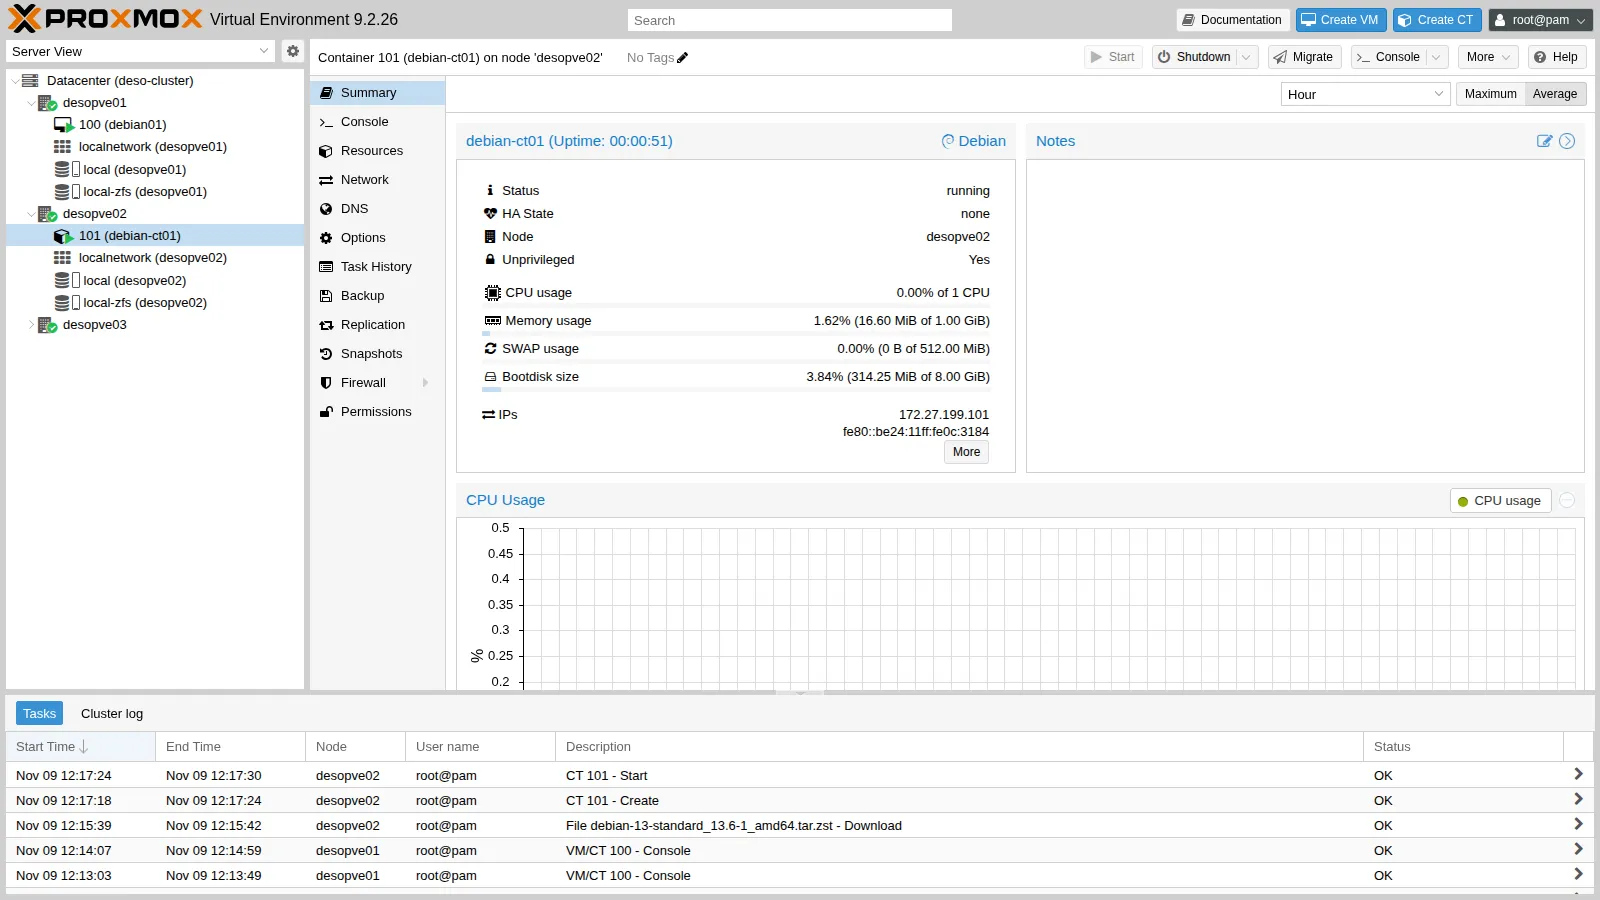
The container disk is a ZFS dataset (subvol-101-disk-0), not a virtual disk: the container sees a file system directly.
pct config 101arch: amd64cores: 1features: nesting=1hostname: debian-ct01memory: 1024net0: name=eth0,bridge=vmbr0,firewall=1,gw=172.27.199.1,hwaddr=BC:24:11:0C:31:84,ip=172.27.199.101/24,type=vethostype: debianrootfs: local-zfs:subvol-101-disk-0,size=8Gswap: 512unprivileged: 1Verification and tests
Section titled “Verification and tests”-
The VM. From the DC, connect over SSH to
[email protected]and check the name, the network, DNS, the gateway and the proxy configured by the installer:labuser@debian01 hostname -fOutput debian01.proxmox.communitylabuser@debian01 ip -br -4 addrOutput lo UNKNOWN 127.0.0.1/8ens18 UP 172.27.199.100/24labuser@debian01 ip routeOutput default via 172.27.199.1 dev ens18 onlink172.27.199.0/24 dev ens18 proto kernel scope link src 172.27.199.100labuser@debian01 cat /etc/resolv.confOutput search proxmox.communitynameserver 172.27.199.20labuser@debian01 ping -c2 172.27.199.1 | grep lossOutput 2 packets transmitted, 2 received, 0% packet loss, time 1001mslabuser@debian01 cat /etc/apt/apt.confOutput Acquire::http::Proxy "http://proxy.proxmox.community:3128";labuser@debian01 cat /etc/debian_versionOutput 13.7labuser@debian01 timedatectl | grep "Time zone"Output Time zone: Europe/Rome (CET, +0100)ens18is the name Linux gives to the VirtIO network card of the VM. -
The container.
pct execruns a command in the container from the node, without a password or network. The DNS configuration is the node’s, written by Proxmox VE between thePVEmarkers:root@desopve02 pct listOutput VMID Status Lock Name101 running debian-ct01root@desopve02 pct exec 101 -- ip -br -4 addrOutput lo UNKNOWN 127.0.0.1/8eth0@if6 UP 172.27.199.101/24root@desopve02 pct exec 101 -- cat /etc/resolv.confOutput # --- BEGIN PVE ---search proxmox.communitynameserver 172.27.199.20# --- END PVE ---root@desopve02 pct exec 101 -- ping -c2 172.27.199.1 | grep lossOutput 2 packets transmitted, 2 received, 0% packet loss, time 1002msFor an interactive shell in the container, use
pct enter 101. -
The proxy in the container. The template does not know about the lab proxy: configure it and refresh the package list.
root@desopve02 pct exec 101 -- sh -c "echo 'Acquire::http::Proxy \"http://proxy.proxmox.community:3128\";' > /etc/apt/apt.conf.d/80proxy; apt-get update" | tail -3Output Get:14 http://deb.debian.org/debian trixie-updates/main amd64 Packages T-2026-11-05-1401.10-F-2026-07-18-0800.33.pdiff [1038 B]Fetched 17.0 MB in 2s (7736 kB/s)Reading package lists... -
The cluster view. From any node you see all the guests of the cluster:
root@desopve01 pvesh get /cluster/resources --type vm --output-format yaml | grep -E "^- |id:|name:|node:|status:|type:"Output - cpu: 0.00447667643448901id: qemu/100name: debian01node: desopve01status: runningtype: qemuvmid: 100- cpu: 0.248149203798156id: lxc/101name: debian-ct01node: desopve02status: runningtype: lxcvmid: 101
- VM
100is running, reachable over SSH at172.27.199.100, and downloads packages through the proxy. - Container
101is running ondesopve02, responds at172.27.199.101and downloads packages through the proxy.
Final lab state
Section titled “Final lab state”- Cluster
deso-clusterunchanged;desopve04standalone. - VM
100debian01ondesopve01, running: Debian 13.7 onlocal-zfs(16 GiB), 2 cores, 2048 MiB,172.27.199.100, usersrootandlabuser, SSH server, proxy forapt. ISO detached. - CT
101debian-ct01ondesopve02, running: unprivileged Debian 13 onlocal-zfs(8 GiB), 1 core, 1024 MiB,172.27.199.101, proxy forapt. - ISO
debian-13.7.0-amd64-netinst.isoinlocalondesopve01; templatedebian-13-standard_13.6-1_amd64.tar.zstinlocalondesopve02.
What you learned
Section titled “What you learned”- The differences between virtual machines (KVM/QEMU) and containers (LXC), and when to use one or the other.
- How to download ISOs and templates directly to the node, with checksum verification.
- What the tabs of the VM and container creation wizards mean.
- That the configuration of a guest is a text file in
/etc/pve, readable withqm configandpct config. - How to get into a container from the node with
pct execandpct enter.